After the California Dress & Peplum (women’s, girl’s, and the bundle) was chosen for June’s Manic Monday Flash Sale, Kymy and I spontaneously decided to do a sew along this week. I love that all the options included let you make many different versions of the California! I’ve sewn both the girl’s and women’s versions many times. I’ve even mashed the California’s scoop neck bodice with the Four Seasons Cardigan sleeves (find the tutorial here), as pictured in the bottom row of the following collage.
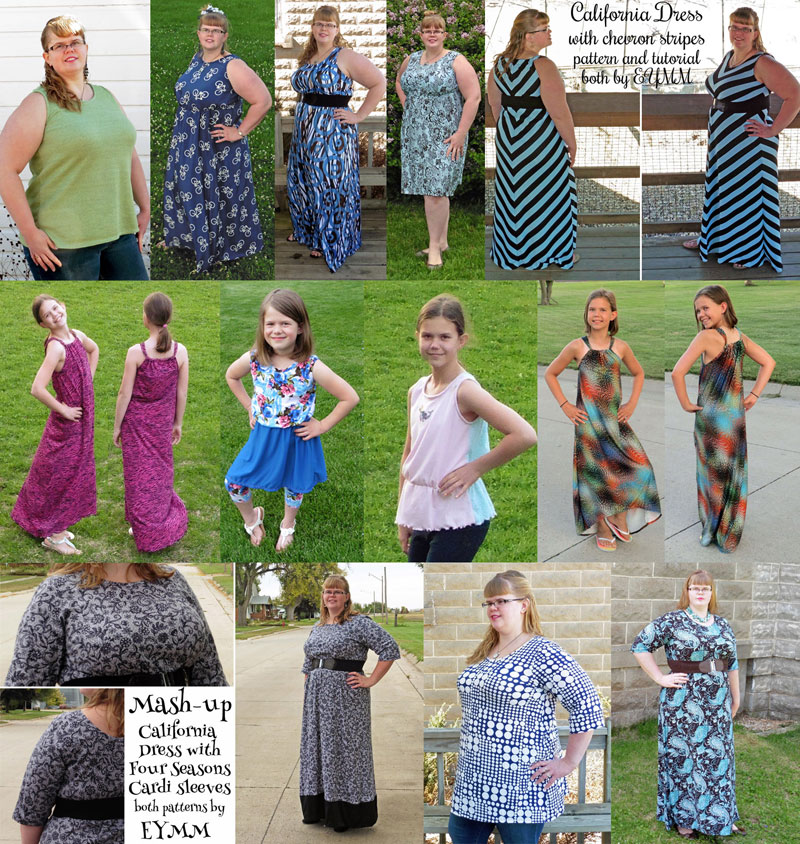
I think I have a slight addiction to the California Dress & Peplum pattern … I even have a few that aren’t included in this collage! I guess there are worse things to be addicted to! 😉
For the sew along, I’ll be using the included options to sew a couple different versions and will post a few steps each day. I’ll also be showing you two ways to color block the pattern. The sew along schedule will be as follows:
Day 1: Color Block Instructions, Cutting Fabric, Sewing Side Seams (this post)
Day 2: Binding the Scoop Neck and Armscyes, Finishing the Faux Halter top
Day 3: Sewing the Elastic Waistband, Hemming the bottom
So … with all that covered … Welcome to Day 1 of the California Dress & Peplum Sew Along!
First things first, you need to decide which size to sew based on full bust measurement (if you’re uncertain, click here for a post about bust measuring) and you’ll need to choose your fabric. If your measurement falls between sizes and you’re using knit fabric, you can choose to size down for a closer fit or up for a looser fit. If you’re using woven (like I did here and here), I recommend going with the bigger size. My bust measures 1/2 inch below size 2x and I definitely need to use a 2x for woven but I prefer 1x for knit.
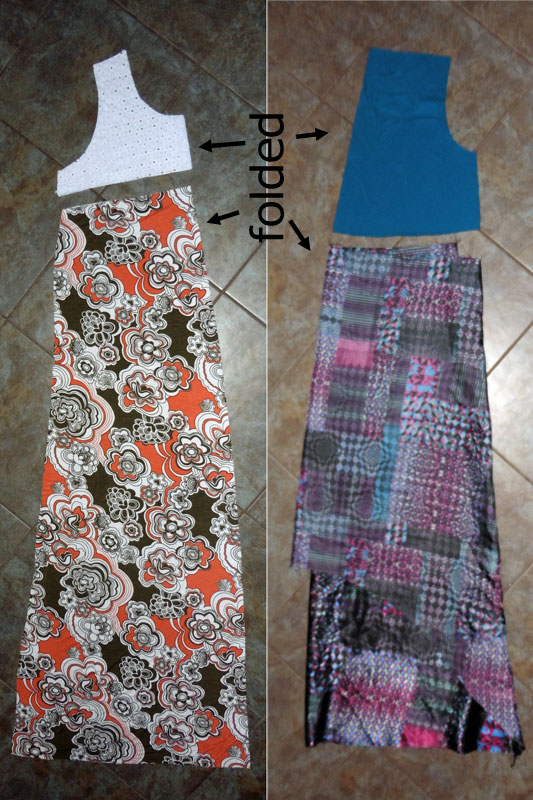
Next, you’ll need to print and tape together your pattern and choose which of the two bodice and multiple hem options you are going to use, then trace or cut your pattern pieces. I like to trace (or fold, if not using the hi-low hem) so I can keep the other hem options intact for later use. Because of the way Kymy drafted the California, you can choose to use either the scoop neck bodice or the faux halter bodice for both front and back of your dress/peplum or you can use one of each!
** Tip: If using both bodices, you can save some paper by using the printing layout guide on page 6 of the pattern to only print the pages needed for the scoop neck pattern of the size range you need. Then print only the few pages needed for the faux halter from the bottom of the armscye up. After cutting/tracing your size, line up the armscye bottom of the faux halter piece with that of the scoop neck bodice and tape it on along that “bottom” edge only. This way, you can fold back the bodice top you aren’t using at the moment and you only have to print the skirt portion of the dress once. Make sure to also print the pages with the bindings and neck strap pattern pieces. **
I will be making a floor-sweeping version with the scoop neck on front and back and I’ll also be sewing a hi-low version with the faux halter for both front and back. Now, I mentioned color blocking and now’s the time to decide if you want to color block your California.

If you do want to color block, I’ll show you how to do both of the ways pictured above. For my scoop neck dress, I decided to color block just the top part of the chest like Lilia B’s gorgeous red and white California Peplum (above left). This look is trending right now, often using lace. I didn’t have any lace in my stash, so I’m opting to use eyelet fabric that I have on hand. For my faux halter California, I’m choosing to color block at the elastic waistline similar to how I did my daughter’s a few weeks ago (I moved my waistline up a few inches to make it empire level, in order to better compliment my bottom-heavy figure). 🙂
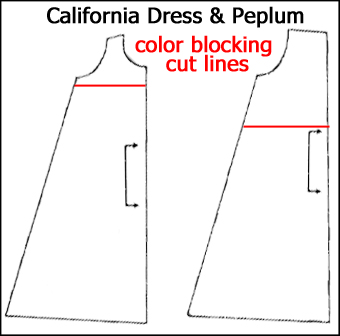
To color block only the upper chest (pictured above on the scoop neck version), you’ll want to cut (or fold) your pattern straight across about one inch below the armscye. When you cut your fabric, add 3/8 inch for seam allowance to both the top and bottom pieces along the color block cut line. I’m choosing to only color block the front of my dress, so I cut my back all one piece. Feel free to use lace, eyelet, or another coordinating woven (or use another knit) for the top piece.
To color block at the elastic waistline (pictured above on the faux halter version), you’ll cut (or fold) your pattern on the dashed waistline included on the pattern. Again, when you cut your fabric, you’ll need to add 3/8 inch for seam allowance along the color block cut line to both the top and bottom pieces. For my dress, I’m color blocking both the front and the back (and using the hi-low hem). I chose to make a knit bodice to go with my slippery/ satiny woven skirt (remember last week when I mentioned salvaging that second dress that I cut too small? Here’s the skirt portion!).
Don’t forget to cut out your scoop neck and armscyes bindings, which should be cut from knit fabric. If you’re using two scoop bodices, you can double the length of the scoop neck binding and just cut one rather than cutting two the shorter length. If you’re sewing the faux halter, don’t forget to cut out your neck strap (if using two faux halter bodices, you can double the length and just cut one rather than two). Now that everything is cut out, we can start sewing!
Color blocking Instructions (red lines indicate where to sew for each step):
If not color blocking, skip to step 3.

Step 1: To color block the upper chest, place the top and bottom pieces right sides together, matching the center and sides. Pin and sew with 3/8 inch seam allowance.
(not pictured: To color block at the waistline, I like to sew the side seams first, then place the bodice and skirt with WRONG sides together … this way the seam allowance will end up concealed inside the finished waistband rather than against your skin)
Step 2: Turn right side up, press the seam allowance down toward the bottom hem (so it won’t show behind your lace) and top stitch to hold it in place.
(not pictured: If color blocking at the waistline, do not top stitch!)
Step 3: Place the front and back right sides together and sew down the side seams from the armscye to the bottom hem. If you’re making the faux halter, you’re done for today!
If you’re using the scoop neck for front AND back, you also want to sew the shoulder seams before being finished for the day.
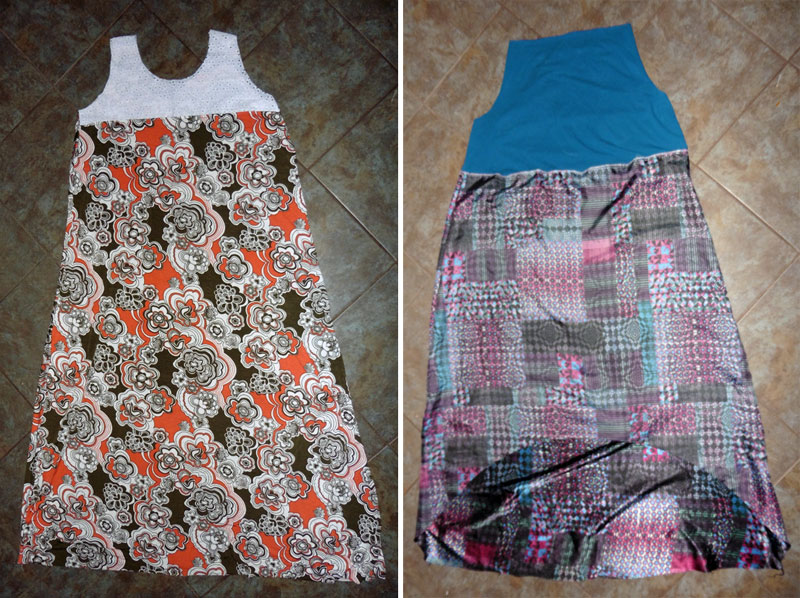
Turn your dress right side out, and you should have something similar to my dresses pictured above. Of course, depending on the bodice, hem, and color blocking options you chose, yours may look a little different. 😉
(Note: To avoid any confusion, I want to mention that I’m using the back/matte side of my slippery/satiny fabric as the right side of my faux halter’s skirt. I didn’t think it flattering to have that much shininess covering my bottom half, lol.)
Check back tomorrow for details on applying the binding to the scoop neckline and armscyes and/or to finish the top of the faux halter!
Happy Sewing!! ~ Joelle
3 Responses
California Dress & Peplum Sew Along: Day 2 | Everything Your Mama Made & More
[…] Day 1: Color Block Instructions, Cutting Fabric, Sewing Side Seams […]
California Dress & Peplum Sew Along: Day 3 | Everything Your Mama Made & More
[…] Day 1: Color Block Instructions, Cutting Fabric, Sewing Side Seams […]
“Cheater” Binding and Flutters for the California | Everything Your Mama Made & More
[…] print fabric. She knew just how she wanted the upper chest color blocked (like I did during the California Sew Along) and a ruffle at the bottom. Since she’d already decided that this is what she wants to […]