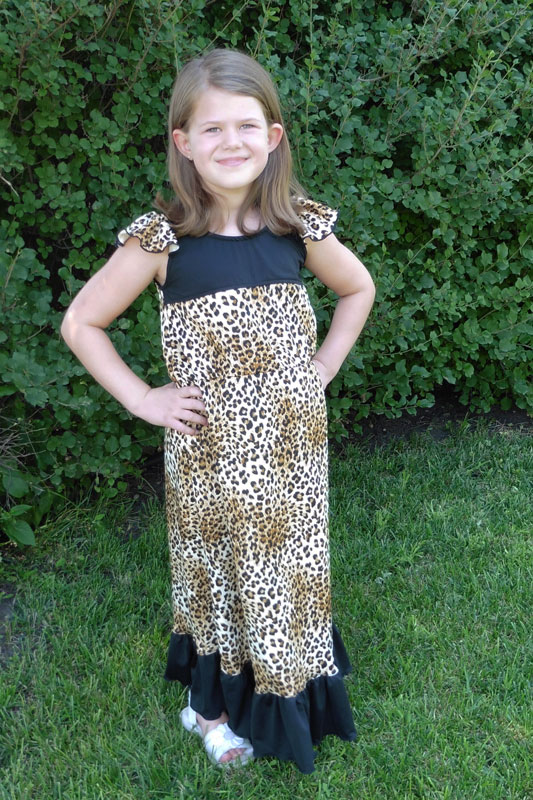
My younger daughter has been hounding me for weeks to sew a California Dress maxi out of her favorite cheetah print fabric. She knew just how she wanted the upper chest color blocked (like I did during the California Sew Along) and a ruffle at the bottom. Since she’d already decided that this is what she wants to wear for school picture day, I also added flutter sleeves so her shoulders would be covered for school.
I took some pictures to show how I made the flutters and will also show you my “cheater” method of putting on the contrast binding.
The California pattern shows the proper way to do an interior contrast binding around the neckline and arm holes. It encloses the raw edges and is completely on the inside of the garment. I love how it looks, but sometimes don’t have the time to fiddle with folding the binding around the raw edges and pinning well before sewing. Somewhere along the way of the several dozen California Dresses that I’ve made, I developed my “cheater” method that is a bit less fiddly and ends with a very similar looking result.
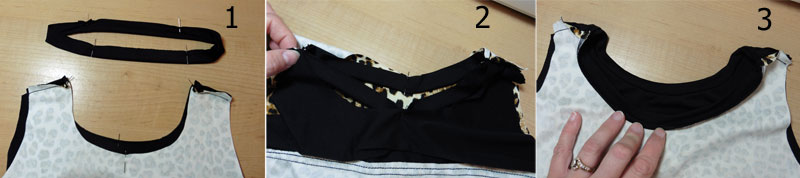
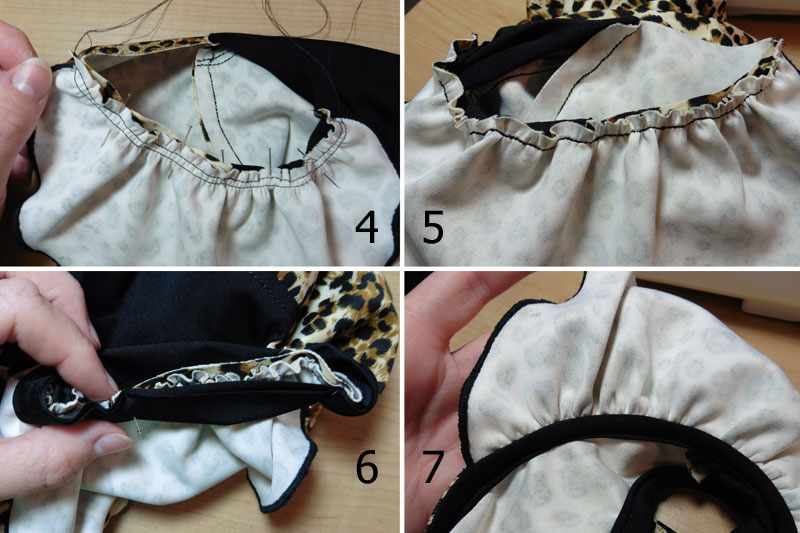
First, when I cut out the binding strips, I make them 1/2 inch wider than the pattern pieces. Then I sew the short ends of the binding strip right sides together to make a loop, fold together the raw edges of the loop with wrong sides touching, and divide the band and the neckline into fourths with pins (picture 1 above). I pin the band to the right side of the neckline/armscye, matching up the raw edges and the pins (picture 2 above). While carefully stretching the band to equal the length of the neckline/armscye, I sew/serge the band on. Picture 3 above shows how it should look once the band is attached. These first few steps are the same as putting on a regular t-shirt neckband.
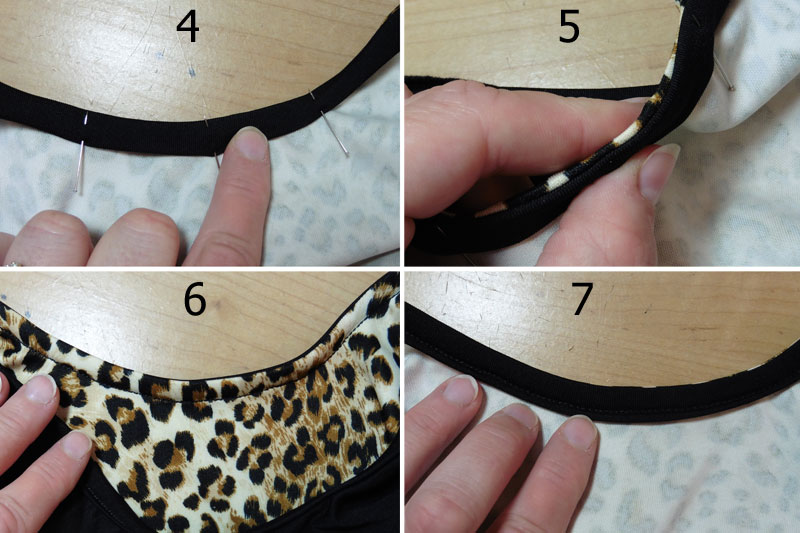
Next, I fold the top edge of the band over to the wrong side, covering the raw/serged edges and pin (picture 4 above). The seam line between the bodice’s neckline/armscye and the band should now be on the edge of the neckline/armscye like in picture 5 (above). From the right side of the bodice, sew 3/8 inch from the edge, making sure to catch the folded down band on the underside. Picture 6 shows how the right side will look when finished and picture 7 shows how the inside should look.
See how easy it is? I find it much faster and less fiddly than the traditional method included in the pattern, though I think it adds one more layer of bulk to the inside of the neckline/armscye. 😉
Now, on to adding flutters!
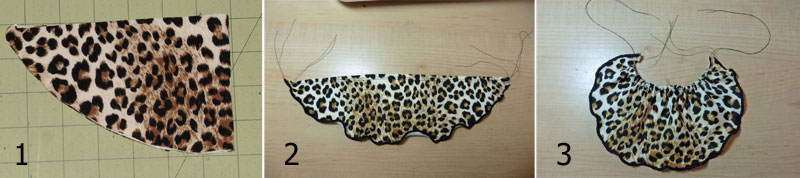
To draft the flutter sleeves, I used the length of the arm binding piece and made it about 4 inches at the widest part of the curve. You can see the shape I cut in picture 1 above, where the left straight side is a fold and the upper straight edge is equal length to the arm binding pattern piece (which is meant to be cut on the fold). Hem the curved edge (I used my serger to make a rolled lettuce edge hem) and then add two rows of gathering stitches (long, straight stitches) to the straight edge, leaving long tails of thread at both ends (picture 2 above). Pull just the bobbin threads to gather the straight edge** to half the original length (picture 3 above).
** I like to put a pin in the center of the straight edge before gathering to make the next step easier.
Place the center of the flutter on the shoulder seam of the armscye, with right sides together. Line up the raw edges and pin the rest of the flutter along the armscye (picture 4 above). The flutter should reach halfway to the side seam on both the front and back of the armscye. Sew it on with a 1/4 inch seam allowance (picture 5 above).
When the binding is attached, it will be on the underside of the flutter. Divide the binding and armscye into fourths and mark with pins. Pin the band to the right side of the armscye, under the flutter, matching up the pins and raw edges. Picture 6 shows how the flutter will be sandwiched between the binding and armscye. If using my “cheater” method of binding, you will sew both raw edges of the band to the armscye then fold it down to conceal the raw edges and stitch on the right side with a 3/8 inch seam allowance. Picture 7 shows the finished inside of the flutter sleeve. If you’re not using my “cheater” method, you will only pin/sew one raw edge of the band to the armscye, then wrap the other raw edge around the seam allowance as the pattern instructs.
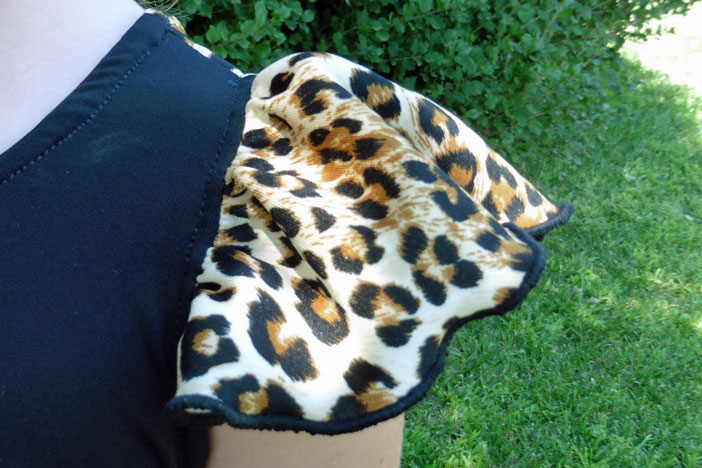
The finished flutter will come out of the seam between the armscye and the binding and should look similar to the above close-up.
The last step of making this dress to my daughter’s specifications was adding a ruffle to the bottom. I cut the maxi hemline shorter and added a ruffle 6 inches tall and twice the width of the bottom edge. I roll hemmed the bottom edge of the ruffle, gathered it, and sewed it on the bottom with right sides together. Then I flipped it down and top stitched on the cheetah print side to keep the seam allowance up and help the lighter-weight ruffle hang more nicely.
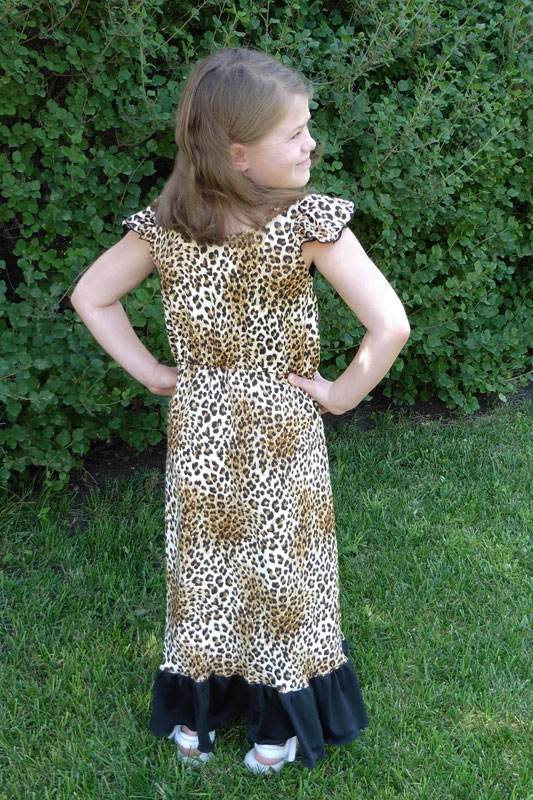
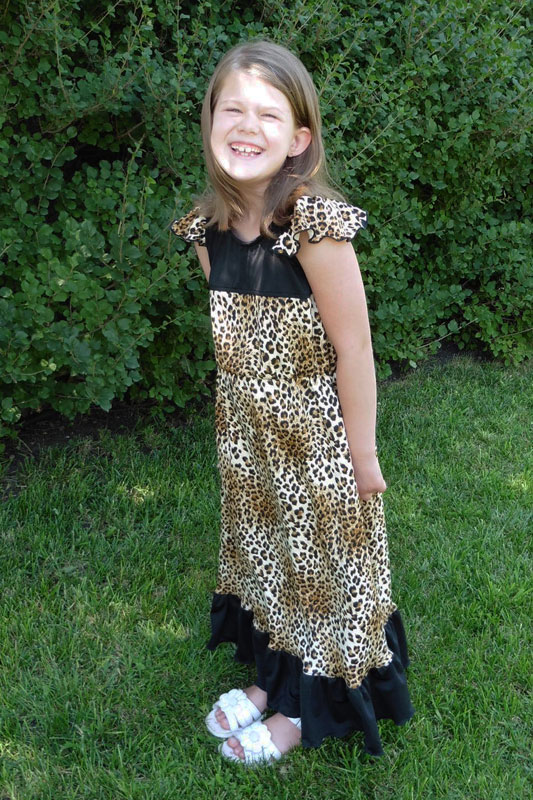
My girly loves her new dress and can’t wait for picture day so she can show it to her friends! I’m pretty sure uniforms are the only thing keeping her from wearing it the first day of school. Haha!
Happy Sewing!! ~ Joelle
2 Responses
Capsule Skirts for Everyone! (or, at least for the girls, lol) | Everything Your Mama Made & More
[…] elastic waistline, so it’s just a tank top). She wanted me to add flutters like I did for her sister’s maxi dress (<- follow the link for a tutorial) last summer, so that she could wear it to church without a […]
Make Laundry, Don’t Do Laundry Tour | Everything Your Mama Made & More
[…] be sure it would cover my booty without being too long. To make it an even faster sew, I used my “cheater” method on the neck and armhole bindings. Then, rather than following the pattern’s […]