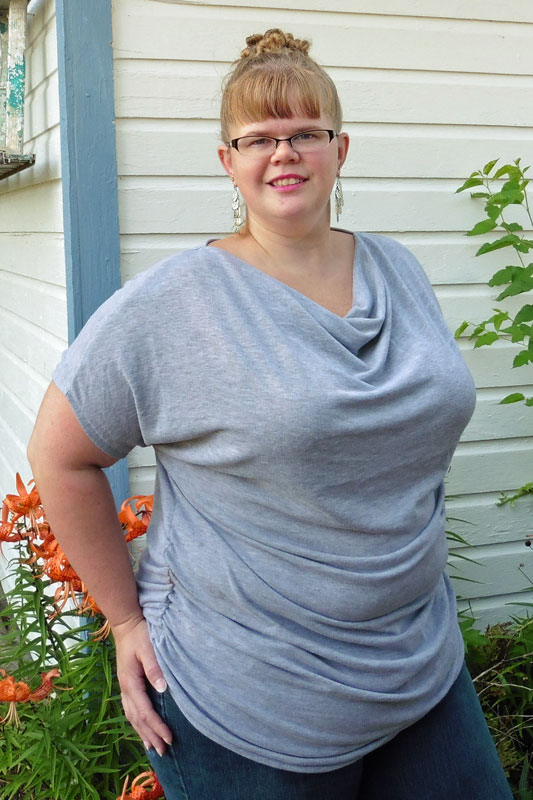
I’m back with another hack of Kymy’s Dolman Top, this time I changed the neckline to a drapey cowl. This hack was suggested earlier this week in the EYMM Facebook group and I had no immediate sewing plans, so I got right on it. I thought it would be perfect timing since so many ladies just got the dolman during Monday’s flash sale.
I even remembered to take pictures along the way in order to share the steps here! Yay! LOL
First things first, trace a copy of the front of Kymy’s Dolman because we’re going to be slicing and spreading the neckline to add fabric in order for the cowl to drape. I like to use freezer paper to trace on because it’s easily accessible and fairly inexpensive, but you can also use cheap interfacing or Swedish tracing paper or even those big rolls of white paper like you see covering exam tables in doctor’s offices.
* For reference, I made the ruched version (view D) and I used the instructions on the bottom of page 6 to make my neckline narrower.
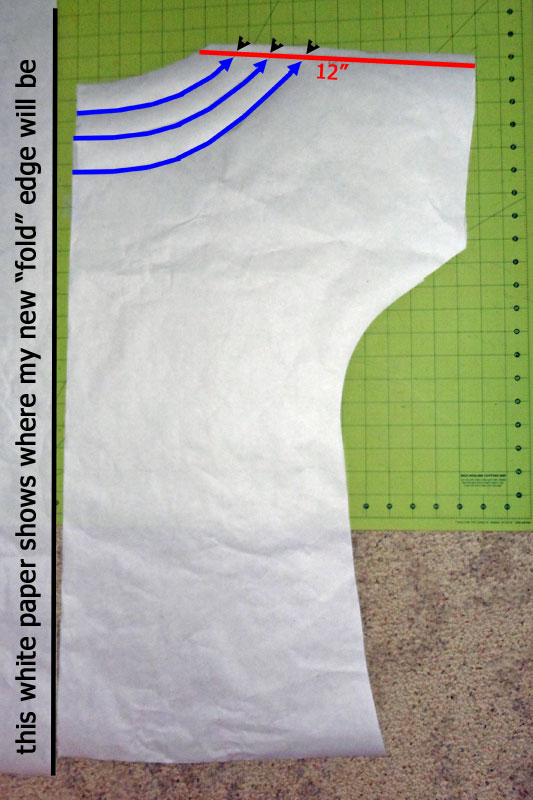
The first step of the cowl hack is to draw a line 3/8 inch away from the shoulder edge to mark the seam line (red line in above left photo). You will also want to make note of the length of the shoulder edge (mine is 12 inches). Next, starting 1.5 to 2 inches below each other, draw three curves that approximately follow the original neckline (blue lines in above left photo). Cut along the three curves from the center fold edge of the pattern up to the marked shoulder seam line. Then, starting from the shoulder edge, cut down to the shoulder seam line at each curve (black arrows in above left photo). Leave a tiny bit of each curve uncut right at the seam line to act as little hinges for spreading the neckline.
Lay down a ruler or paper (or use the lines on your cutting mat) to mark what will become the new center fold edge, then lay the pattern piece down with the bottom touching and top tilted away from the new fold line. You will want it to tilt so the original neckline is moved over about 1/2″ for smaller busts and 1″ for fuller busts. Taping the pattern down along the original fold edge (below the cut curves) will help keep the pattern in place while spreading the neckline.
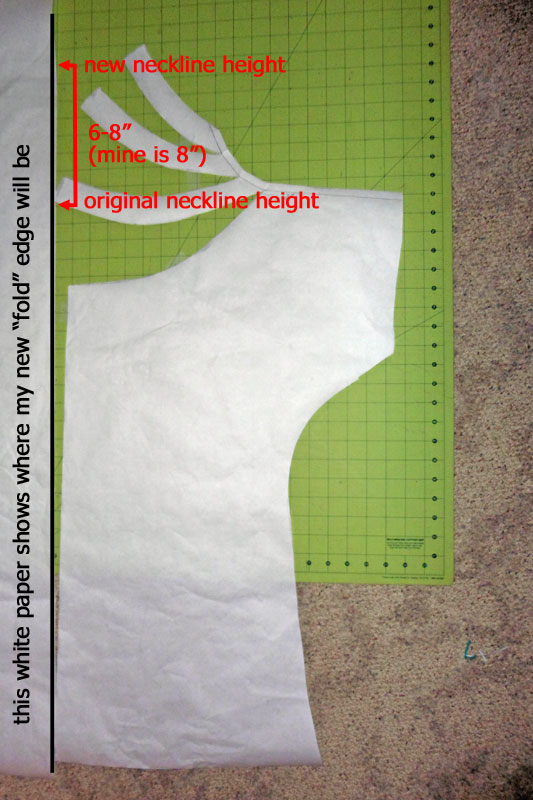
Spread the cut curved pieces upward until the bottom point of the top piece is approximately 6 to 8 inches above the original neckline height (above right photo). I used 8 inches for my size 1x dolman, but smaller sizes will want to spread slightly less. Tape the pieces down so they don’t shift while tracing the new shape of the cowl neckline.
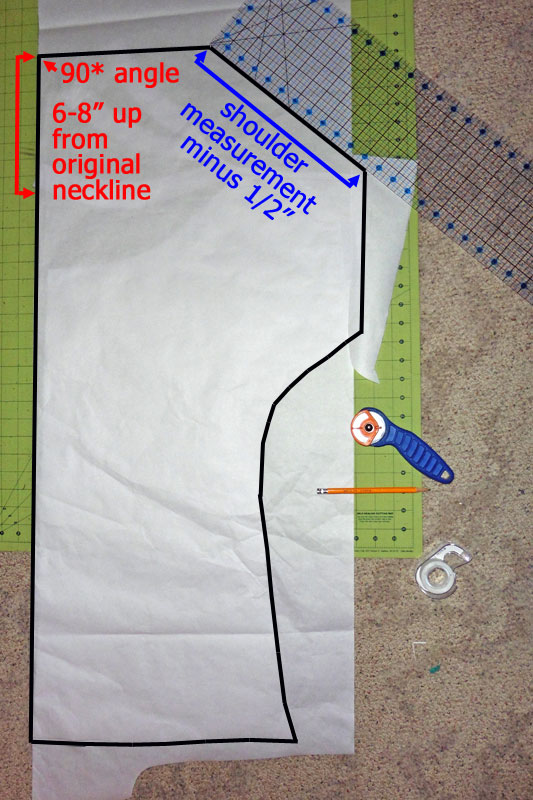
Lay your tracing/freezer paper over the top of the spread pattern. Trace around the arm/sleeve opening, side seam, bottom hem, and new fold edge of the pattern (I lined up the edge of my freezer paper with my new fold edge line). Draw a line at a 90 degree angle from the fold edge at the height of the new neckline (see red type/arrows in above left photo).
For the new shoulder, draw a straight line to connect the top of the arm/sleeve opening to the new neckline (see blue type/arrows in above left photo). The new shoulder edge will need to be 1/2 inch shorter than the original shoulder measurement. This is because the back neckline will be hemmed 1/2 inch, while the front cowl edge will be a fold.
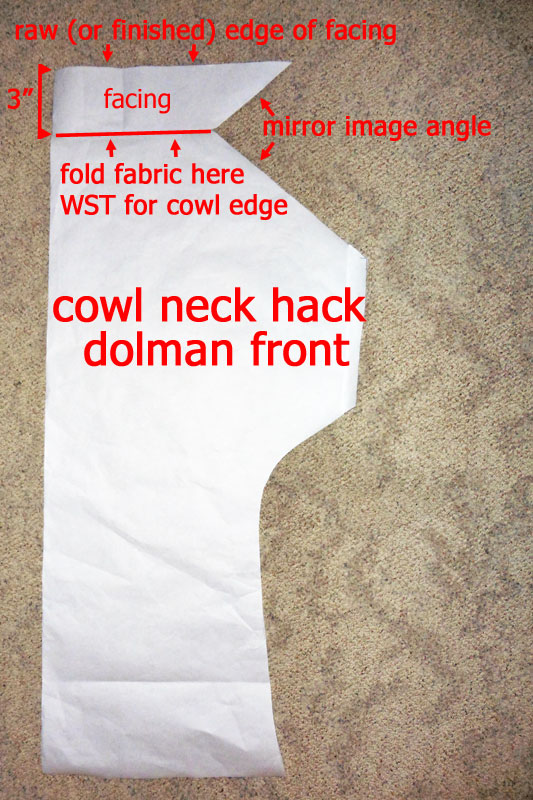
The last pattern alteration step is to add the facing to the top of the cowl neckline. Rather than having a separate piece to sew on, we will be drafting a facing that will be cut as one with the front of the pattern. First draw a line 3 inches above and parallel to the new neckline. Then fold your tracing/freezer paper along the cowl neckline and trace both the center fold line and the angled shoulder line to connect the new neckline to the new higher line. Once unfolded, you should have a pattern shaped like my above right photo. Cut out your new dolman front, but do not cut along cowl edge (red line in above right photo). Use the new pattern to cut your fabric (with the center front on the fabric’s fold) for the front of your cowl neck dolman.

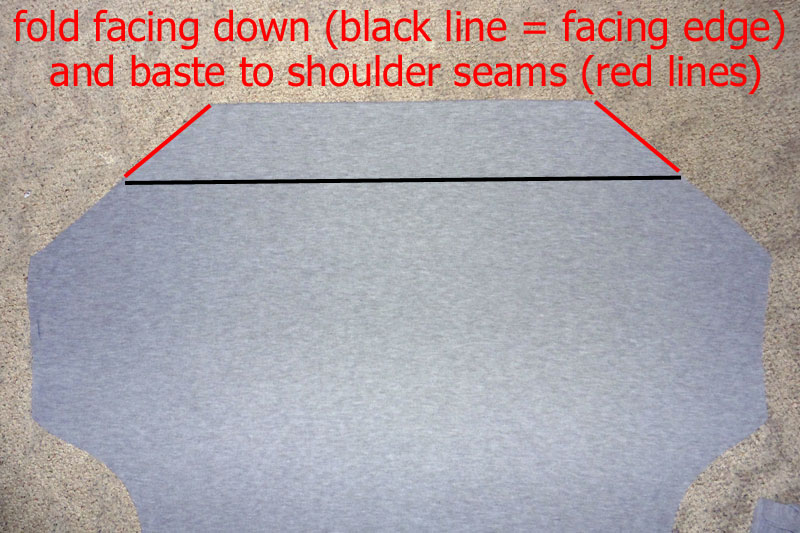
Once cut out and unfolded, your fabric should look like my above left photo. Fold the facing piece down along the cowl neckline with WRONG SIDES TOGETHER (WST) and baste the angled edges to the shoulder seams within the seam allowance (red lines in above right photo).
** If you want to finish the raw edge of the facing, do so before basting it to the shoulders. You can serge it or hem it.
Cut the back of your dolman out using the original back pattern piece. The only difference in construction will deal with the neckline. You will want to hem the back neckline BEFORE sewing the shoulder seams (there is 1/2 inch allowance for the neckline hem). When you sew the shoulder seams, you will line up the folded cowl edge with the hemmed back neckline.
Sew the side seams and hem the bottom and sleeves as per the pattern. If you’re making view D like I did, you will add the ruching to the side seams either before or after hemming the bottom.
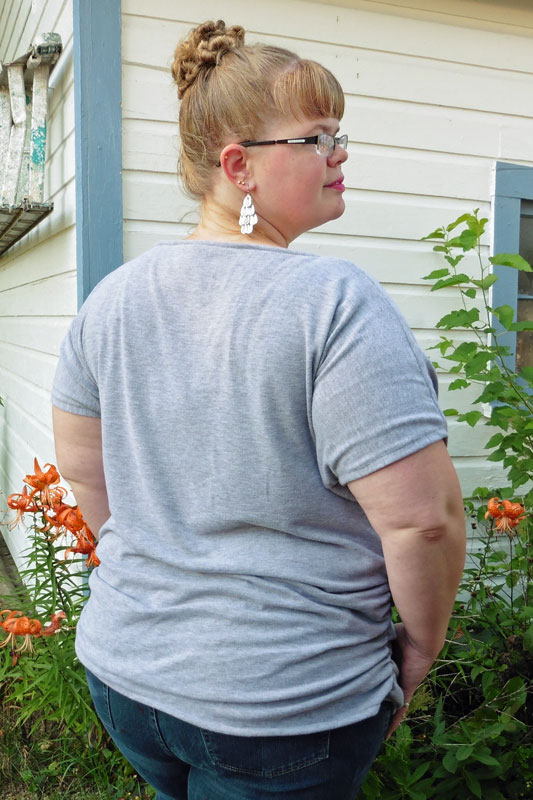
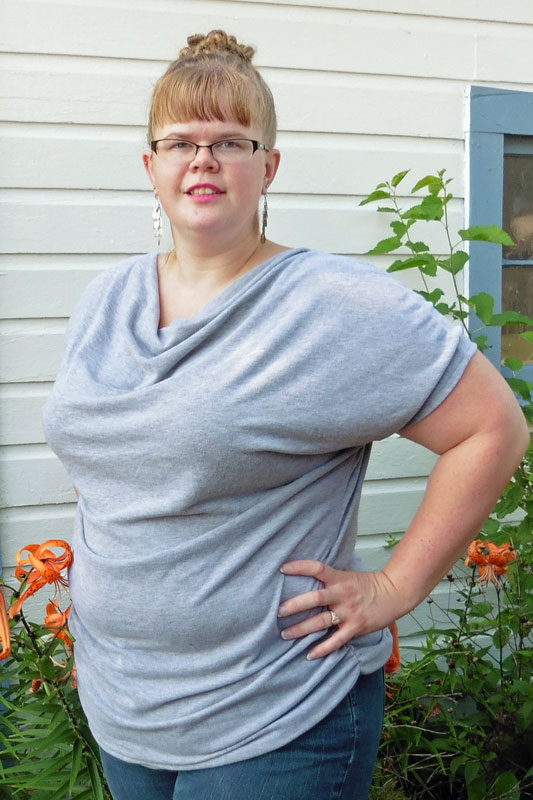
That’s it! I love how the cowl neck changes the whole look of Kymy’s Dolman Top. This hack could also be done to Carlie’s Dolman Top, though you’d want to adjust the amount of center front tilt and add less height to the neckline.
If you try this cowl neck hack, we’d love to see you share it in our Facebook group or on the EYMM Facebook page.
Happy Sewing!! ~ Joelle
2 Responses
Cowl Neck Dolman + Capsule Skort = Perfect Fall Outfit | Everything Your Mama Made & More
[…] finishing my cowl neck hack for Kymy’s Dolman Top last Friday, the wheels were spinning in my head for this perfect […]
Making a Chevron Capsule Skirt | Everything Your Mama Made & More
[…] up for church or dressed down for every day wear. For these pictures, I paired it with my red cowl neck hack Kymy’s Dolman (which I made to matche my French terry Capsule Skirt last fall), my jean […]