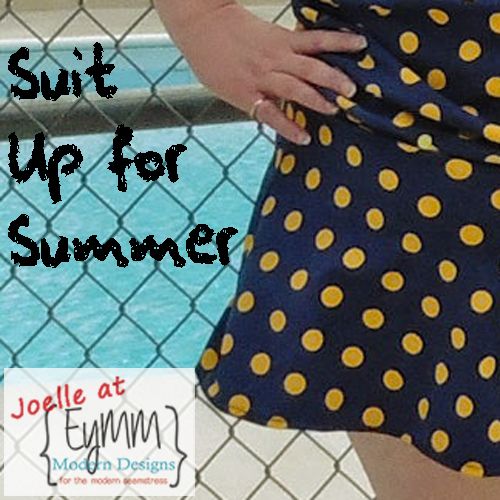
I am super excited to be joining in on the Suit Up For Summer blog tour and sharing my new swimsuit today! You may be thinking, “But, Joelle, EYMM doesn’t yet have any swimsuit patterns for sale!” … and you’d technically be 100% correct because Kymy hasn’t yet released any swimwear patterns. However, I made this suit from patterns that are available in the EYMM shop. Have I gotten you thoroughly confused yet?
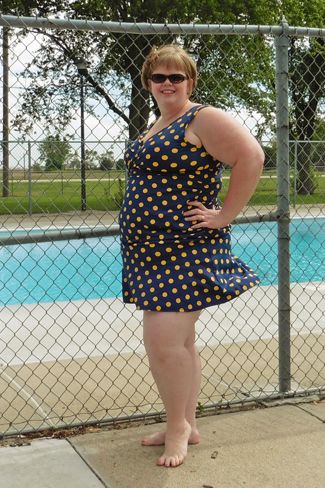
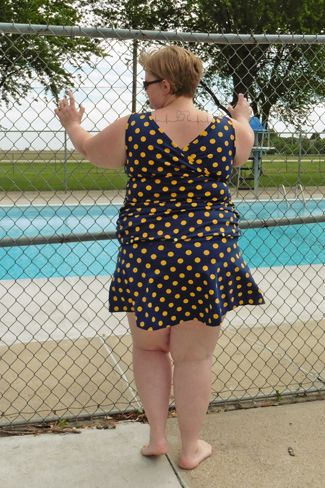
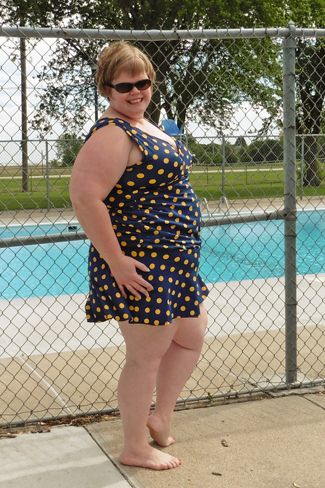
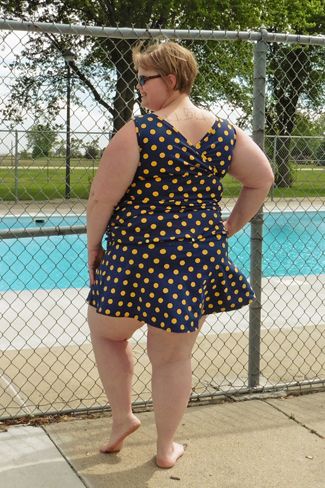
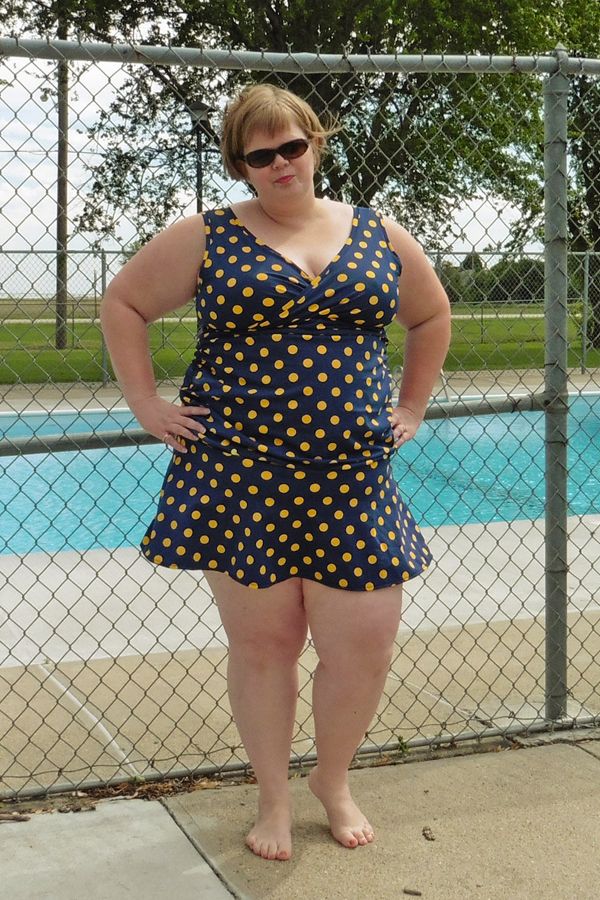
Let me explain: I’ve taken three (3!!) separate EYMM patterns and combined them into one smashing swimsuit! I present to you my not-so-itsy-bitsy, nor-teeny-weeny yellow polka dot tankini!!
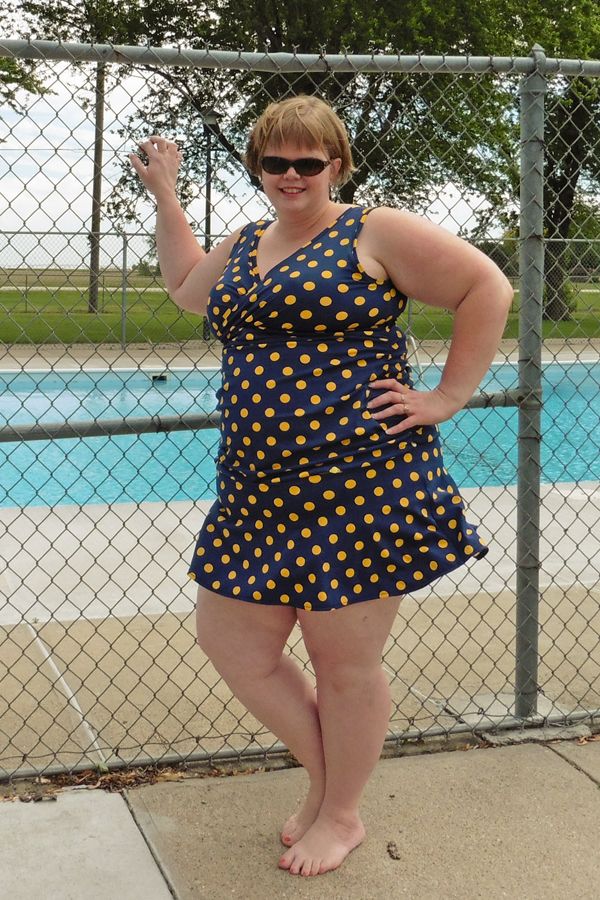
What do you think? I hope you love it as much as I do. I’ve been rolling the idea of this suit around in my brain for more than a year. I’m so glad this blog tour gave me the push to get it out of my head and made into reality! Hooray for tankinis because I get to combine the changing/bathroom ease of a two piece suit without having to show off my so-not-beach-ready midriff. LOL
I’ll explain the details from top to bottom. My apologies if I get a bit wordy. I hope you can follow along with my mini-tutorial, since I forgot to take pictures while in progress … that’s what happens when I get excited!
Not interested in the how-to? Make sure to at least skip down to the bottom and visit the other tour stops and enter the TWO giveaways!!
For the top, I made up a fully-lined Everyday Essentials cami with a couple twists thrown in. First (and, perhaps, most importantly), I added an interlining (this means it is sandwiched between the main fabric and the lining) with swim cups sewn on for extra support for “the girls.” I would normally choose to use power mesh for this layer, but I didn’t have any and am trying to sew only from my stash lately. Anyway, I cut two extra fronts (one left, one right) from my lining fabric, then positioned and stitched the soft swim cups to the inside/wrong side of the pieces. I prefer the soft cups rather than molded ones because they lend themselves to a more natural-looking shape and are more comfortable to wear.
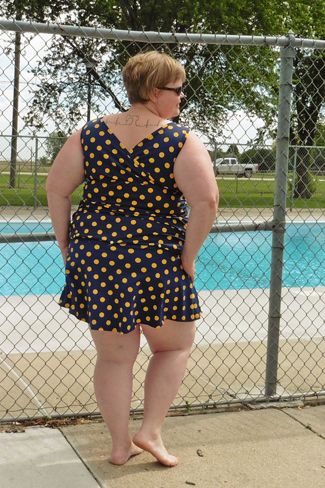
After figuring out how to add extra support to the front, I turned my attention to the back. Rather than use the included bodice back piece, I chose to open it up (mostly because I love showing off my tattoo, lol) by using the “front” crossover pieces on the back as well. To make it fully lined and the front interlined, this meant I cut 4 pieces (2 left, 2 right) from my main fabric and 6 total (2 left and 2 right for lining and one each for interlining) from my lining fabric. Before sewing the shoulders and side seam of the lining, make sure they’re in the right order. You’ll want to stack them so the outside of the interlining is on top, wrong sides together with the front lining; then put the right side of the front lining against the right side of the back lining. Believe me, this can be tricky … I seam ripped these pieces more times than I care to admit because I didn’t stop to think it through first. LOL!
Once the bodice pieces are all sewn at shoulder and side seam, place the outer and lining wrong sides together and treat as one as you sew the binding to the armholes and the necklines (remember, the left and right sides will be completely separate if you make the back with the crossover). Set them aside to work on the cami bottom pieces next.

Since I love how the ruching on view D of Kymy’s Dolman sort of camouflages my leftover baby weight (I can still call it that even though he’s nearly 4, right?), I decided to attempt something similar for my swimsuit. First, I cut the outer/main fabric to be about 6 inches longer than the pattern, but I cut the lining to normal length. After sewing the side seams, I ruched the outer/main fabric by stretching and stitching clear elastic along the side seam allowances. Once I let go from holding it stretched, it shrunk up to be just a tad longer than the lining. To eliminate the need to hem the bottom, I put my main and lining right sides together and sewed around the bottom edge of the cami bottom. Then I flipped it right sides out and it was ready to attach to the top bodice pieces.
Still following? After constructing all of the above, I made my next variation from the original look. I followed the modification included in the pattern for more modest coverage by skipping the underbust gathers and overlapping the crossover more. This is easy, since all you have to do is line up the bodice side seam with the cami bottom side seam and fit the pieces right sides together without stretching until running out of upper bodice … then repeat with the other side front bodice so they overlap in the front and back. Because of the bulk, I opted to use my sewing clips rather than pins to hold it all together. It would be a good idea to baste these layers together before adding the bra band, but I threw caution to the wind and instead used many, many clips. Oh, I almost forgot to add that I did add elastic inside my bra band as recommended in the pattern for extra support … cause “the girls” can never have too much support! 😉
Whew! Top finished … now on to the (much less wordy) bottoms details!
For the bottom half of my tankini, I knew I wanted to use the Capsule Skirt because it would hide the bottom of my gut better than a non-skirted suit and it allows for an even hemline. I have another swimsuit that has an attached circle skirt and my large behind means that the back of the skirt sits and looks much shorter than the front. It’s the only thing I dislike about that swimsuit, so I was excited to be able to eliminate that problem. I cut out my skirt with my normal size waistline and shortened it so it to be just 12 inches long on the side seam. I followed the center hemline for the front skirt piece and the lower “additional coverage” line for the back. I sewed each side seam and then sewed a 1/2 inch hem around the bottom edge. (Note: Don’t cut out or attach a skirt waistband.)
For under the skirt, I cut out a pair of ‘Get Moving’ Leggings with a mere 1.5 inch inseam. I chose to make them fully lined and did it in a sort of complicated way because I thought it would work well. Turns out I was wrong so I won’t detail how I did it. Next time, thought, I plan to construct the shorts outer and lining, slip them together with wrong sides touching, and then put a band around the bottom of each leg hole. I think that will make them stay put on my thighs rather than trying to creep up like this pair does. Oh, well … live and learn.
Now, the skirt gets attached to the (super-short) leggings when you sew on the leggings waistband. Before stitching, you’ll want to have the skirt sandwiched between the bottoms and waistband, with the right side of the skirt facing the waistband and the wrong side against the right side of the shorts.
And … voila … just like that, the swimsuit bottom is finished! See, told ya that it was much (much!) less wordy! Haha!
Now I’ve got just one more “trick to show you.
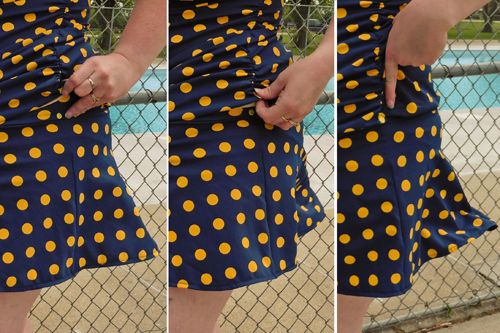
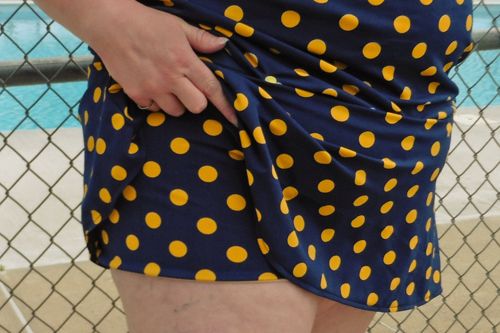
Have you ever worn a tankini and had the top try to ride up around your natural waist instead of staying put against the bottom half? I have discovered a great solution to stop it from happening. I simply add a few snaps to hold the two pieces together. As you can see in the collage above, I put one half of the snap on the waistband just above the skirt seam and put the other half on the bottom edge of my suit top. I used eight total snaps (2 at the side seams, 2 at center front/back, and 4 placed halfway between each center and side seam). I found that, after snapping them, the extra length of the top’s main fabric droops down just enough to hide the snaps from view. I love that I don’t have to worry about it riding up above my “love handles” when I’m swimming or chasing my kids at the pool!
See that ^^? My suit even looks awesome when I’m throwing the “mom look” at my mouthy daughter! HAHAHA! But, seriously, I truly love my new swimsuit and can’t wait for the local pool to open next week!!
Make sure to visit all the stops on the Suit Up For Summer tour! Many thanks to our two gracious hosts who did a wonderful job putting together this whole shebang!

Hosted by: Sew Sophie Lynn & Paisley Roots
Pear Berry Lane / Inspinration / It’s Liesel / Sewing For Four
Harper Lu / Call Ajaire / Stylin Stacy / Skirt Fixation
Sewing By Ti / Sewing With Sarah / Sew & Tell / Me Made
Made By Melli / Life Sew Savory / That’s What She Crafted / Auschick
Rebel & Malice / EYMM / Stitching & Making / Lilliepawillie
This tour is extra amazing thanks to our great sponsors. Please take a few minutes to look up their shops (all are linked on the host blogs) and give them some love. There are so many sponsors that we have two separate prize packages!
Details on how to enter (one is a rafflecopter and one is a link up) and a list of each package can be found over at the Suit Up for Summer hosts’ blogs (Paisley Roots or Sew Sophie Lynn) … so click over and get yourself entered! Check out the link up for fabulous swimsuit inspiration (plus, add your own sewn-in-2017 suit pictures by May 30 for a chance to win that prize package)!

15 Responses
Sue
I LOVE your tankini 🙂 I thought I was the only one that mixed and matched patterns and made things harder on myself LOL
I LOVE your bottom skirt/shorts idea. I was just thinking today how i could make some bottoms and you have given me awesome ideas (plus i have all the patterns that you used 🙂 )
Joelle
Happy to have given you ideas. I love mashing and changing patterns … sometimes it is easy and sometimes I make things more complicated than necessary, LOL.
Jayne
Awesome job. Looks great …..
Joelle
Thank you!
Joan Brown
Wow! You are very talented. That is the nicest swimsuit.
You did a super job! Love your blog!
Joelle
Aww, thanks!
Diane
Your new suit is so cute on you and so is your hair cut!
Joelle
Thank you!
Judy Waters
I love this!!!! Thank you for the tutorial. It is amazing and looks fun to make.
Joelle
Thanks! We’d love to see if you give it a try!
Cindy
This is awesome, and I would ware it!
Joelle
Thanks! I’m looking forward to the pool opening!
Teronia
That’s awesome!!! I’ll be making a skirted tankini soon and I was trying to imagine how it would come out, but i love yours so I think it’ll be fine. Way to inspire our pants off!
Joelle
Thanks! If you try it with the Capsule Skirt, be sure to show us!
It’s Getting Hot In Here tour | Everything Your Mama Made & More
[…] “It’s Getting Hot In Here” tour over at her blog Sewing by Ti. After making my EYMM swimsuit a couple weeks ago, I decided that I needed a cover-up to wear to and from the […]