Back in July, I came up with this perfect plan to use my sewing machine to duplicate a drawing made by my best friend’s daughter onto a Carlie’s Dolman Top for her birthday present!
I first printed a photo of her drawing that I took when I had the idea. I pinned the paper to my interfaced fabric and stitched over all the drawing’s lines before carefully pulling/tearing the paper away from the stitching. As I was filling in all the “freckle” details with hand-sewn French knots (my fingers still hurt!), I realized how itchy the back of the stitching would be to wear. 🙁
I briefly considered using a fusible material made for covering the back of embroidery, but in my experience that stuff peels off after a few washes. It took me over a month of sitting and looking at that stitched “thread sketch” before my brain landed on the idea to just line the entire shirt, so all the thread knots and tails would be hidden between the layers.
Bonus: Lining the whole top also eliminated the need to hem the neckline and sleeves … yay!!
(Brief written directions for adding a square “circle” skirt like this to make a dress can be found at the end of this post.)
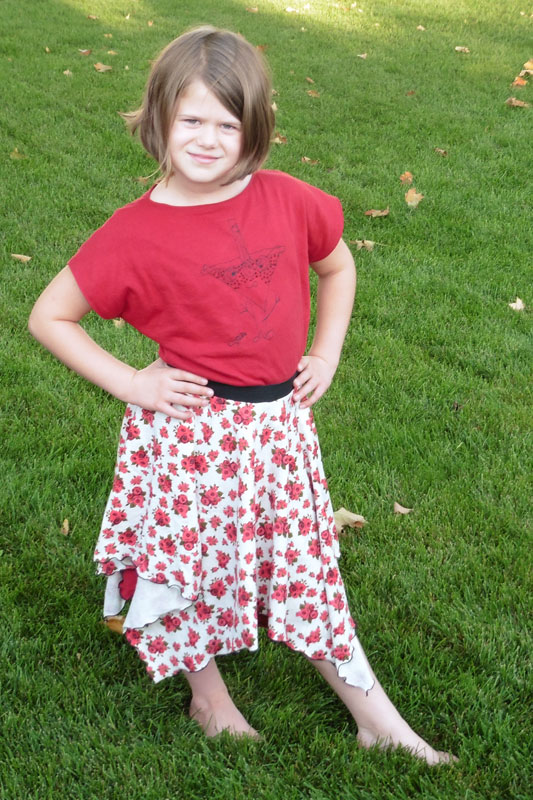
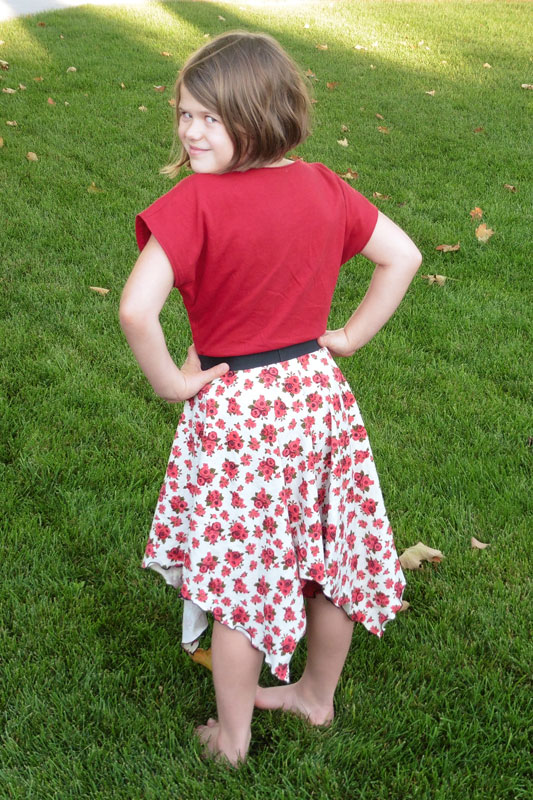
Before I had to mail it off to the birthday girl, I had my daughter model my finished project (she’s shorter than the recipient) so I could write here about how I lined the top, enclosing all raw edges. This method would work great for a top with embroidery on the front or for thin knits that may be too sheer to wear with only one layer.
Here we go!
** Please excuse the slight variances in photo color … this project wasn’t done all at once (due mostly to kid interruptions, lol) and I had a hard time getting the red fabric to look exactly the same in the different amounts of sunlight coming through the nearby window. **
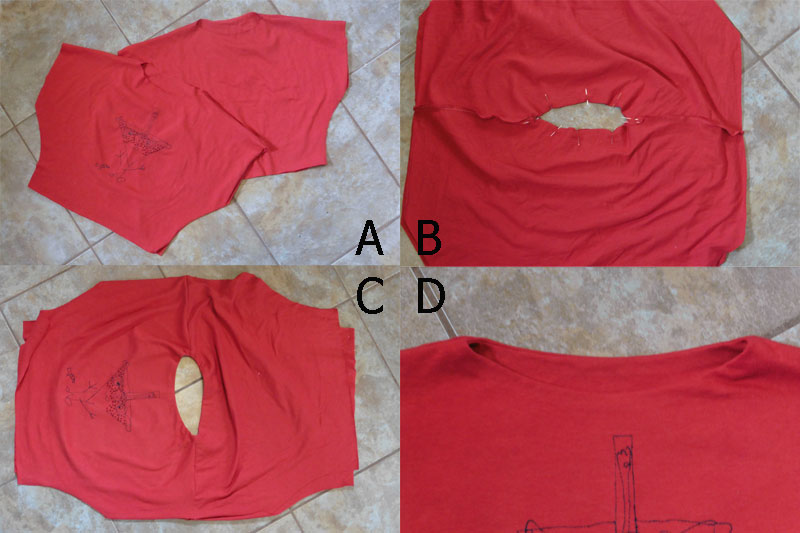
To make a lined dolman top, you’ll first need to cut out two shirt fronts and two backs (one set for outer fabric and one for lining) and sew just the shoulder seams of each set (photo A above). Next, place the outer and lining right sides together and pin the necklines to each other, matching up the raw edges and the ends of the shoulder seams (photo B above). Sew around the entire neckline with a 1/2 inch seam allowance (as that’s what’s included for hemming the neck in the original pattern). Turn the shirt right side out by pulling the lining through the neck hole (photo C above) and press the neckline so it lays nicely (photo D above). You can either topstitch the neckline now or wait to topstitch after doing the sleeves.
** I want to mention that I did the thread sketch before cutting the pattern pieces and that I used the neckline alteration instructions included in the pattern (on page 7) to make the neckline narrower. I did this because I didn’t want it to fall off the recipient’s narrow shoulders.
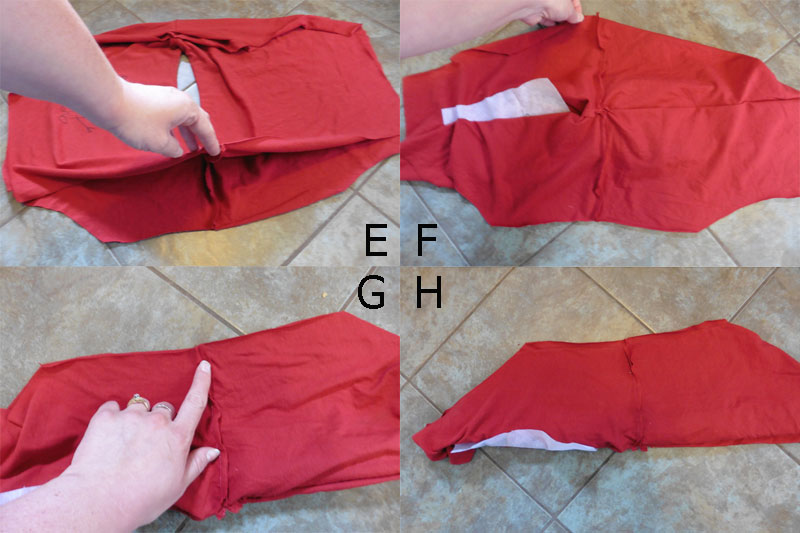
The next step is to sew the sleeve of the outer and lining from the same side of the shirt with right sides together. To do this, grab the outer fabric sleeve (photo E above) and pull it over the top of the opposite side (photo F above) and then bring the lining sleeve underneath to match the ends of the shoulder seams with right sides together (where my finger points in photo G above). The neckline and opposite sleeve will be bunched inside the area under where my my thumb is in photo G. Sew the outer and lining sleeve (which is the edge near the top of photos G and H) with a 1/2 inch seam allowance (the hem allowance included in the pattern). After stitching that seam, your project will look similar to photo H above.
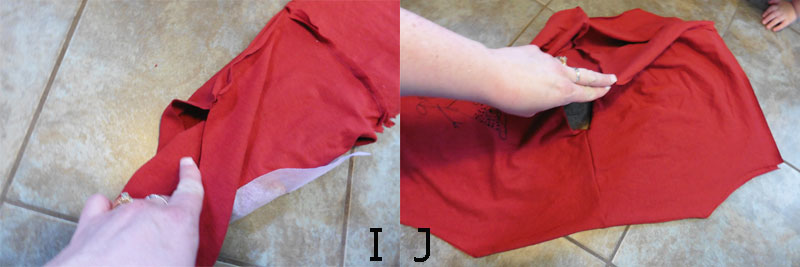
Next, pull the shirt right sides out from one of the ends. Photo I shows the beginning of pulling the shirt out of the middle from where it was bunched in photos G and H. In photo J, you can see the sleeve at the bottom of the picture is already sewn and I’m lifting the outer fabric of the second sleeve to bring it down and repeat the same steps for the second sleeve. Again, pull the shirt completely right side out. Press the sleeve seams, but do not topstitch yet.
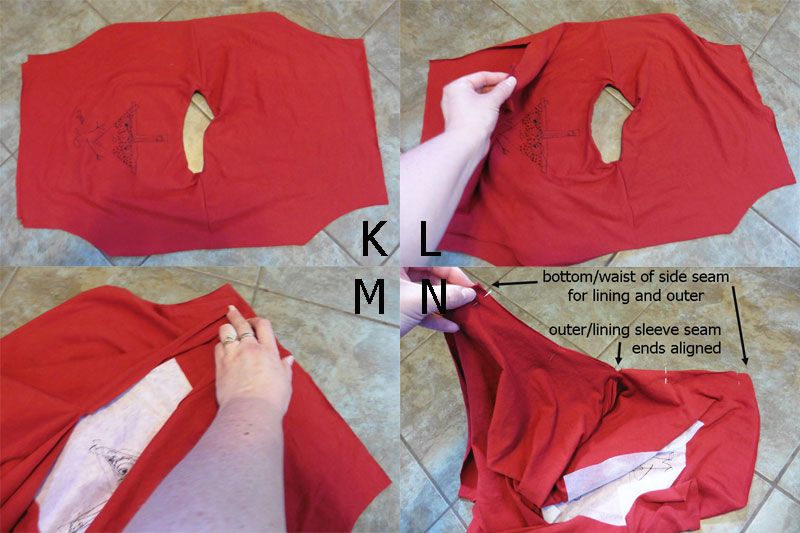
Your top should now look similar to photo K above (it won’t lay completely flat because of the angle of the shoulder seams). Now, you’re going to match up and sew the side seams. Grab the bottom front corner of the outer fabric (photo L above) and pull it over to match with the bottom back corner (photo M above). Pin the bottom of the side seams of the outer fabric to each other. Align the rest of the side seam edges and pin, matching up the ends of the outer/lining sleeve seam and matching the lining front and back to each other (photo N above). Sew this seam with a 3/8 inch seam allowance. Match up, pin, and sew the opposite side seam in the same manner.
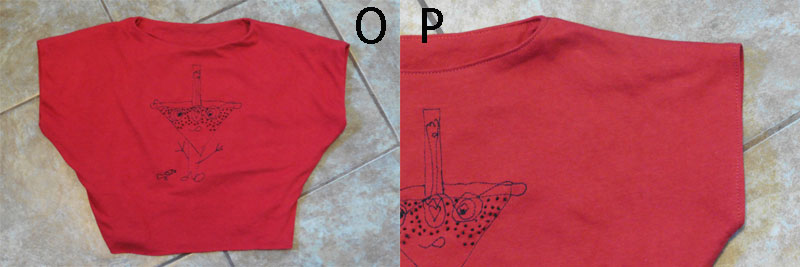
Once turned right sides out, you’ll have a lined dolman top with raw edges enclosed and a finished neckline and sleeves (photo O above). The last step is to topstitch the sleeves and neckline if you didn’t topstitch it earlier (photo P above).

If you’re making just a top, you can now add a band to the bottom or hem it by pressing the bottoms of both the outer and lining to the fabric’s wrong side and topstitching them together to enclose all raw edges between outer and lining. I cut some off the length of Carlie’s Dolman Top so that I could add a skirt to create a dress.

To make Carlie’s Dolman into a dress, I added elastic and a square”circle” skirt. For the skirt, I measured the waist circumference needed and then cut a square that was the width of the waist’s diameter plus twice the amount of the finished skirt length. Then I cut a circle (the same size as the waist circumference) in the center of the square for the waistline.
After sewing the top, I matched the top’s bottom raw edges to the skirt waistline with right sides together, then slipped a circle of 1.5 inch wide black elastic between them and pinned. My skirt and elastic were slightly smaller than the dolman’s bottom edge so, while sewing all the layers together, I carefully stretched them to match.
Putting her own drawing on the front of her dress thrilled the birthday girl so much! Her mom said she kept trying to figure out how I’d managed it. I was just excited that I hadn’t messed up by missing some small detail of her sketch! LOL
Happy Sewing!! ~ Joelle
One Response
Thrive Garden
I do not even know how I ended up here, but I assumed this publish was
once good. I do not recognize who you might be but definitely you’re going to a famous blogger if you are not already.
Cheers!