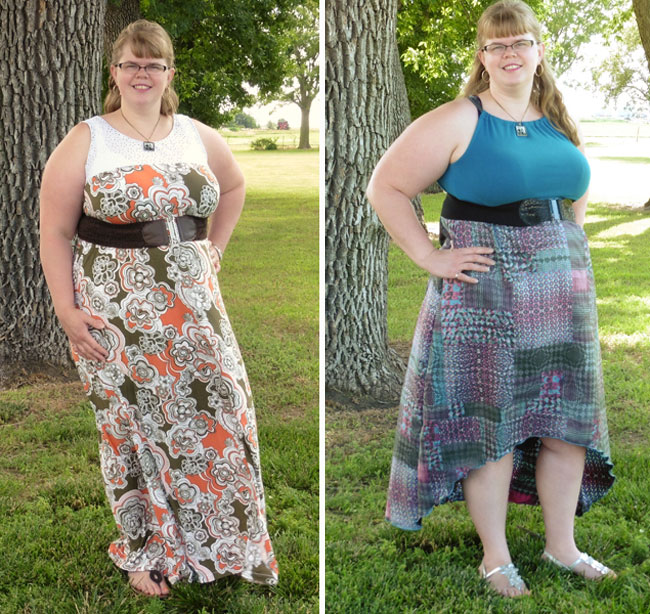
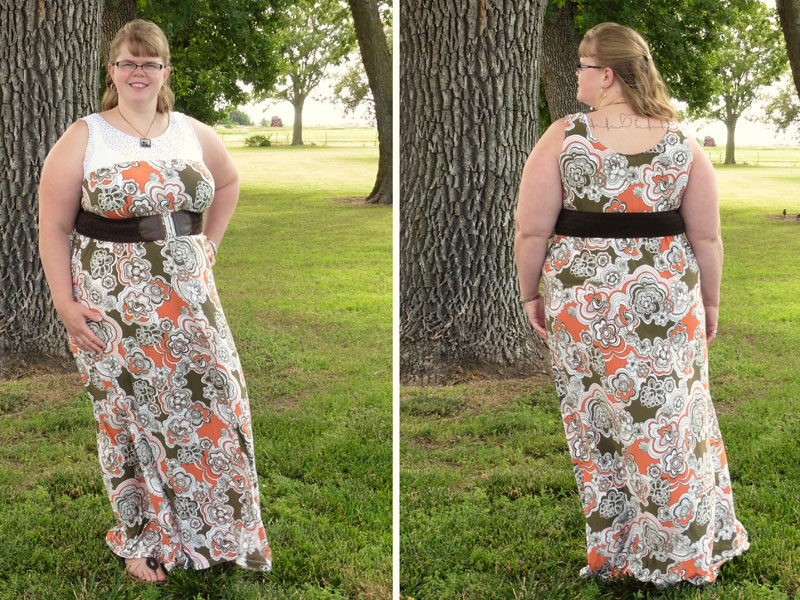
Welcome to Day 3 of the Girl’s and Women’s California Sew Along! Over the past two days, we’ve sewn the majority of the California. I’ve been making myself two different versions, which covers several included options, plus shows how you can color block the pattern.
If you’re just joining us, you can click the following links to go to the previous posts:
Day 1: Color Block Instructions, Cutting Fabric, Sewing Side Seams
Day 2: Binding the Scoop Neck and Armscyes, Finishing the Faux Halter Top
Day 3: Sewing the Elastic Waistband, Hemming the Bottom (this post)
Today we’ll be putting on the finishing touches by sewing the elastic waistband and hemming the bottom. Let’s get started with the waistband!
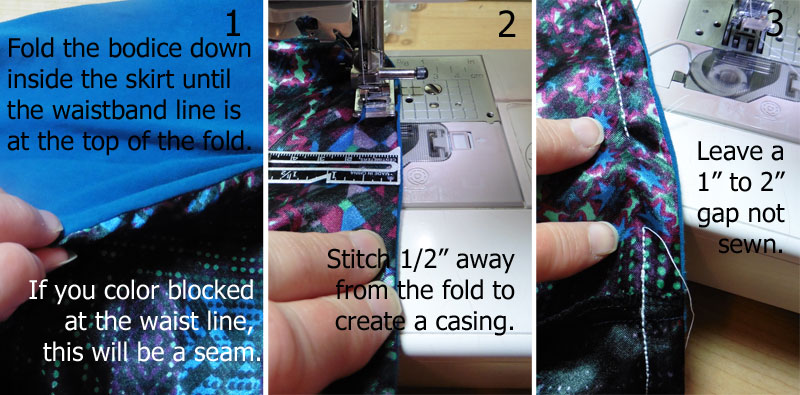
Step 1: With the dress inside out, fold the bodice down inside the skirt until the waistband line is at the top of the fold. If you color blocked at the waistline, the seam will be at the top of the fold like mine. If you did not color block at the waistband, then you should have transferred the waistline marking when you cut out your pieces. (Note: If you forgot to copy the marks over and still want to put in the elastic waist, you can measure down from the armscye on the pattern and on your dress/peplum and mark the waistline on the inside of your garment before starting this step.)
Step 2: Using a stretch stitch, sew a line 1/2 inch away from the waistline fold to create a casing for the elastic.
Step 3: Make sure to stop sewing 1-2 inches before reaching your starting point. This unsewn gap is where you will insert your elastic in the casing.
The elastic should be 3/8″ wide and you can find the suggested length cut chart on page 7 of the pattern (for both girl’s and women’s sizing).
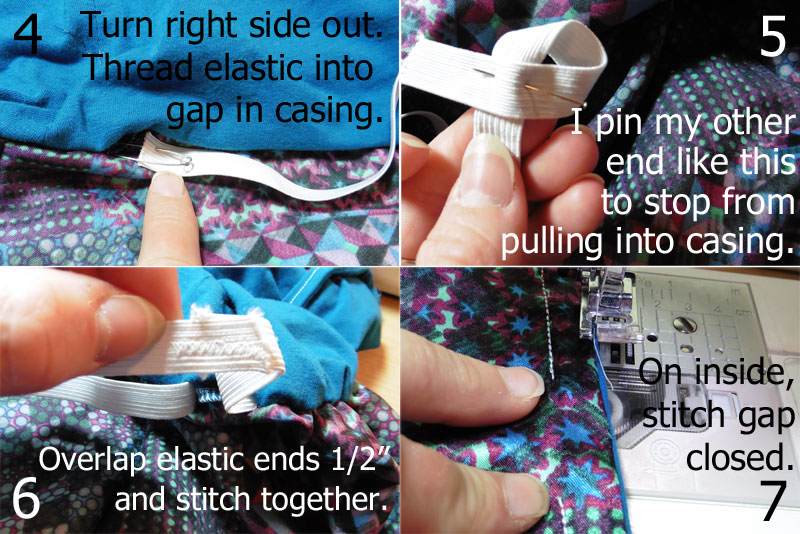
Step 4: Turn your California right side out and find the unsewn gap in the waistline. Using a safety pin or bodkin, thread your elastic into the casing. Pull it through until it comes out the other side of the gap.
Step 5: This one is more of a tip than an actual step. 😉 I like to fold the other end of my elastic around like this and pin it to itself to prevent it from being pulled into the casing, which would mean I’d have to start over with threading it through.
Step 6: Overlap the ends of the elastic by 1/2 inch and stitch them together. I usually use a zigzag stitch and go back and forth over it to be sure it’s secure. Then pull the fabric waistline to make the elastic go completely inside the casing.
Step 7: Turn your California inside out again and find the unsewn gap. Stitch the casing closed to finish the elastic waist.

Your finished elastic waist should look similar to mine in the above photos from the outside and the inside.
Now, on to the last part: Hemming! I will show how I used a traditional hem on one dress and show my serger setting for a rolled hem on the other dress.
Traditional hem:
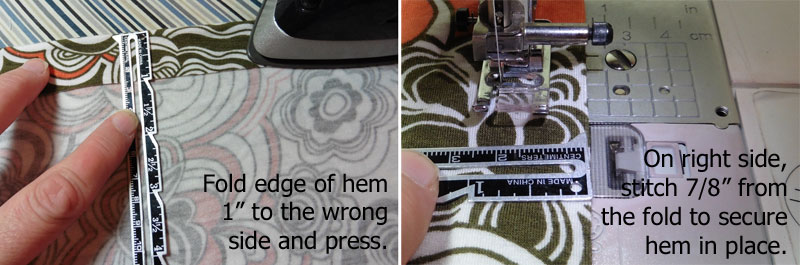
Step 1: Fold the bottom edge of your skirt up by 1 inch to the wrong side. Press well, but don’t drag your iron along or you might stretch your fabric out of shape. (Note: You can serge or zigzag the raw edge before hemming, if you made a woven skirt or if you prefer your knit edge to be finished.)
Step 2: From the right side, use a stretch stitch to sew 7/8 inch away from the fold to secure the hem in place. Stitch all the way around the hem and your California is finished!
Rolled Hem:
For my hi-low hem, I chose to use my serger to make a rolled hem. I have a Brother 1034d and am sharing the settings that work well on my machine. Check your manual before trying a rolled hem, because the settings could differ from machine to machine. You will also want to practice on a scrap of the same fabric because settings can vary from fabric to fabric, too. Generally, though, these are the settings I use for almost all my rolled hems.
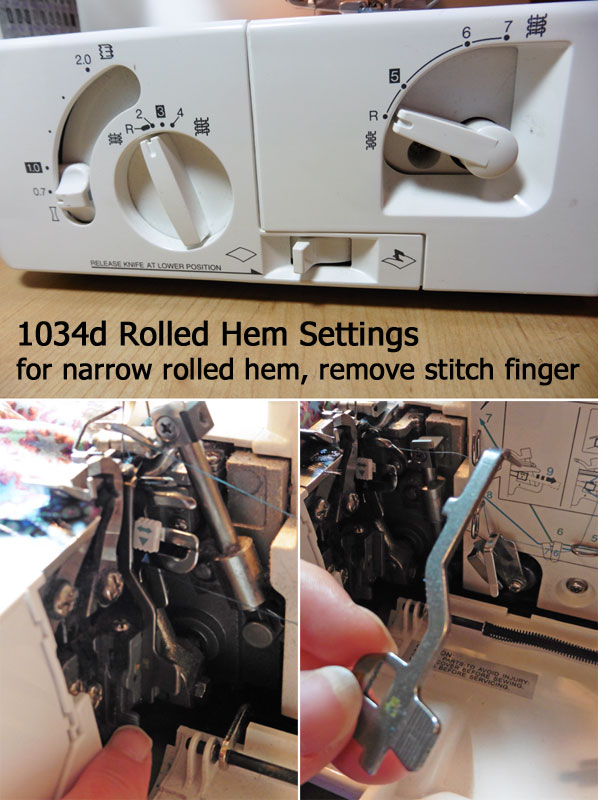
The first thing I do for a rolled hem is to take out the left needle. If I want a narrow rolled hem, I also remove the stitch finger (as shown in the bottom half of the above picture). Then I change my settings using the knobs on the left side of my machine. I usually roll them all toward the back, setting them as follows:
Differential Feed: 0.7
Stitch Length: R
Stitch Width: R
I also disengage my knife so I don’t accidentally cut into my skirt. This way, I don’t have to be so careful to keep it away from the knife, but still far enough right for the needle to catch the edge of the fabric well. Maintaining an even speed without fast/jerky starts and stops will also help keep your rolled hem looking nice and even.

Now comes the exciting part of putting on your finished California and admiring your work! Wear it out (and wear it often) and be proud of yourself! Nothing is more beautiful than a woman (or girl) with her confidence shining!!
Happy Sewing!! ~ Joelle
One Response
California Dress & Peplum Sew Along: Day 2 | Everything Your Mama Made & More
[…] Day 3: Sewing the Elastic Waistband, Hemming the bottom […]