You can find the full FREE tutorial with printable pattern pieces in the EYMM shop HERE.
Click ‘Add to Cart’ and check-out. You do have to create an account but it will NOT ask for payment information. You will receive the download link via email.

Yay! It’s finally here! Kymy digitized the reindeer pattern pieces for my Sven Inspired Costume Head and I decided it would be helpful to include a tutorial on how to assemble the hat. Please, bear with me, as this is my first time writing detailed instructions like this. 😉
You can get your free copy of the pattern pieces and tutorial here. Please do not share the pattern with anyone, but instead direct them to the EYMM site to download their own copy.
Now, let’s get started!
First things first, you’ll need to choose a hat pattern to use as a base for your Sven head. I used Peek-a-Boo Pattern Shop’s Snow Day Fleece Hat, but feel free to use whatever pattern you want so long as it has side seams in the main body of the hat. (** I rotated the hat body so the seams would be directly on the sides rather than the way the Snow Day Hat pattern is written. **)
To achieve the same look as mine, you should cut the hat body pieces from brown faux fur and the brim/band/ear flap piece from white faux fur. I chose to cut the ear flap lining piece from fleece rather than fur and to fully line the inside of the hat body so the backside of the fur wouldn’t bother my son’s head. This meant I had to cut additional main hat body pieces from fleece.
** Tip: Always make sure the nap of your faux fur is laying down toward the bottom of your pattern pieces when cutting. This will ensure it lays nicely and can be “petted” from top to bottom without ruffling up the fur. **
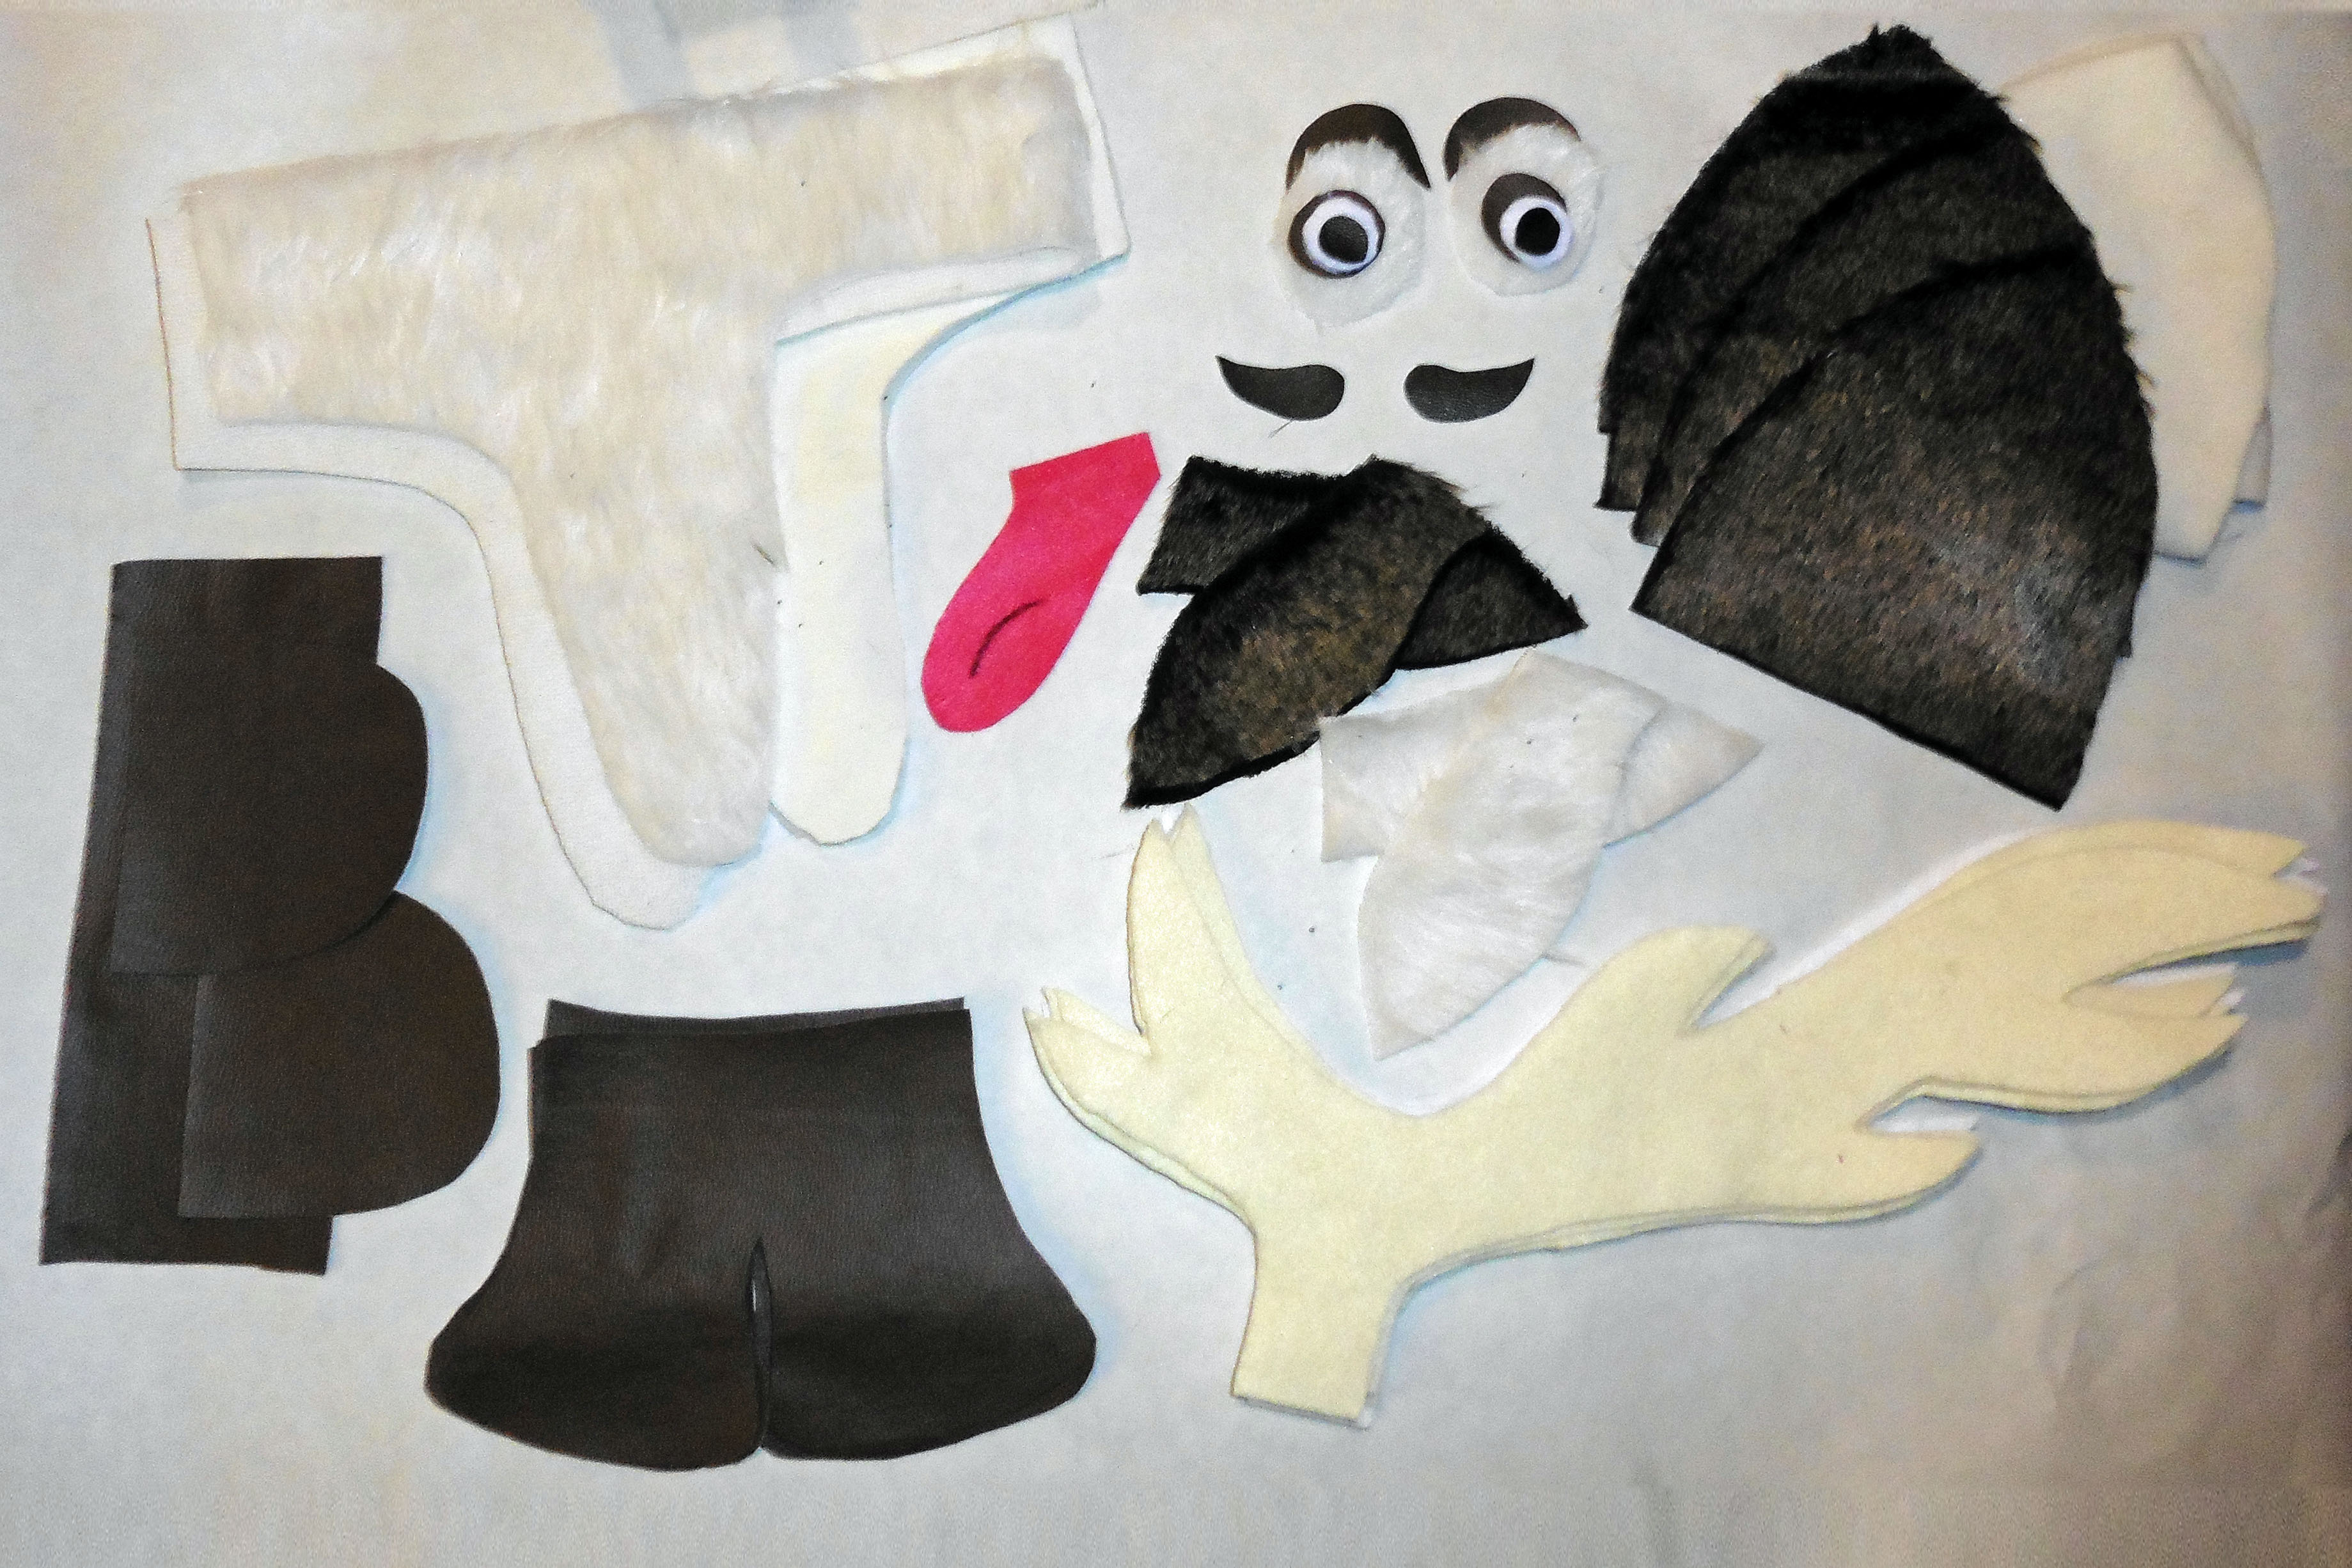
Next, you’ll need to print the reindeer pattern pieces at 100% scaling, gather your supplies, and cut out all the pieces to transform the hat into a reindeer head. Besides the base hat pieces (which are in the two upper corners of my photo), you should end up with:
- 2 muzzle sides (mirror images) from brown pleather
- 1 rectangle for the muzzle’s front (follow measurements found on muzzle pattern piece) from brown pleather
- 1 tongue from pink felt (I used a fabric marker to draw the tongue crease)
- 2 nostrils (mirror images) from black pleather
- 2 ears (mirror images) from brown fur
- 2 ears (mirror images) from white fur
- 5 pieces for each eye (which are stacked up in the picture): eyebrow and eye from brown pleather, outer eye from white fur, eye white from white fleece or felt, and pupil from black pleather
- 4 antlers from ivory felt (2 each of mirror images if your felt has a right/wrong side)
- 2 antlers from heavy-weight stabilizer
You’ll also need six light-colored (so they don’t show through the ivory felt) chenille stems (a.k.a pipe cleaners).
All seam allowances are 1/4 inch, unless otherwise noted.
** The above photo also shows the hooves, which are an included pattern piece (but obviously not part of the head, haha). If doing the whole costume, you’ll want to cut 4 of those from brown pleather. You’ll attach them to white fur cuffs at the ends of the sleeves and pant legs. 😉 **
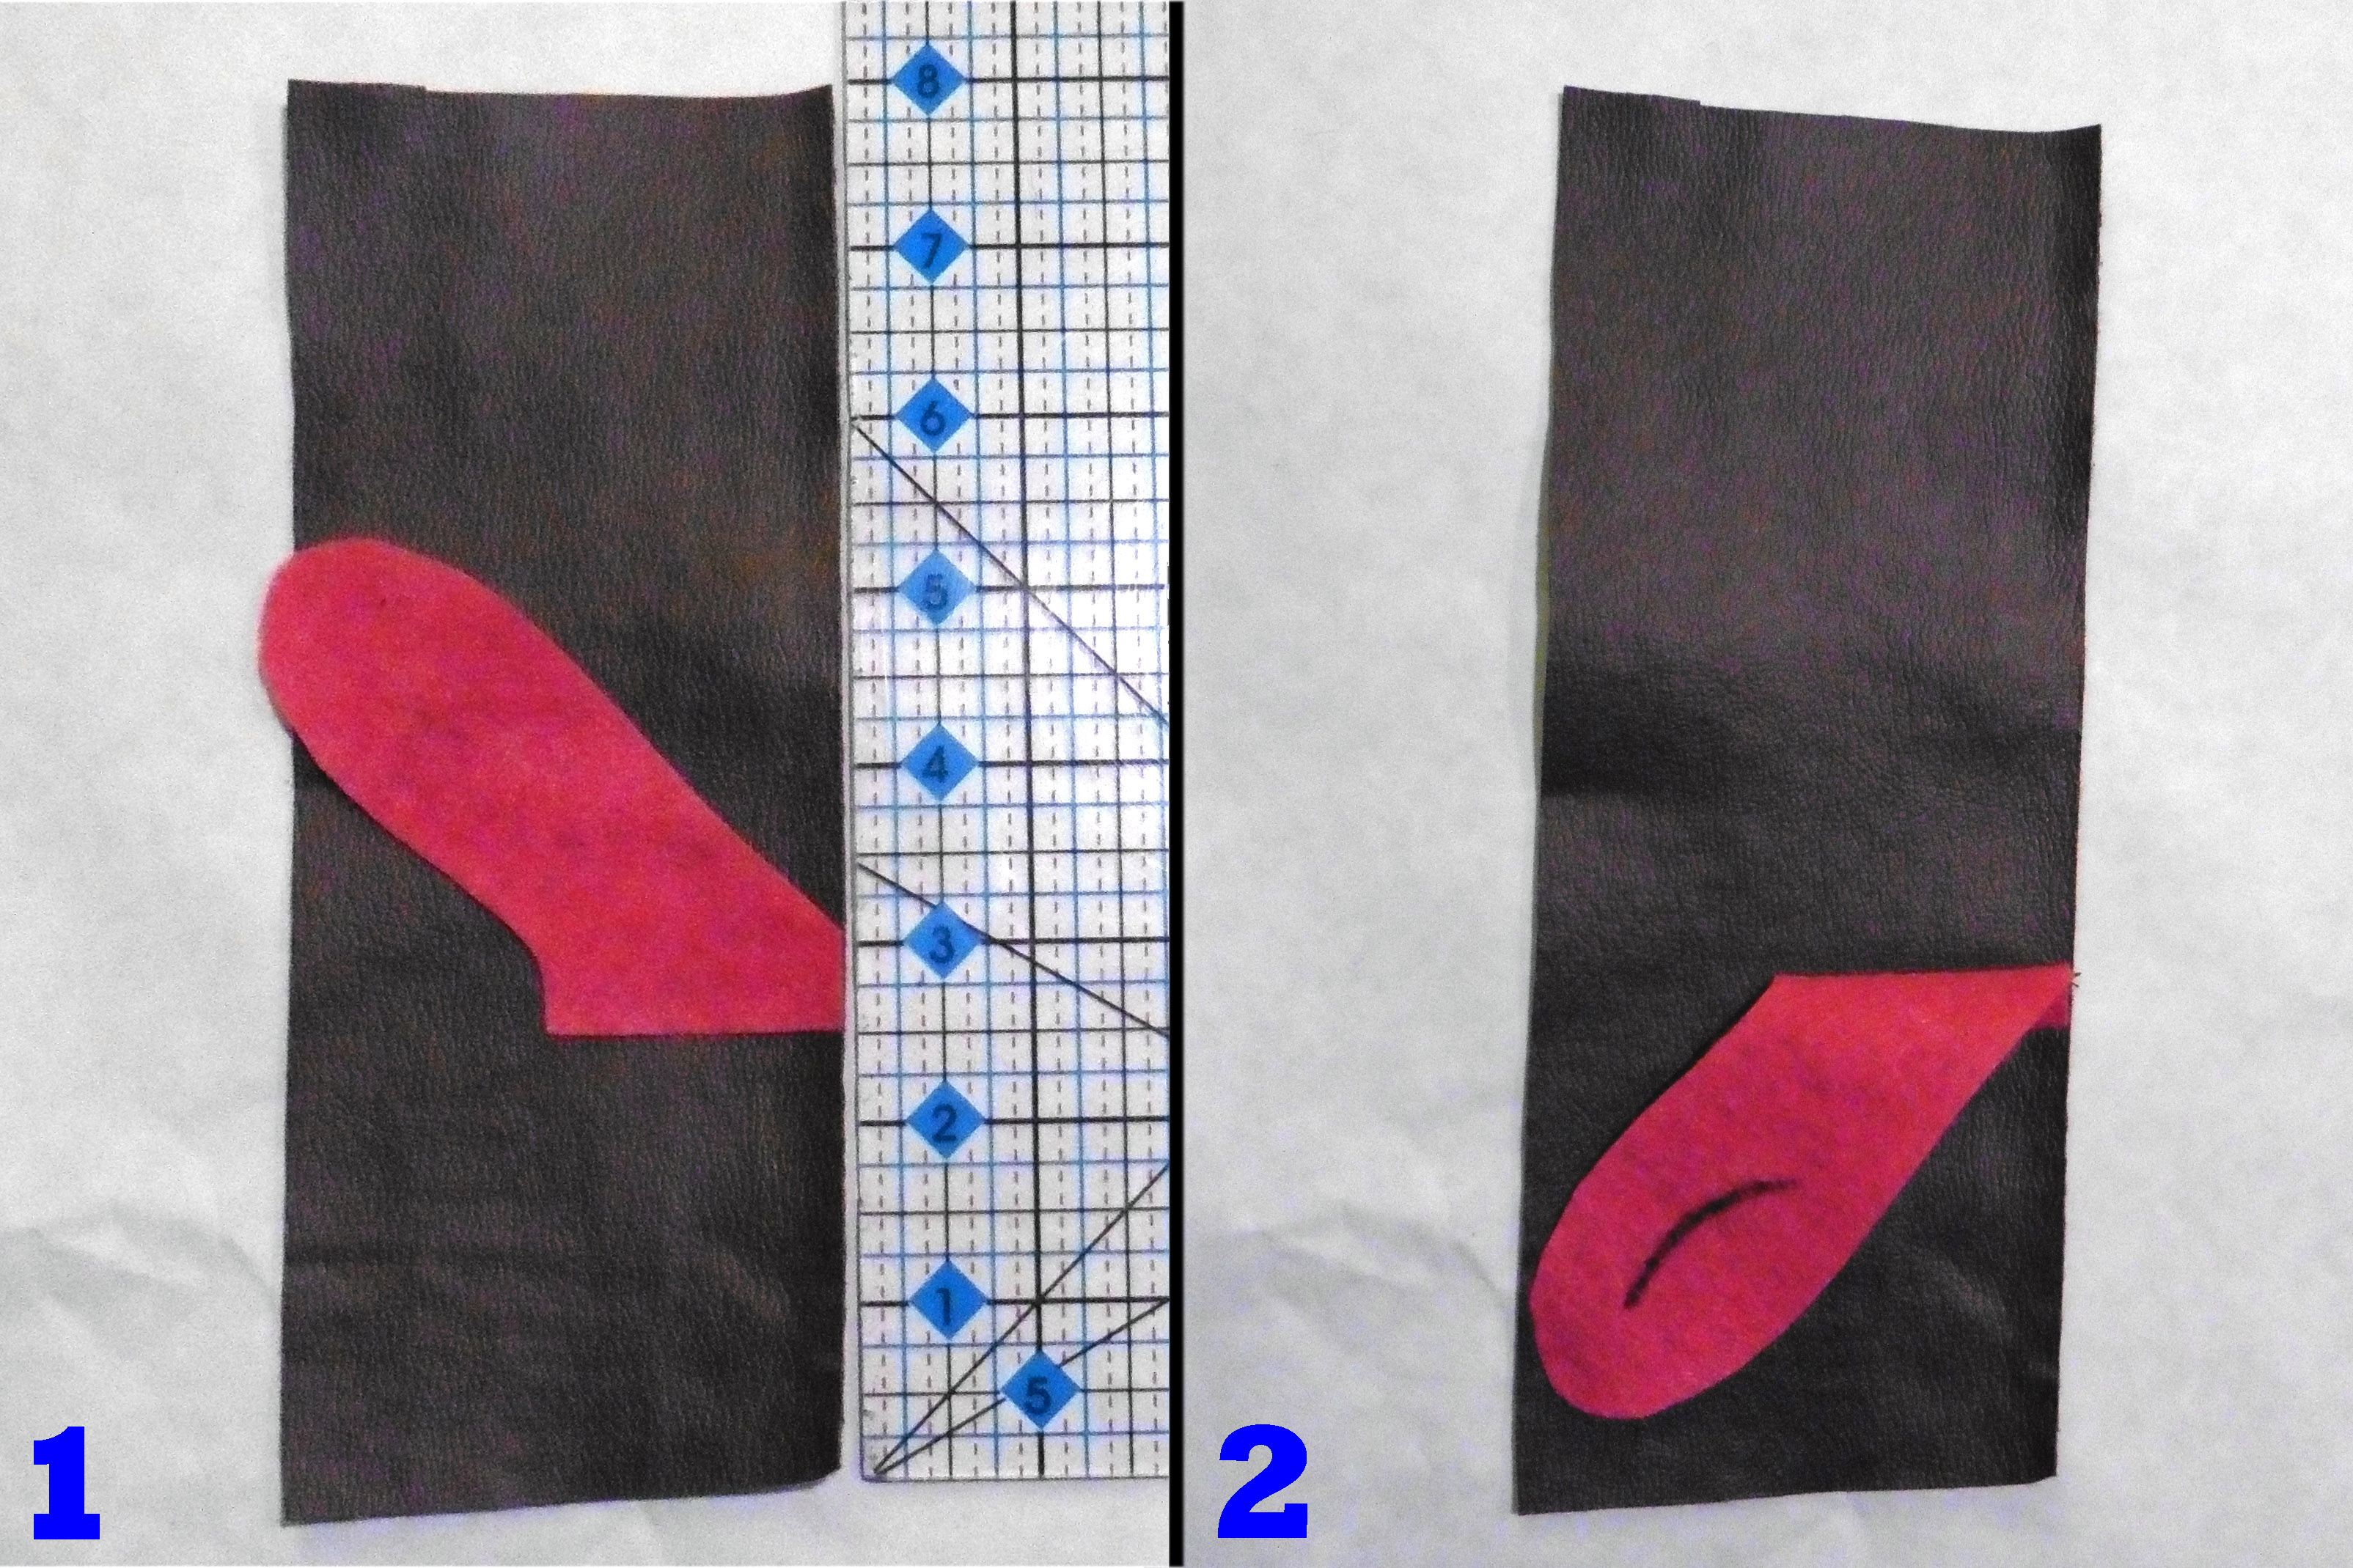
We’ll start with assembling the muzzle. First, take the tongue and place it upside down about 3 inches from the bottom of your rectangle muzzle piece (see photo 1). Stitch in place across the bottom of the tongue and then fold it down to cover your stitches (see photo 2). When you attach the side, the fold will be caught in the seam and make the tongue stay down like this.
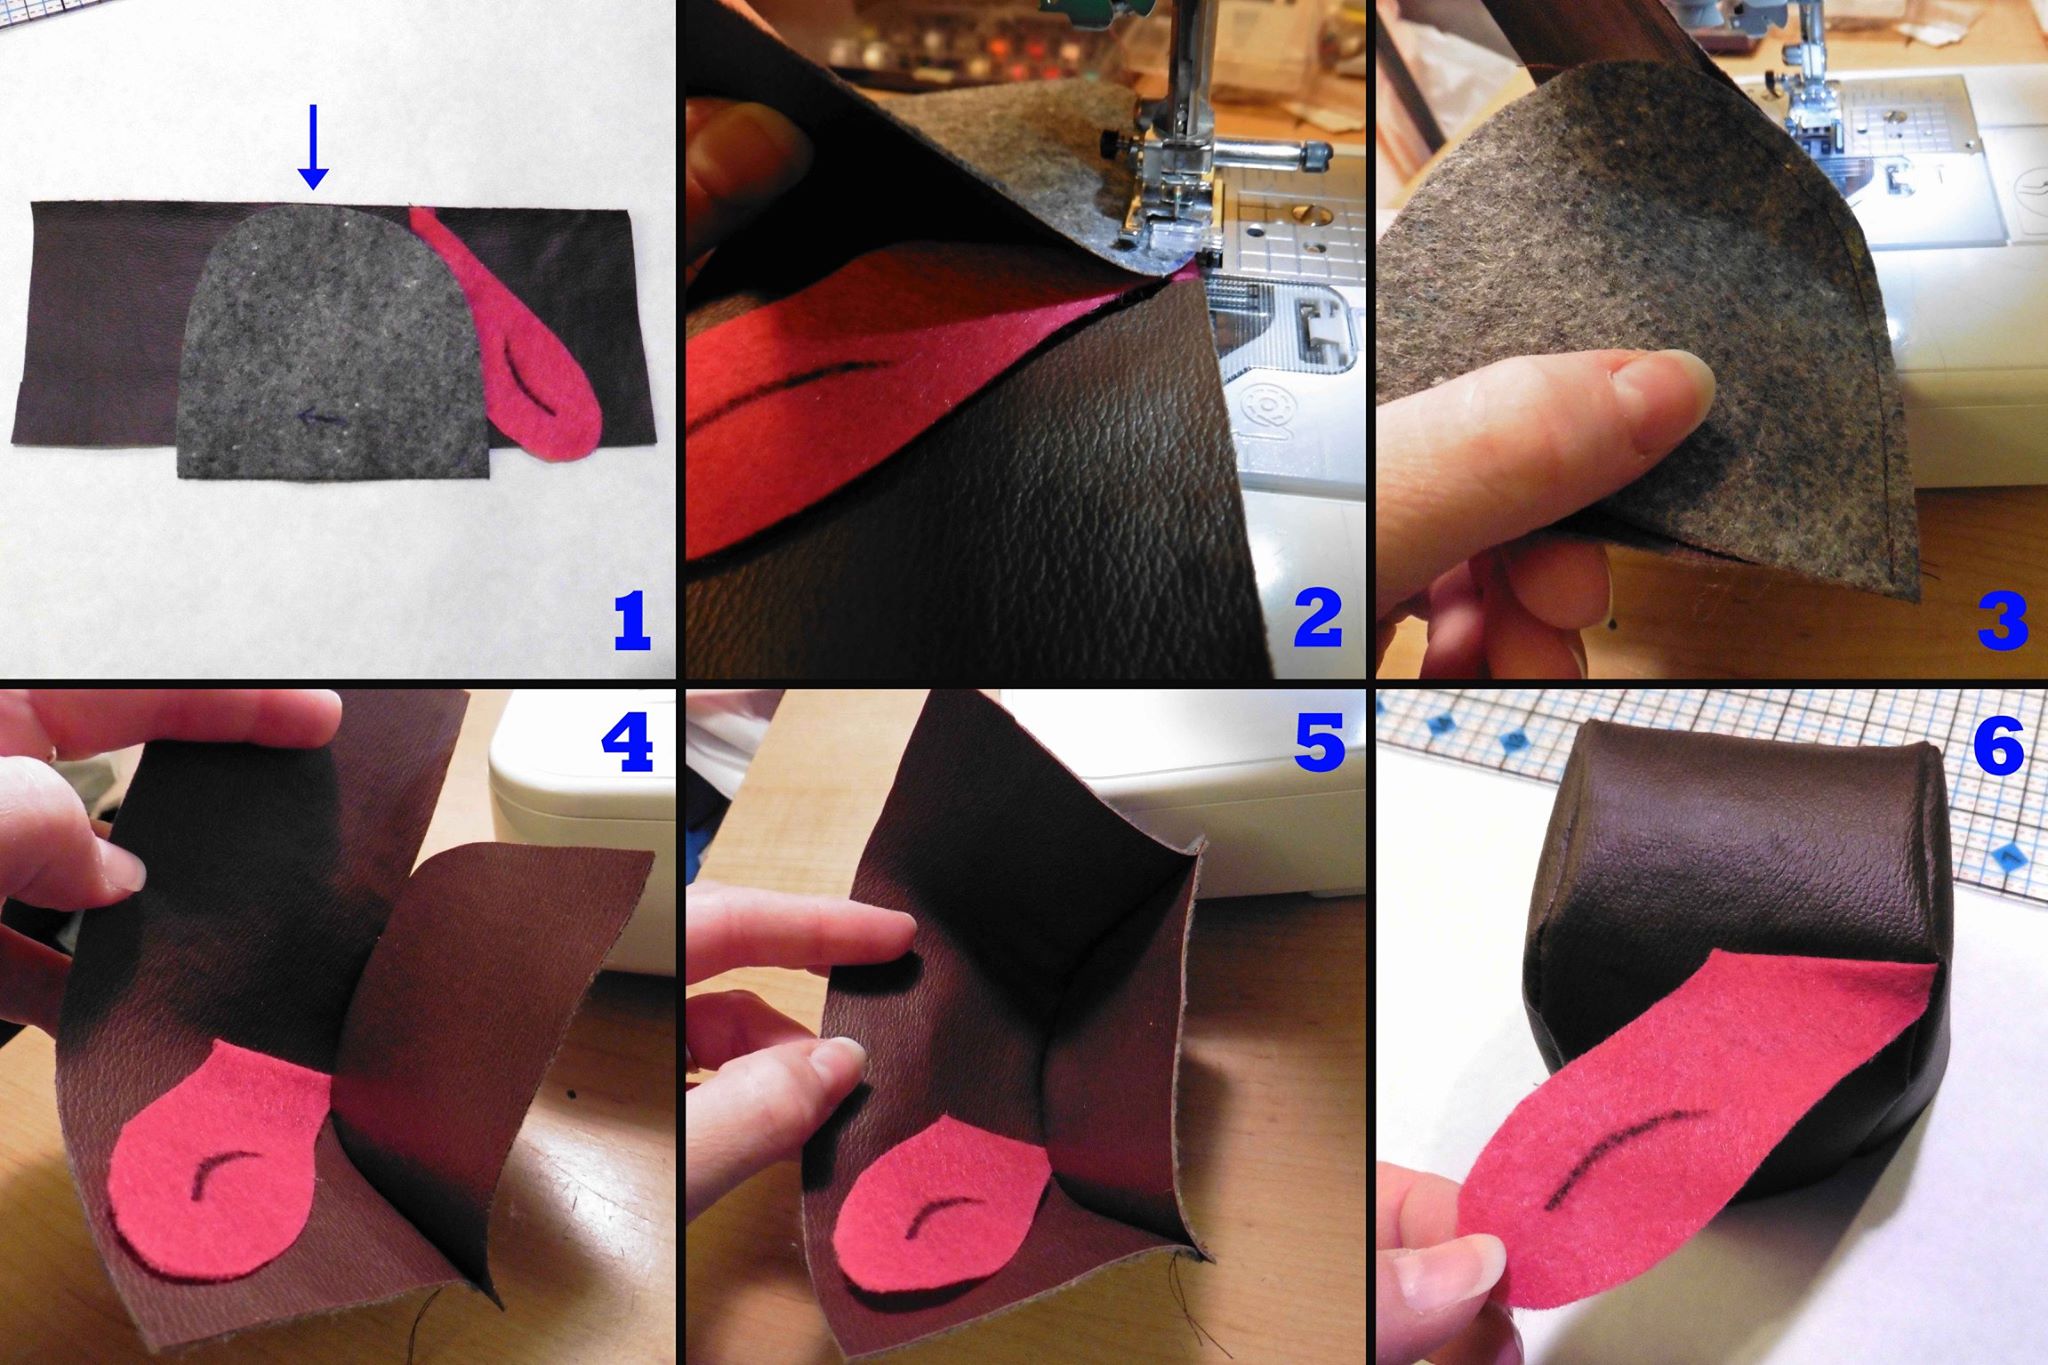
Next, take one of your muzzle sides and find the center of the curve. Match it up with the center of one long side of the rectangle (see blue arrow in photo 1), keeping the tongue folded down and sew the two pieces together using 1/4 inch seam allowance. Because pins leave permanent holes in pleather, I matched the centers and took it to my machine, put the needle down, and pulled the raw edges even as I slowly sewed around the curve (see photo 2). I found it easiest to start from the center and sew to one end, then go back to the center and sew to the other end (photo 3 shows it half sewn from the wrong sides, photo 4 shows it half sewn from the right side of the pleather). Once you finish sewing one curved muzzle piece to the rectangle (see photo 5), repeat with the other curved muzzle piece and the other side of the rectangle and turn it right side out (see photo 6). Be careful not to catch the loose end of the tongue in either of your seams.
Now is a good time to put on the nostrils, of which I forgot to take a picture. I used superglue to attach them to the muzzle. Make sure the rounded end is in front, the pointed end is on the muzzle side, and the curve looks like a smile.
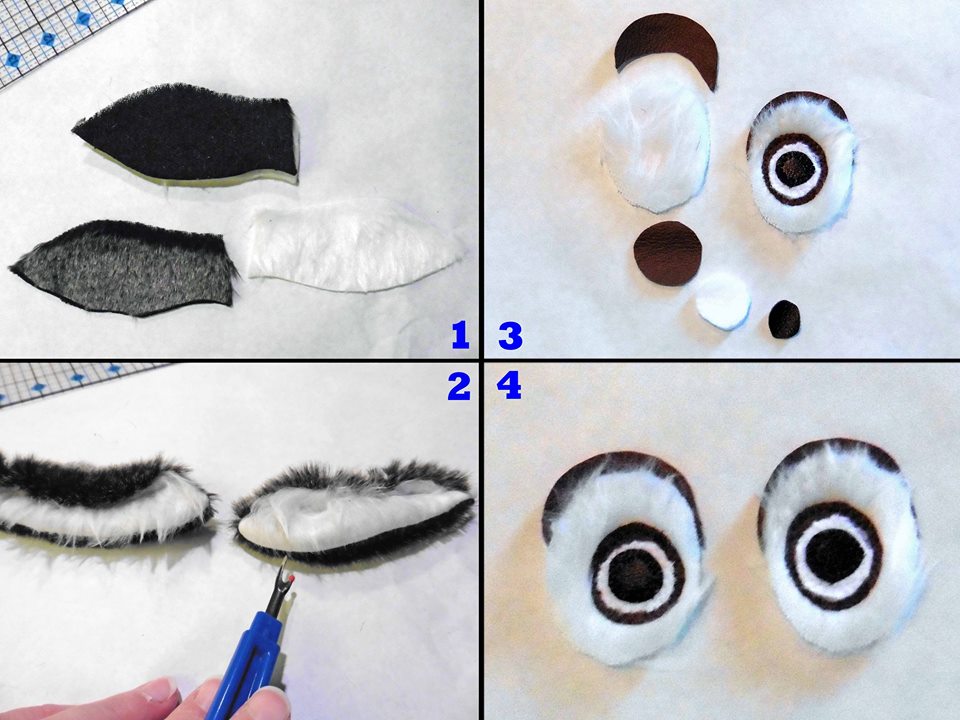
For the ears, you’ll take one brown and one white ear (bottom of photo 1 shows a pair of ear pieces that will get sewn together) and put them right sides together (top of photo 1). Sew around the curved sides, pivoting with the needle down at the point. Clip the point off beyond your stitch line and turn the ear right side out. Fold the top of the ear down where the dotted line is on the pattern piece and secure it with straight stitching across the top and down the open end of the ear (your stitches should disappear into the thick fur).
Because of the length of the white fur, I found that it got caught in the seam and needed to be pulled out. Using the back of the point on my seam ripper to very gently tease the fur out of the seam worked well for me. The right ear in photo 2 shows the seam before teasing the fur out and the left ear shows the difference after the fur is pulled out of the seam.
Repeat all ear steps for the second ear and you’ll end up with both a right and left ear.
Each eye should have 5 pieces that need stacked and sewn together before attaching to the hat (photo 3 shows one eye not stacked and one finished eye). I started with the pupil and worked my way to the bigger pieces, attaching each to the one behind it with a zigzag stitch around the perimeter. To attach the white fur outer eye to the eyebrow, I overlapped it according to the dotted line on the eyebrow pattern and used a straight stitch. Then I teased the fur out from under the seam to disguise the stitches. Photo 4 shows my two finished eyes, where you can see I placed the brown eye piece slightly off center, leaving more white fur around the outer sides of the eyes.
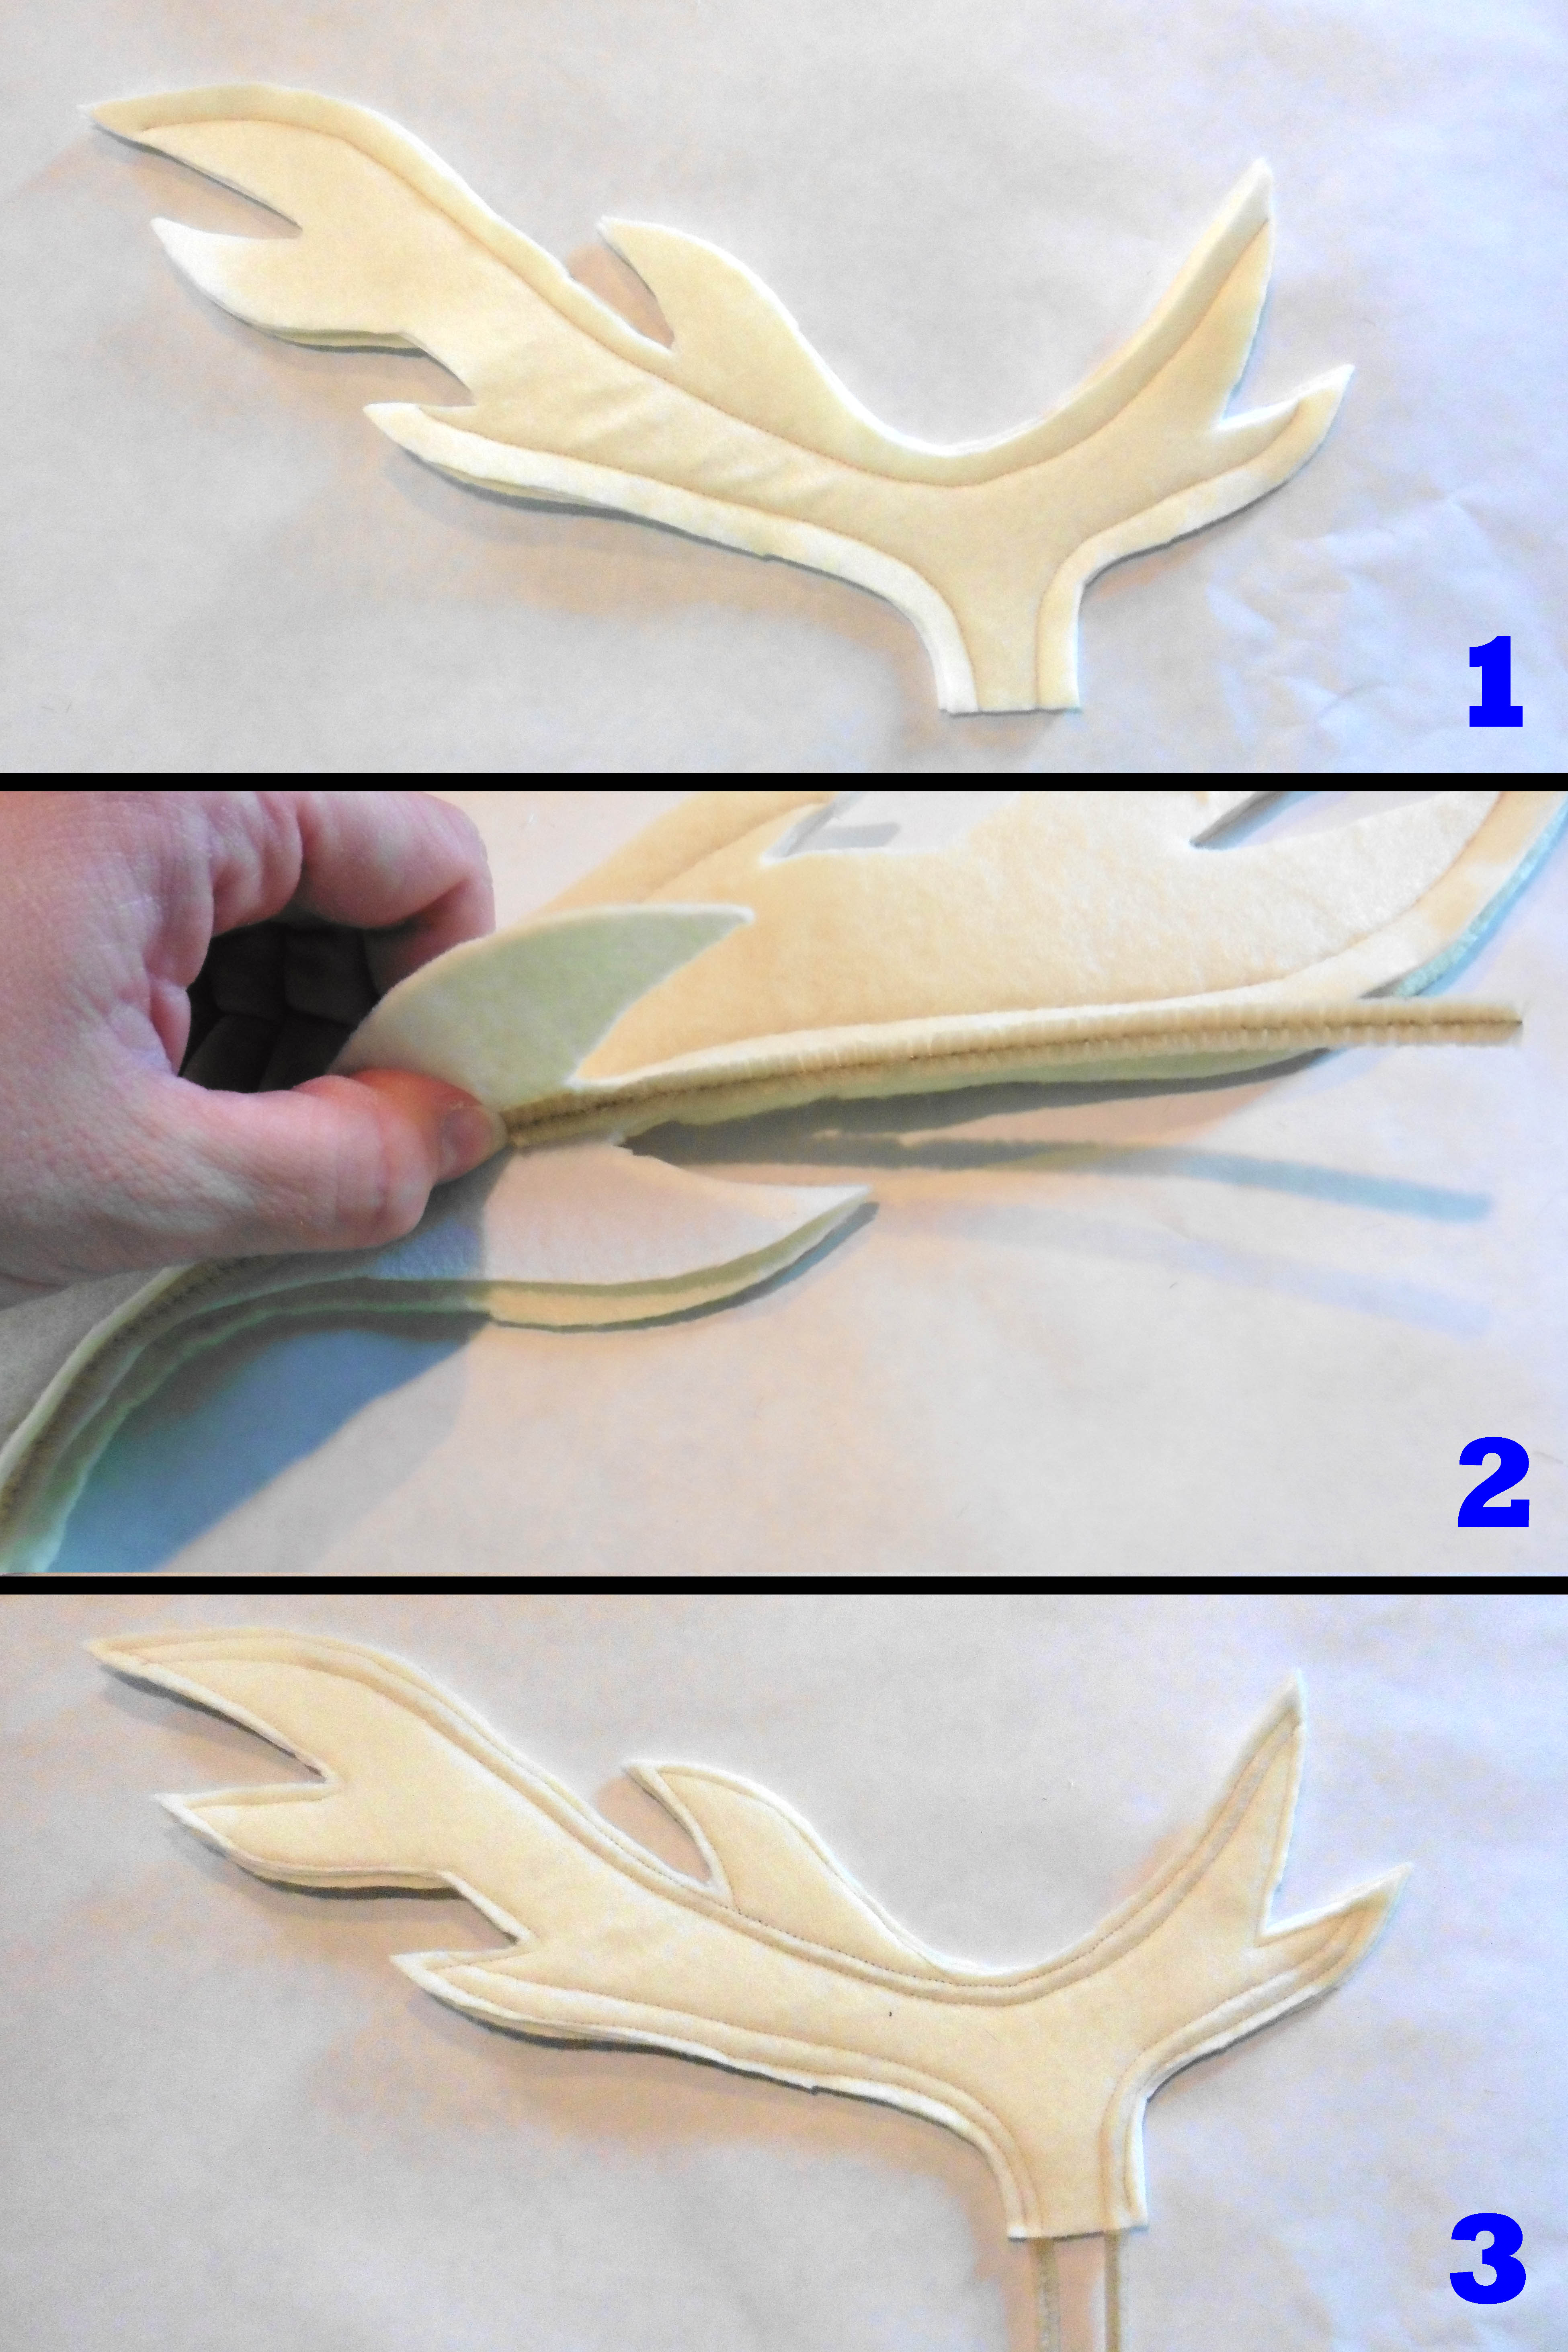
After finishing my son’s costume and watching him wear the hat with the antlers flopping outward from the weight of the hanger wires, I decided there had to be a better way to make them stand up. I did some brainstorming and decided that chenille stems (a.k.a. pipe cleaners) would work better and look nicer if placed inside the felt.
I started by lining up two felt antler pieces right sides out with a stabilizer antler sandwiched between them (another improvement from the lightweight cardboard in my original). I carefully sewed the three largest curves with a 3/8 inch seam allowance (see stitched lines in photo 1). I carefully trimmed the stabilizer around the edges of the antler so that it wasn’t showing. I pulled up one side of the felt and placed a pipe cleaner right up against the outside of the stitching on all three seams (see photo 2). Then I put the felt back over the top and sewed around the entire perimeter of the antler using a 1/8″ seam allowance (see stitched lines in photo 3). This traps the pipe cleaners between the two lines of stitching and sews shut the rest of the antler points. For now, leave the long ends of the pipe cleaner coming out of the antler’s base (bottom of photo 3).
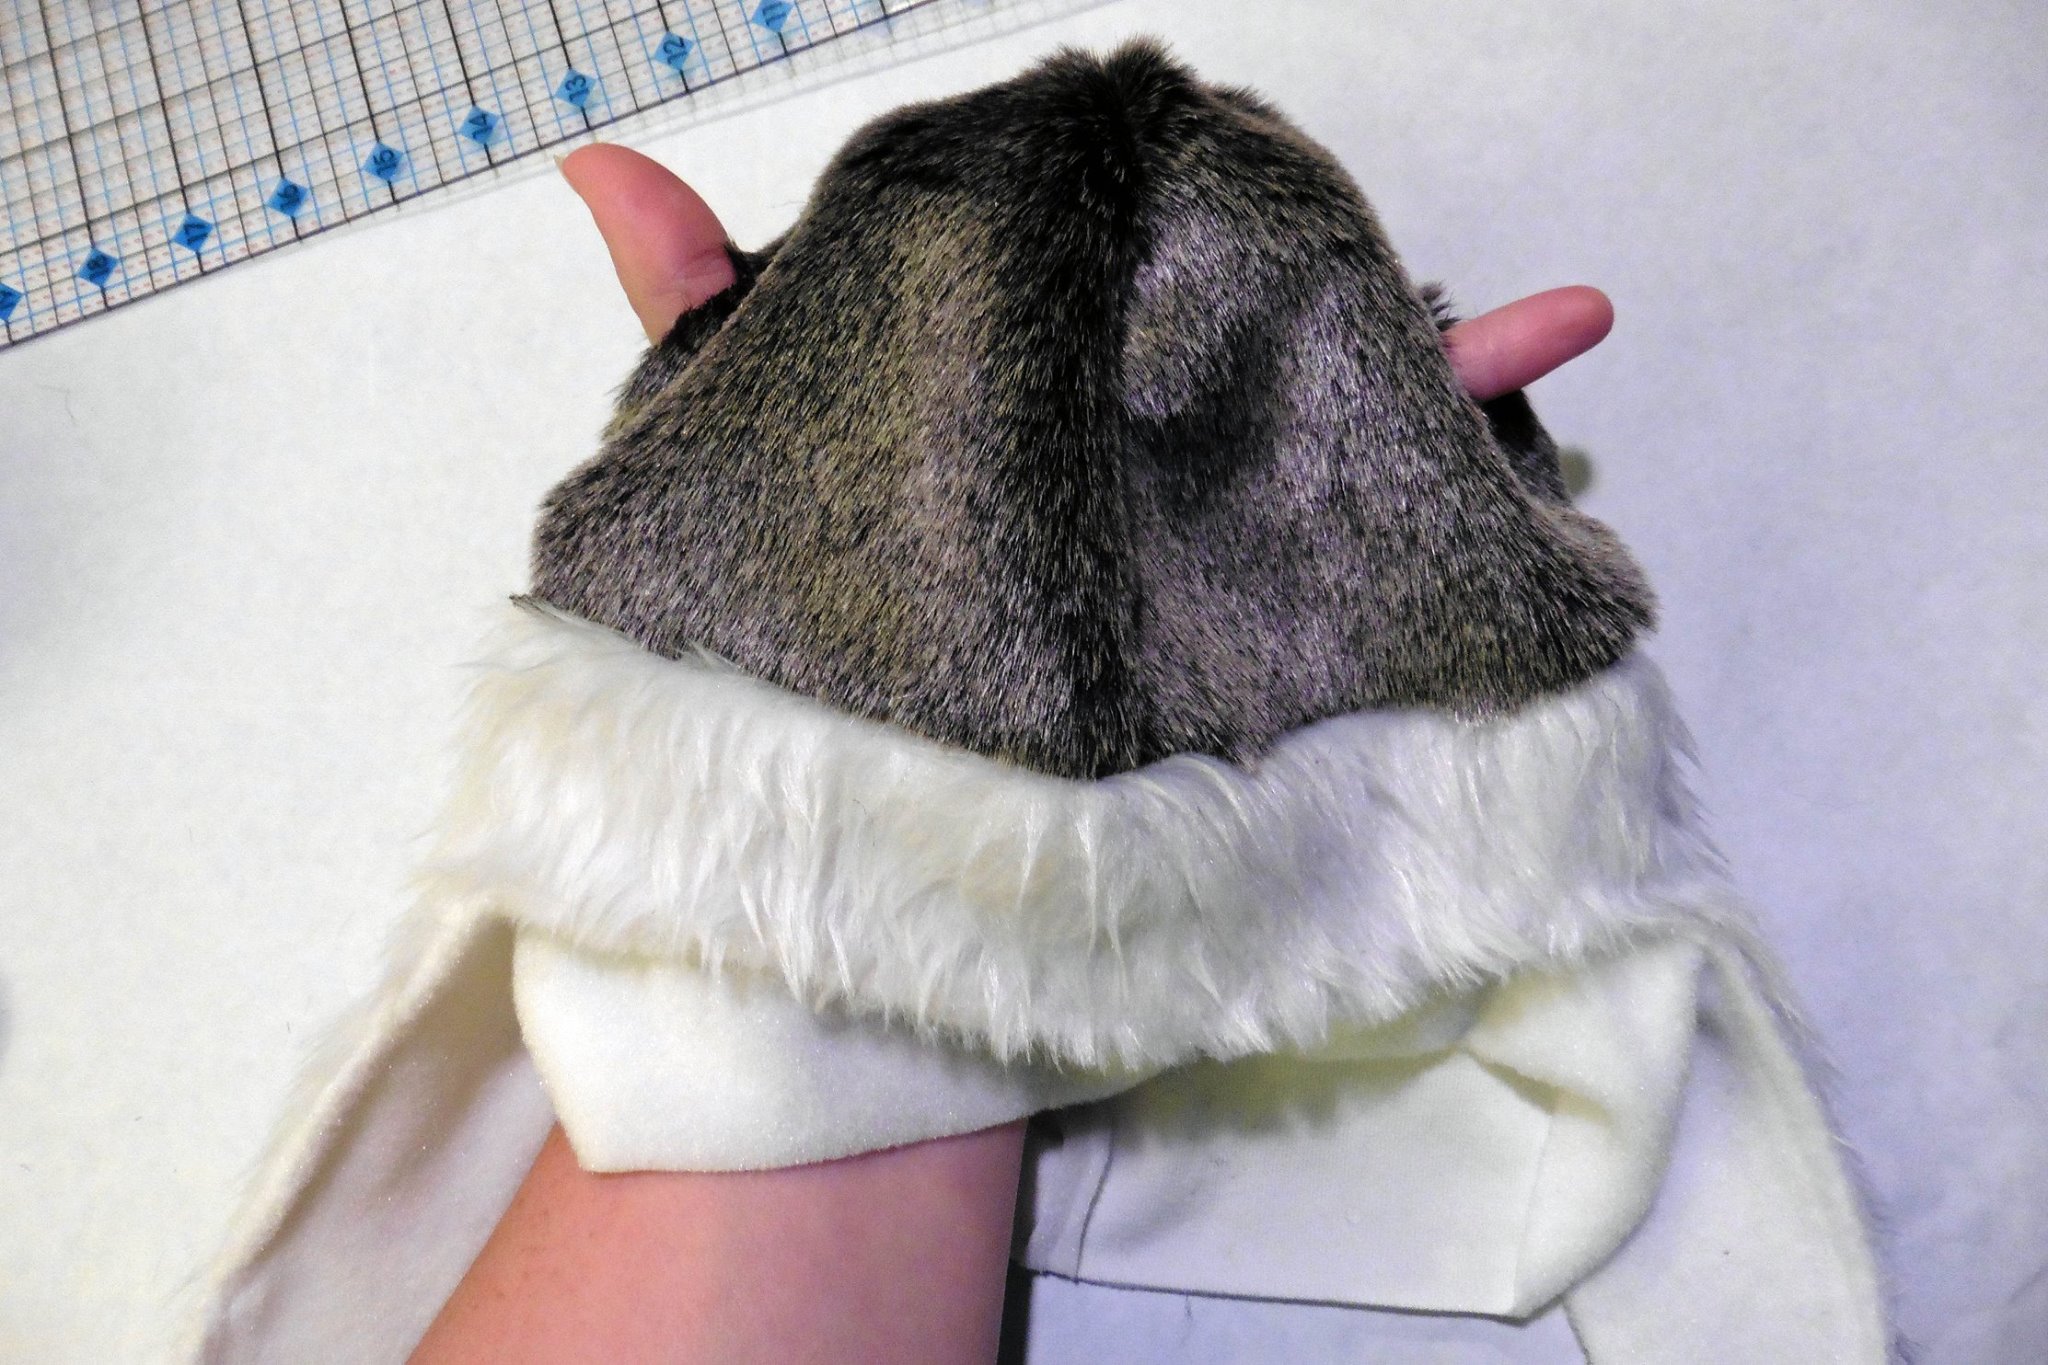
With all the reindeer embellishing pieces assembled, it’s time to sew together your hat. Follow your chosen pattern’s directions, with two exceptions. First, leave a 2-inch gap unsewn on each side seam approximately 3 inches from the center top of the hat body (where you see my fingers poking through in the above photo). Second, do not attach the top of the band/ear flap lining to the hat body yet. Waiting to attach the lining until later will allow you to use it to cover up some of the stitching (or all of it, if you completely line the hat) and make the inside more comfortable on the wearer’s forehead.
Now, let’s put the pieces together to build Sven’s head.
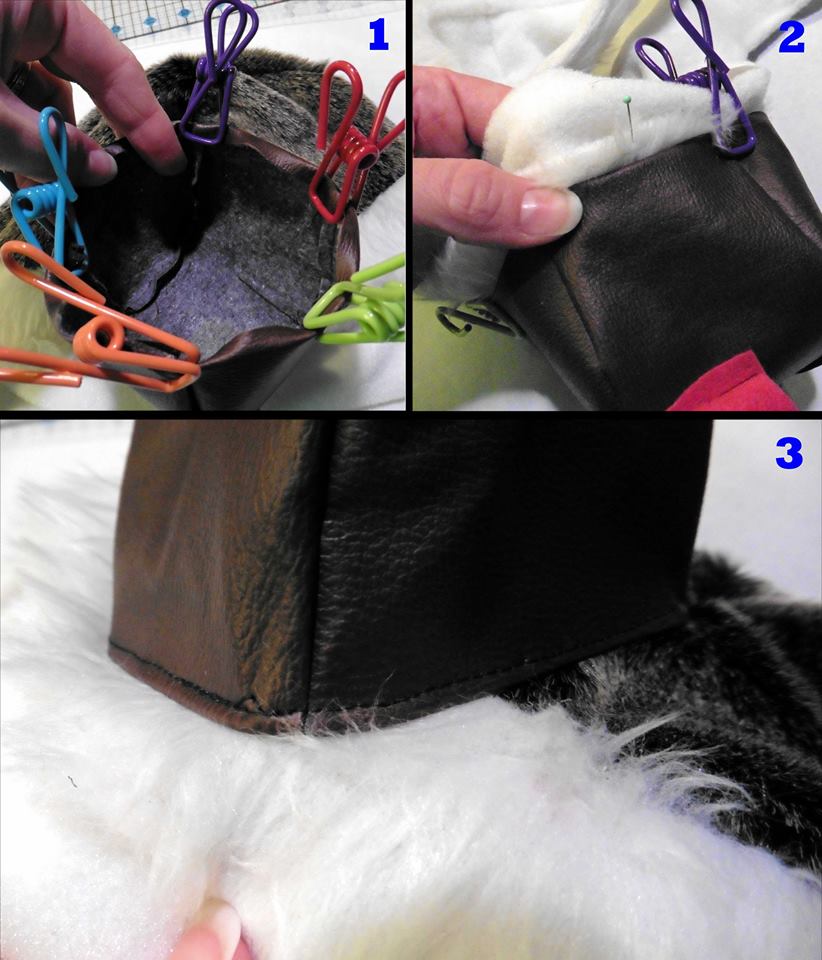
Before you attach the muzzle to the hat, you’ll want to fold in the raw edges 1/4 inch to the inside. Since I didn’t want to leave lots of pin holes in the pleather, I used large clips to help create creases on mine (see photo 1). Next, you’ll want to carefully line up the bottom center of the muzzle about 1/2 inch from the bottom of the center front of the band/ear flap piece (see photo 2; the pin is marking the center front of the hat). Very carefully, sew the muzzle to the hat by topstitching 1/8 inch from the folded edge all the way around, making sure to keep it centered on the front of the hat. You will probably have to lift your presser foot often to make adjustments and avoid wrinkles. (Confession: I pinned the muzzle on before sewing, despite leaving pinholes in the pleather. I just tried to line up my pins with where the needle would stitch in order to disguise/cover the pinholes) Photo 3 shows how the edge looks after being sewn to the hat.
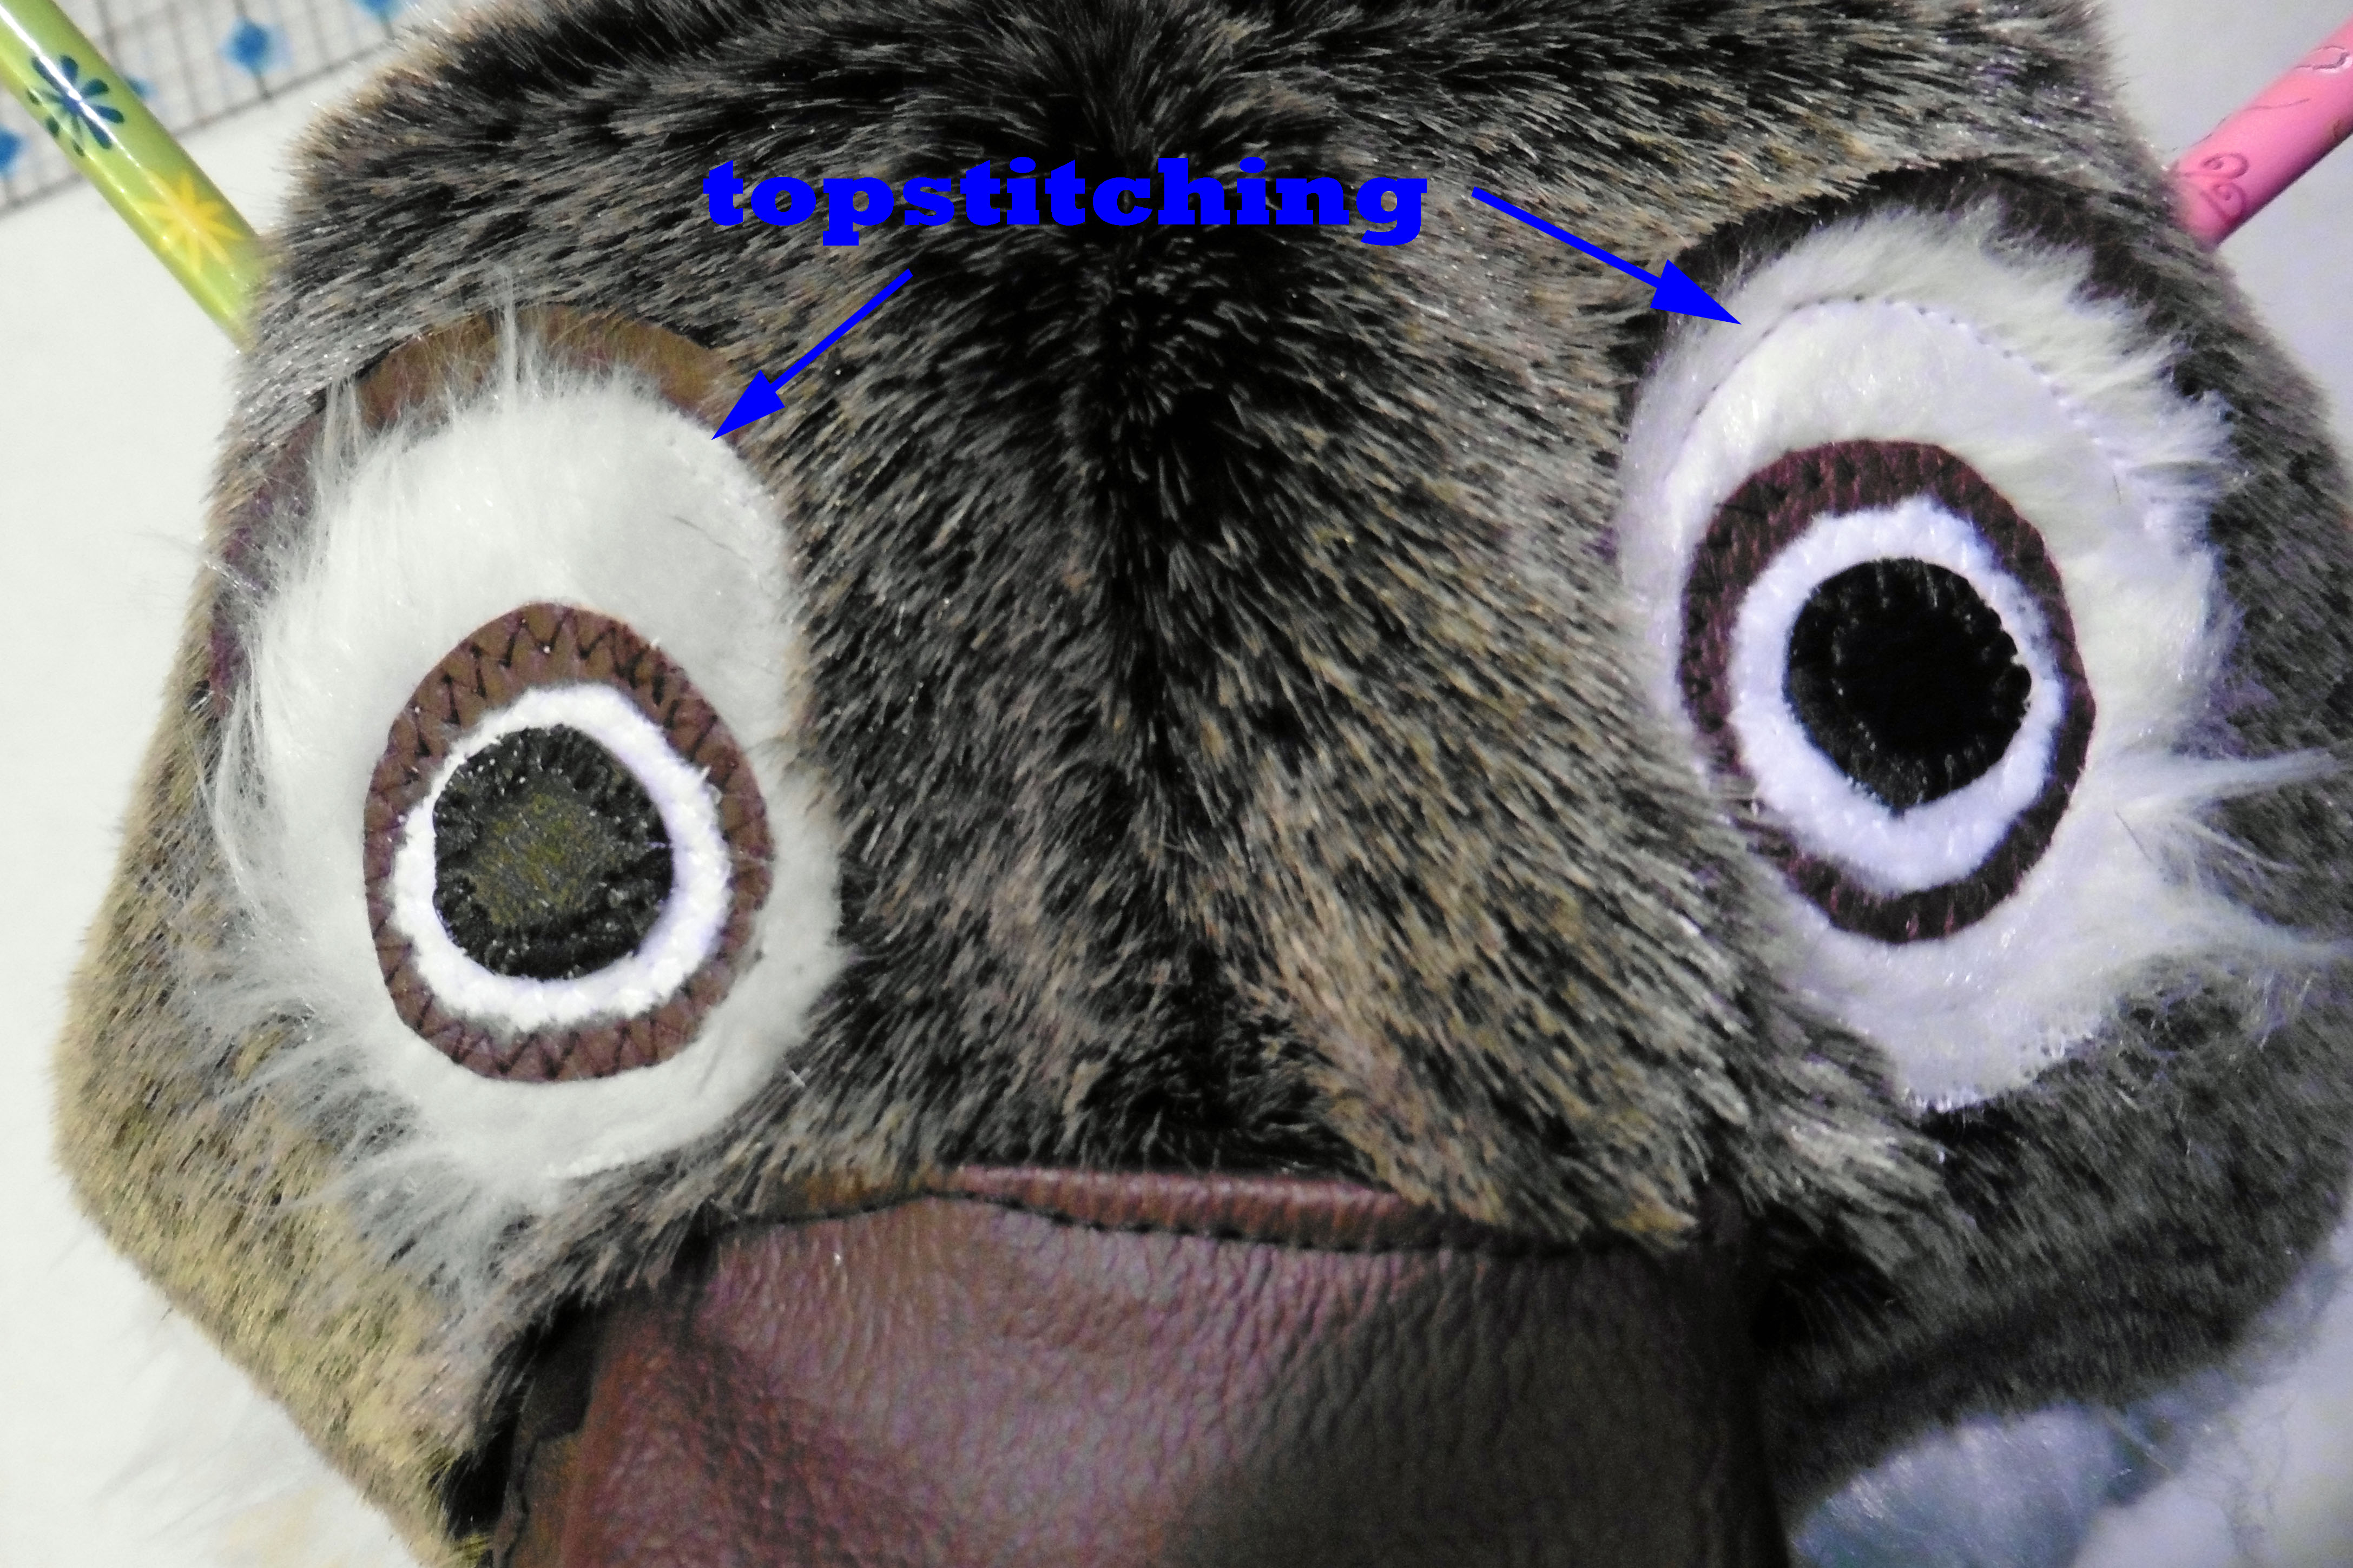
Next up is attaching the eyes! Position them about 1/2 inch above the outer top corners of the muzzle and pin. Topstitch them in place with a regular straight stitch around the perimeter of the white fur outer eye. Again, you’ll need to tease the fur out. In the photo, you can see the difference in the seam before (left eye) and after (right eye) teasing the fur from under the stitching.
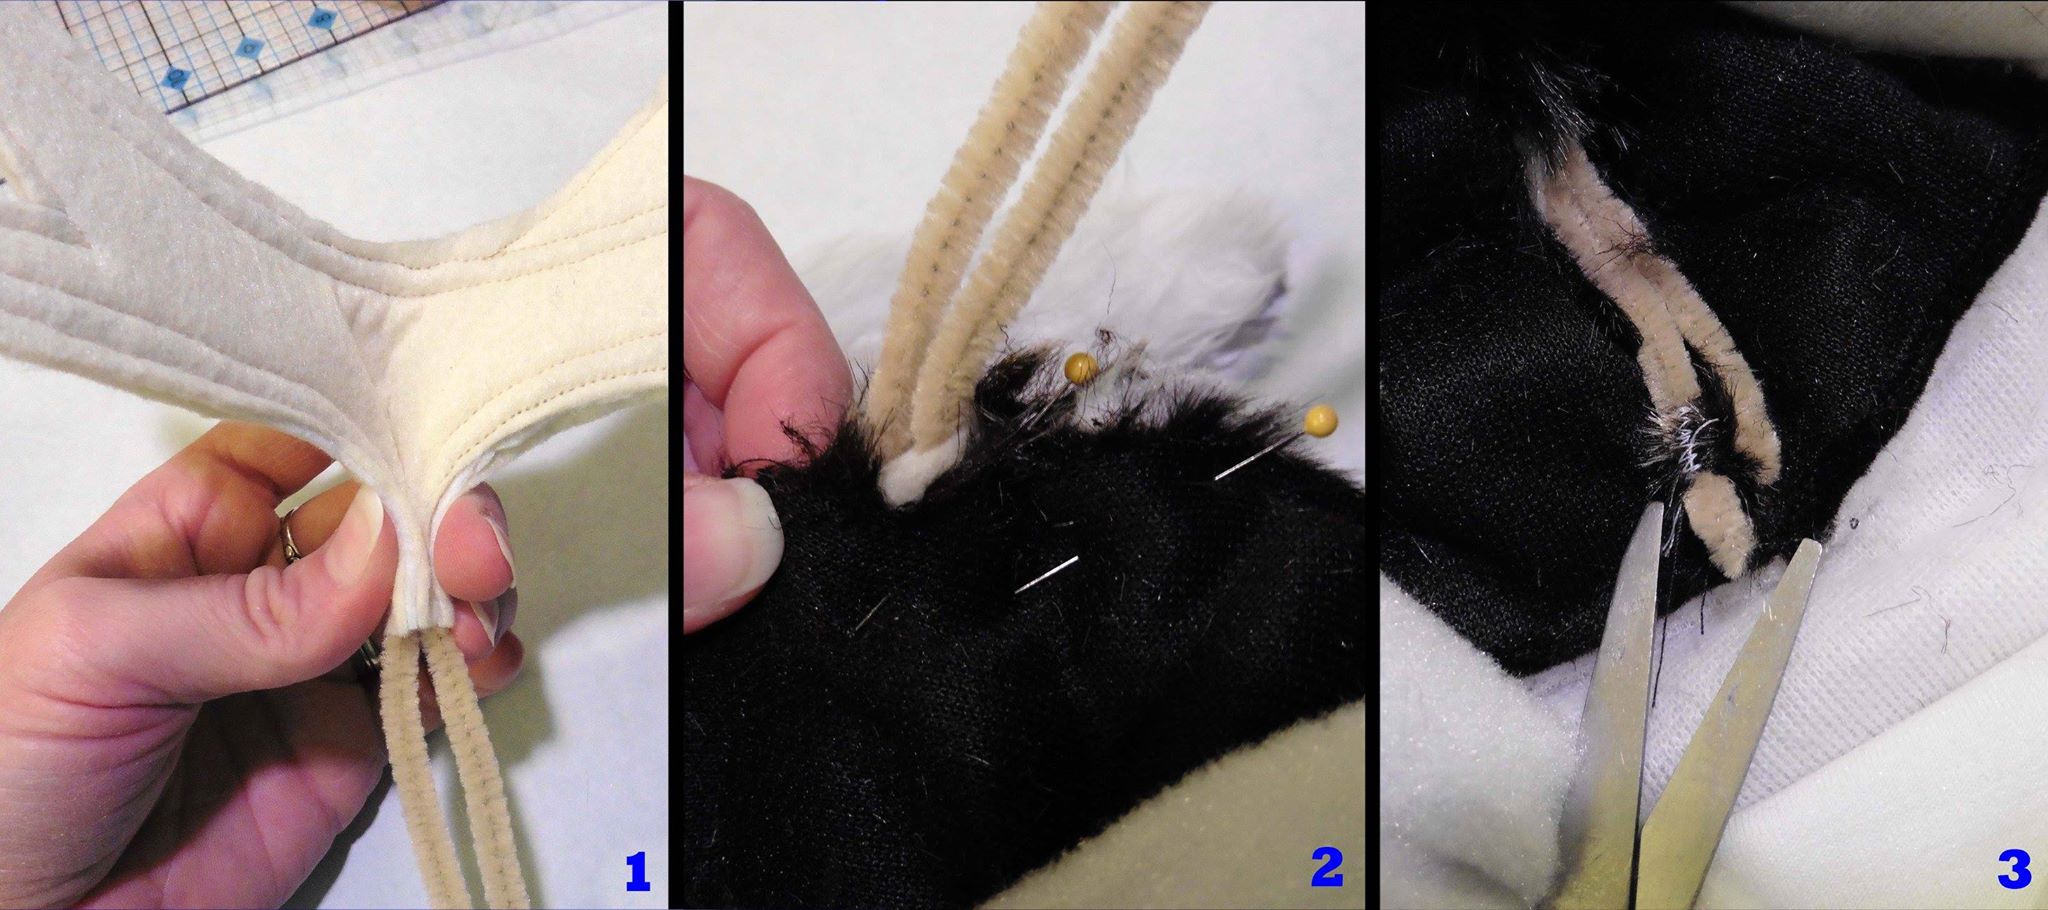
Last, but not least, we need to attach the antlers and ears into the side seams of the hat. First, fold the base of the antler in half (see photo 1) and then place the pipe cleaners through the side seam gap. Put the edges of the antler base against the top of the side seam gap (so the folded side will be closer to the ear) and be sure your antler’s smaller front points are facing the front of the hat. Place the ear into the side seam gap below the antler with the white fur facing the hat front and the ear’s fold toward the top of the hat (the fold in the antler base and the fold of the ear should be about 1/2 inch from each other). Pin the hat side seam closed with the antler and ear in the seam (see photo 2). Stitch it shut, turn right side out to check that the antler and ear are placed well, and then stitch the seam again to make sure they are securely attached.
To help the antlers stand up better, I attached the long ends of the pipe cleaners inside the hat. First, I positioned them near the side seam and then used a zigzag to stitch over them to secure them near the top of the ear flap piece (using black or brown thread on the fur side helps the stitches to disappear under the fur). Cut each pipe cleaner off about 3/4 inch below your stitching (see left pipe cleaner in photo 3) and fold it up to cover the zigzag stitches (see right pipe cleaner in photo 3)
Finally, it’s time to attach the top of the hat band/ear flap lining. If you are not fully lining your hat, you can stitch the top edge of the ear flap lining to the seam allowance of the outer ear flap and hat body. If you are putting in a full lining, you’ll need to assemble the hat body lining and stitch it to the top raw edge of the band/ear flap lining.
** Tip: To enclose all your seams, leave part of the lining side seam open and pull the edges out through the opening as you’re stitching the hat body lining to the ear flap lining. Then you can top-stitch the opening closed. (Sorry I forgot to take pictures of that process.) **
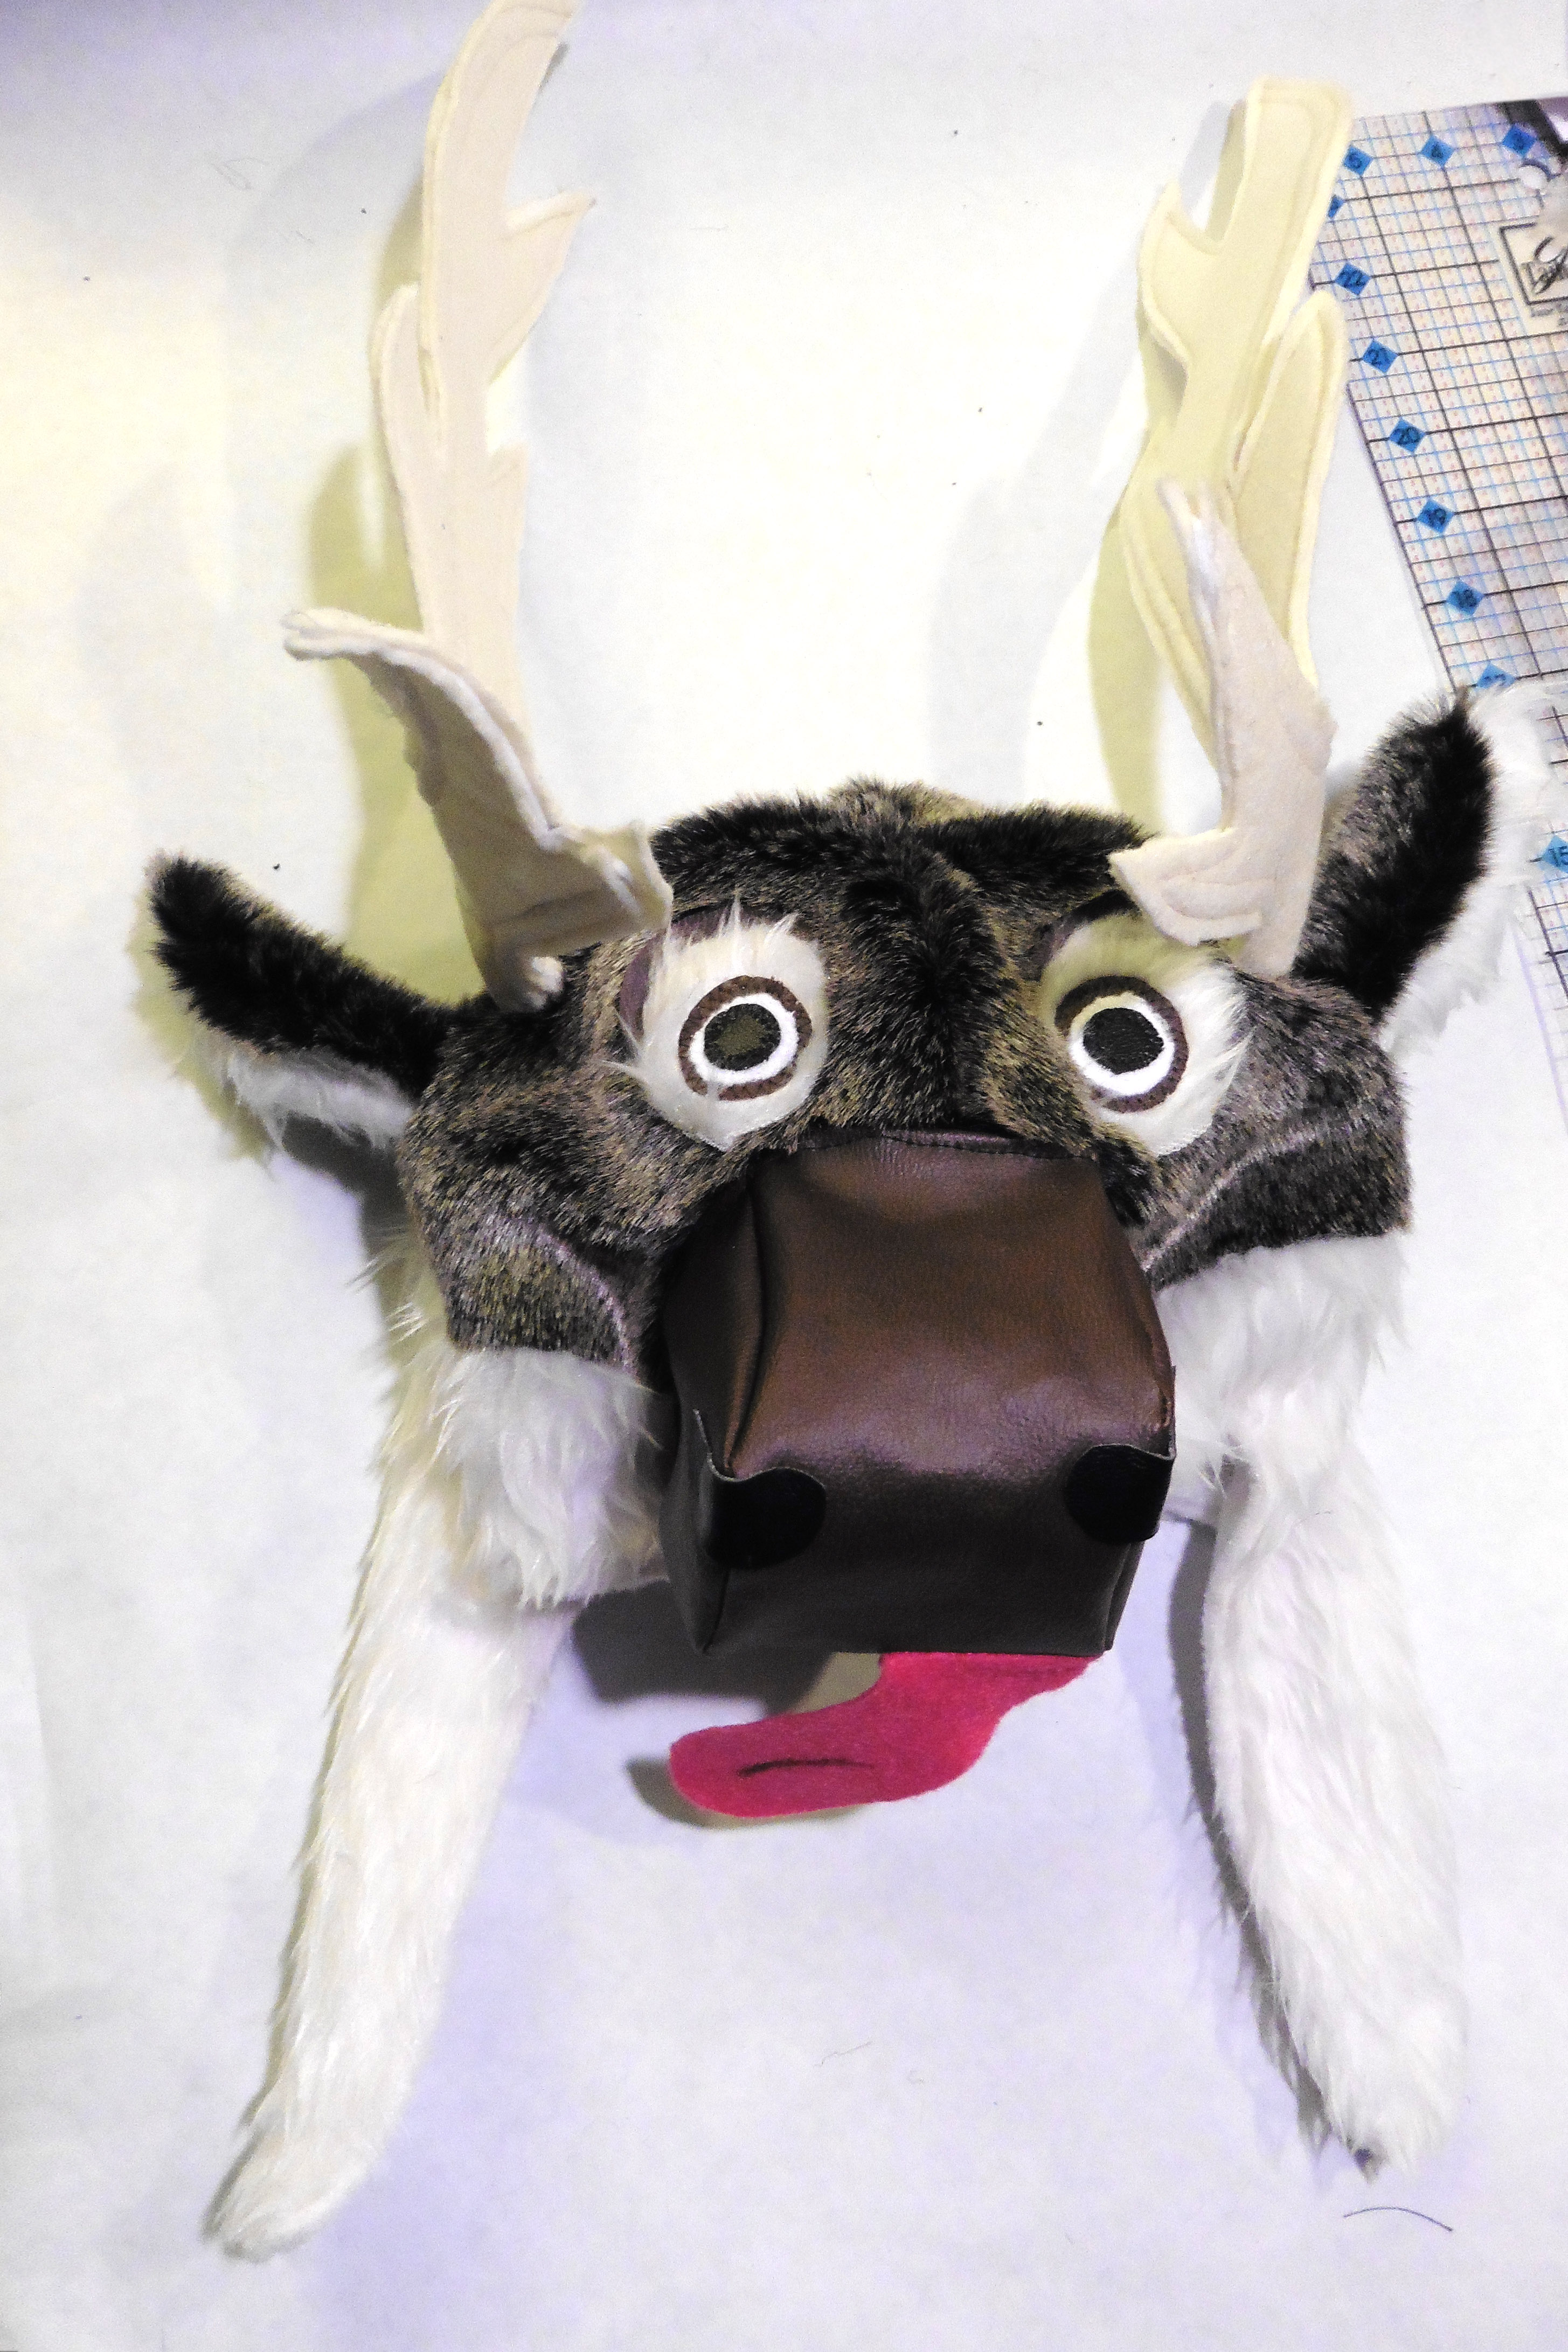
Turn your hat right side out and admire your finished Sven-inspired costume head! You did it!!
Click here to get your free download of the pattern pieces and tutorial.
Happy Sewing!! ~ Joelle
2 Responses
regina28
i wood like to heave de pattern of a reindeer:plaece
Thank you
Joelle
Here’s the link to the free pattern in the EYMM shop:
http://www.eymm.com/product/free-reindeer-costume/?affiliates=32 (affiliate link)