I have been sewing with knits for a while but as they have become more available more people have started trying them out as well. Unfortunately they don’t always realize that they sew a bit differently until they finish the first project and it just doesn’t look quite right! Since I have started sharing more & more knit projects and tutorials I wanted to do a quick post on some of the basics of sewing with knits with your serger OR sewing machine.
~Pre-Wash your fabric! Since knits are most often used for garments this is pretty important for sizing in general, but also just like wovens different fabrics shrink at different rates & at times only in 1 direction. I have had 1 yard of cotton knit shrink almost 6″ before (that is NOT the norm, but still!) There is nothing worst then taking the time to sew up a nice dress or shirt & then have it come out the wash (it’s not just the dryer!) 3″ shorter then it went in.
~Avoid cotton thread! Yes I know natural is often better… but when it comes down to it cotton simply isn’t as strong as poly thread. Since knits are often stretched it puts stress on the threads holding the seam together. Cotton thread is much more likely to break so for construction purposes I recommend poly thread. Wooly Nylon is also great for rolled hems though it is NOT iron safe.
~What TYPE of knit are you using. There are not only different contents of knits (I LOVE cotton/lycra (spandex)) but there are 3 main different types to. You can often mix them together as long as you prewash, but they have their own purposes and it can help to know what you are sewing with because some stretch in 1 direction, others stretch both ways! This post from Oliver +S has a great explanation with pictures… http://oliverands.com/blog/2010/12/some-knit-fabric-basics.html
~Know your needle. Use a ball point or stretch needle in both regular & serger / overlock machines!!! There are also different sized needles, a 12 is pretty standard but an 11 or 10 may be better for light weight knits. The reason for the ball point/stretch needle is that it goes between the knit fibers instead of ripping through them like a sharp needle. Sharp needles will often leave pin holes in the fabric at the seam with use/wear lead to bigger holes and seams falling apart.
~Stitch choice is IMPORTANT! Use a stretch stitch or long narrow zigzag. If you don’t your seams won’t have stretch will likely break. I prefer a stretch stitch over zigzag because it is stronger and will hold up better it also creates a straight seam. Most machines that offer 10+ stitches should have this and or a triple stretch zig zag.
~Assembly: I recommend assembling garments (and most things honestly!) with a sewing machine & finish the seams with the serger. Sergers are GREAT for finishing seams & sewing seams with low stress but I find clothing holds up much better if sewn together with a proper stretch stitch on a sewing machine.
~Guide the fabric but DON’T push or pull the fabric! Let the machine do the work, otherwise it stretches the fabric leaving you with wonky stretched out seams.
This video shows you what it looks like to use the triple stretch stitch… notice that the needle moves fast & the fabric goes back and forth before going forward? Yet it looks like a straight stitch/line? That’s what it’s supposed to do! Also notice how I am simply guiding it with one hand, but letting the machine pull the fabric on it’s own?
Triple Straight Stretch Stitch & Sewing with Knits Video
~ Choose finished or raw edges/hems! You can actually leave knit seams or hems raw/unhemmed because knit fabric doesn’t fray like wovens. In general I prefer to finish them, you can do with with a serger or a zig zag stitch on your regular machine. Even though they won’t unravel they can show wear with wash… they don’t stay clean cuts.
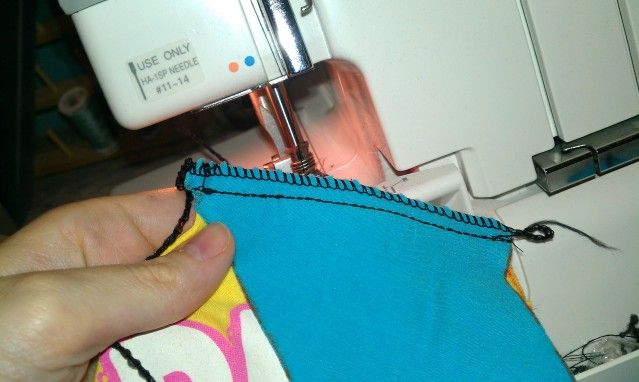
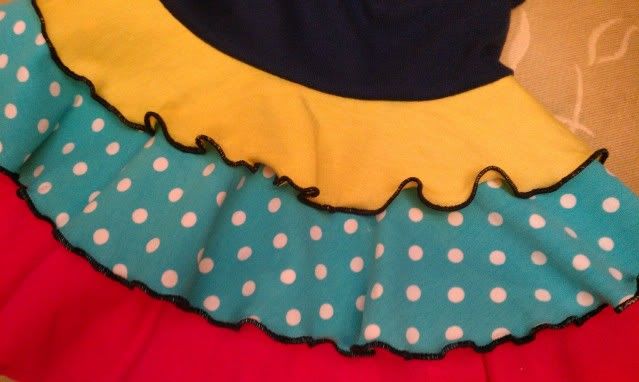
~ Lettuce Edge… For hems on the girls clothes made of knit I often prefer to do a ‘lettuce edge’ rolled hem on my serger. This is done by doing a regular rolled hem but since knit is stretchy you pull as you go to make it a wavy ‘lettuce edge’. You can get a similar effect on a regular sewing machine with a short zig zag stitch & pulling as you go. Here is a great tutorial for doing a lettuce edge/hem on a regular sewing machine. http://fromanigloo.blogspot.com/2011/02/lettuce-edge-with-your-sewing-machine.html I can’t find a good photo/video tutorial for a serger, but it’s the same idea is the tutorial above in regards to stretching as you serge. You just want to use the rolled hem feature on your machine & turn your differential (controls the feed dogs) down as low as it will go.
These are just some of the basics. with the popularity of upcycling and custom clothing I hope this helps some of those wanting to give it a try. Also look forward on more tutorials on how to sew upcycles & other knit garments!
Leave a Reply