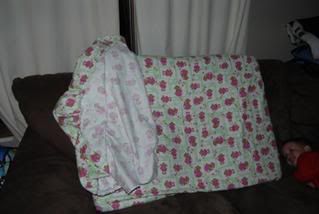
I have always used a pack n play or playard with my little ones! They are really nice now… WAY fancier then anything my mom had. The only thing is the sheets to cover the mats are pricey, & if you use them often you really want at least one sheet! SOOO I have made a free tutorial/pattern for a standard size Graco Pack ‘N Play / Playard… this will fit most brands that you buy in the stores as they now use a pretty standard sizing. I know it will NOT work on square playpens, Travelite (mini playpen) or the outdoor ones that are unique shapes. Most standard playpens dimensions are approx. 30″ X 40″ give or take an inch or two.
If you know how to make crib sheets already this process is identical! If you don’t you can check out my full photo crib sheet tutorial click here.
PLAYARD SHEET TUTORIAL…
They are SUPER easy to make & a HUGE money saver, you can even make them out of old sheets from the thrift store! Some patterns call for a little less fabric, but I like this sizing because it fits over the mattress VERY well with the extra on the back, & I have never had any of them come off my sons bed. You do want these to be snug fitting!
You need 1 yard of fabric (I LOVE JoAnn’s Suggle Flannel for this!) PRE-WASHED. Knits stretch all over, but not in the seams so they require different measurements (cut them 1″ smaller in each direction, but use the same cut out for the corners)
4 9″ peices of 1/4″ or 3/8″ elastic
Scissors or Rotary cutter
Sewing Machine
Matching thread…
First you want to cut your fabric to be 42″ X 34″ (43″ X 35″ if you want to hem the ends) piece of Fabric. This MUST be pre-washed, otherwise the first time it is washed it very well may never fit the mattress as well again!
Next if you want to just serge or zig zag the raw edges then you just do that. If you want to hem the raw edges then cut it 35″ instead & on each end fold it under 1/4″ & then again another 1/4″ to hide the raw edge & sew it down!
Then you take your big rectangle that you now have & you cut 4″x4″ squares out of each of the 4 corners. I have found the easiest way to do this is to fold the fabric in half so your newly finished edges meet. Then take the edge that we haven’t done anything to & fold it over to the matching edge… this quarters it & puts all 4 corners in the same place.
Lay your 4″ by 4″ template down (or mark with ruler) & cut it out of all 4 layers. You can also do it one corner at a time.
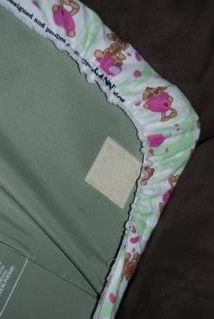
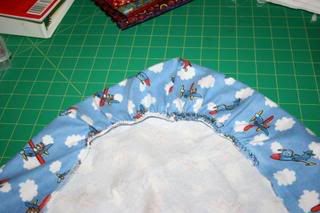
Then with the WRONG side of your fabric facing up you want to match to two side that are now left from where you cut the square out together (right side facing right side with wrong side out) & sew (I use 3/8″ seams, its up to you!) Do this to all 4 corners.
Next is the elastic! Fold the elastic in half & mark the center… now line this up with the edge of the seam you just made (again on the out side of the fabric) & pin in place. Then you want to mark out 9″ from both sides of that point & pin the lose ends of the elastic to the sheet.
Now with your machine set to zigzag… I found the width 5-7 works best depending on the with of your elastic. I also set my stitch length to 4, or the longest or ‘basting’ stitch that your machine has. Now place your starting end under the needle & lower the pressure foot, you want to make a few stitches & back stitch or two to make sure it is secured & stop with the needle in the down position. Now you want to grab the next pin & stretch it so the fabric is tight… holding both the back & front of the fabric, pull it through as sew… once you needle gets to the next pin, grab the last pin & repeat, just make sure to back stitch it to secure the end. Again this is done to all 4 corners & then you are done!
29 Responses
blueflowertreasures
I’ve visited your blog a couple of times & never left a comment (bad blog reader!). But I had to say that this sheet tutorial was just what I needed to see! I’ve been trying to wrap my mind around how to make flat sheets into fitted (since my children don’t like top sheets) without huge bunches of fabric in the corners. I didn’t think about cutting out the corners! DOH! So, anyway, thanks for tute!!
~Rebecka (ladymadelon at SM)
Tenille
This so so great, exactly what I needed! Thank you!
hannah
Thanks so much! My fabric was only 43 inches wide, but it still worked. Great! Much cheaper and nicer than the store bought kind. Woo hoo!
Robin
Thanks for this! It was easy to do with your detailed directions. I’ve always been afraid of fitted sheets, but now I see how easy they are. 🙂
Emily Davis
What a great pattern! I am not a sewer, but after seeing the high prices for the actual pack n play sheets, I went looking for a pattern and found yours. It took me less an hour to make, and it fits perfectly- so easy- even for me! Thanks so much for sharing, and saving me a bunch of money!
Karen Sunderland
I was delighted to find your pattern. However, my pack & play measures 26: x 39″. How should I adjust the measurements you gave to fit my mattress?
Sarah
I am wondering the same–I am looking to cover a changing table pad with the same type of sheet, and my measurements are 341/2 by 17. Is there some type of formula you’re using to figure out your raw dimensions?
Amy
still too complicated for me LOL. How do I find your etsy store?
Kymy
lol, it’s okay Amy, some people just aren’t sewers! My Etsy store is http://www.EYMM.etsy.com. I don’t have a bunch listed right now but you can always convo me for custom stuff 🙂 I am doing the OH Public Market on Thursday’s with my sister but don’t have much inventory right now.
Dorie
Thank you for this. My step daughter is having a baby, and we bought two playards and a crib. Not much $$$ left over for commercial sheets for them all. This is perfect (and I have a few bins of fabric stash in a closet to work with – yay!!)
I love your blog – added it to my LJ feed – thanks again.
Heather
hi – i was looking at your tutorial and im kinda confused (doesnt take much these days LOL) … I wanted to sew some flannel packNplay sheets for my friends new baby.. and they measured the mattress in thier playard.. the top of it was 26″x35″ .. so.. . Im lost as to how much extra i cut the materail, and how many inches to make the corners… the packNplay mattress is NOT thick at all, so I wonder if I have make the corner cut-outs 4″ ???
What would you do?
Kymy
That is the same size & likely thickness (it’s only about 3/4″ thick) that I made this tutorial for… so it should fit perfect. The reason for the bigger corner cut outs even though it is pretty flat is because to get a proper fit on sheets for babies & toddlers bedding you want the sheet to wrap around the back of the mattress a bit so it stays secure & doesn’t come loose while they are sleeping.
Maggie
Thanks so much for this tutorial!! I can’t wait to get my sheets sewn!! 🙂
sharon
Thanks so much for this pattern. My daughter was coming to my home and had forgotten her sheet.. I went to my stash and by the time she arrived 5 hours later there was the back up sheet .. Which now resides here.. Thanks again. Love your blog and ideas.
justbarefoot
I just found your site through a google search. I’m loving everything I see here! Going to *try* to make the pack ‘n play. Wish me luck, I’m not the most patient sew-er! 😉
Mary Chadwick
I’m expecting our 4th child and have really been into sewing. I really appreciate the free tutorials so I can outfit our new little one’s things and save some $$. Thanks for this one in particular, I have NO pack and play sheets, it’ll be nice to lay him on some super cute, soft sheets when he comes!!
Jess
Thank you!!! This was just what I was needing!
melzie
Then with the WRONG side of your fabric facing up you want to match to two side that are now left from where you cut the square out together (right side facing right side with wrong side out) & sew (I use 3/8″ seams, its up to you!) Do this to all 4 corners.
OK I cannot picture this in my mind. Do you mean to sort of make it like a box corner maybe?? Also my mattress is 25.5×36.5, how do I adjust the fabric? Thanks in advance 🙂
Kymy
You don’t need to adjust the fabric, it should fit just fine as that is close enough to the size I made it for. You are just sewing the 2 sides together from where you cut out the 8X8 square. This will create a squarish/box for the corner.
Mary Brewer
Why won’t this owrk for the newer “square” packnplay’s? As long as I adjust the measurements won’t it have the same effect?
Thanks,
carol
Thanks I needed to make a crib sheet for a Pack and Play. Yeah!
Teresa
I made these this evening. They were super easy and turned out fabulous. Thank you for takingthe time to do these tutorials becasiee eventhe cheapest set at target was 7 dollars and I couldn’t see mysel paying those prices.
portable crib bedding
This so so great, exactly what I needed! Thank you!
Gale
Thank You! Next grandbaby due in August and new mama wants a pack n play. Now I can make her all the sheets she’ll need 😀
Sarah
Hello and thanks for this tutorial!! I was cutting my fabric and got a little confused by the measurements. Here’s what you said:
“First you want to cut your fabric to be 42″ X 34″ (43″ X 35″ if you want to hem the ends) piece of Fabric….
Next if you want to just serge or zig zag the raw edges then you just do that. If you want to hem the raw edges then cut it 36″ instead & on each end fold it under 1/4″ & then again another 1/4″ to hide the raw edge & sew it down!”
I *do* want to hem my edges, but first you said to cut 43×35, then you said to cut 36, but didn’t mention the longer side. Should I just use the 43×35 that you mentioned first? I should be able to figure this out, but that usually leads to me completely ruining a project. lol
Thanks in advance!
Kymy
Sorry it took so long to reply, this got filtered weird by wordpress! It is 35″ not 36″. I have corrected it. Thank you for asking!
Samantha
I have mastered the art of making crib sheets but am having issues with this.. lol.. With the crib sheets I just make a tube and run the line of elastic through that to get the tightest possible fit.. With doing these corners I dont seem to get the same fit.. Am I doing something wrong? I stretch the elastic but when I am done sewing I dont seem to get stretch 🙁
Kymy
are you attaching it with a long wide zigzag? A straight stitch will cause it to loose it’s stretch. Also sometimes if elastic is older that will happen with it is sewn through & some elastic is just less stretchy. I use the poly braid elastic from Walmart if that helps. If you cut it 1.5″ bigger in each direction you should be able to do the casing method. This sheet is very fitted so it stays put.
kim
To adjust the size for a different mattress size, if you are cutting 4″ x 4″ squares in the corners, you would take the measurement of the mattress and add 8″ to the length and also to the width. (i.e. mattress is 24 x 30 you would cut 32 x 38)