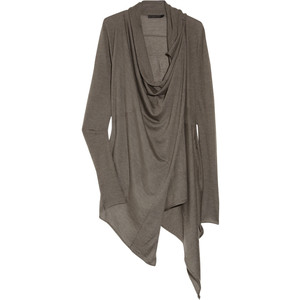
I was recently talking to one of my sewing friends Trisha about this cute cardigan we found through pinterest. We both love the style, not so much the designer price tag of $1,295 or the $453 on sale.

theoutnet.com
We both agreed something similar could be made with the EYMM Four Seasons Cardigan! By adding some buttons and loops you can give this already versatile garment even more options! Below is a tutorial Trisha created to show you how to do just that. You can also place the button on the outside of the shoulder with the elastic loop on the hem for more looks or use ties like the original inspiration. A few other options to think about is to put the button/loop 8″ down from the corner or add 4-8″ width to the edge of the cardigan you hem. Due to the flowy loose fitting nature and the layering options this makes a great holiday gift for friends and family!
ORIGINAL Donna Karan Wrap Cardigan = $1,295
KNOCK IT OFF via Trisha = less then $30 with solid Jersey.
Around $150 when made with 100% cashmere.
Do you already have the Four Seasons Cardigan? If so you are ready to go! If not use the coupon ‘DIYSAVINGS’ to save 20% off any Four Seasons Cardigan purchase now through 11:59pm PST 11/12/14.
KNOCK IT OFF WRAP CARDIGAN GUEST TUTORIAL
Hi everyone! It’s Trisha from Sweet ‘n’ Sassy Girls and I’m here to share with you a quick tutorial for how to turn the Four Seasons Cardigan into a draped cowl neck top.
From this:

To this:

Awesome, right? It’s super simple to do, just add a loop and a button.
Let’s get started! First, cut out all the pieces like you normally would. I wanted mine a little longer than the cardigan, but not quite as long as the duster, so I added a few inches of length to the cardigan. You don’t have to do this, I’m just quite tall and didn’t want it too short on me.
Next, sew the shoulder seams like normal. Add the sleeves and sew the side seams. I used my serger here, but you can use a stretch stitch on a sewing machine.

Now, there are a few different ways you can add a loop. You can use a small piece of ribbon, an elastic cording, or even 1/8″ elastic, which is what I used. You want to make sure the loop is large enough to slip over your button. I cut this at 4″ so I could tie the loop easily, and then I trimmed the ends down so it would fit nicely in the seam. Having a knot at the end of the loop helps so the loop won’t come out of the seam down the road.

One way to add the loop is when you are hemming the neck and top of the front panel. Place the loop on the front panel side of the garment right about the left shoulder seam. Make sure the loop is facing in towards the arm so when you aren’t wearing it buttoned the loop won’t show.

Another way to add the loop is to place it on the shoulder seam and sew it into the seam allowance with the loop facing the front panel. I did it about an inch from the neck. You could also add this loop when you sew up that should seam initially. Simply place the fabrics right sides together with the front panel piece on top and place the loop on top. Sew the seam as normal, making sure to catch the loop.

Now, on the opposite side, take the top corner of the front panel and sew a small matching button on.

Finish hemming the rest of the cardigan including the sleeves, and that’s it! All you have to do is slip the button through the loop and you have an awesome draped shirt!


2 Responses
Trisha
Even better when you get the fabric on sale for $3/ yard! I probably spent less than $6 on this!
Sara
Very Nice! Thanks for the quick and easy tutorial!