As a single mom of 3 under the age of 3 I was always looking to save money by figuring out how to make those neat pricey things that everyone has gotta have! I LOVE baby legs, but with 7.5 month old twin girls at $12-$15 a pair it adds up fast. So I came up with a tutorial to share on my blog for free with other moms just like me.
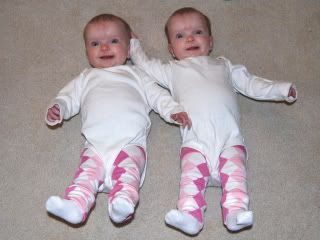
This is a quick inexpensive project that anyone can do! The socks in the tutorial below were $1 at Walmart, but Target & the dollar store are great places to get them as well. I have found them ranging from $1-$4 depending on length & where you get them. These are harder to get between Easter & back to school shopping (late spring & summer months) because its just to warm so most people don’t want to buy socks!!! Here is a picture of my identical twin girls (7 months at the time) in their matching ones of course. They are a GREAT alternative to tights, making diaper changes much easier. They are warmer & much more durable & can also double as arm warmers to give a warm layered look to your favorite t-shirts for girls & boys of all ages.
Supplies…
Womens tube/knee socks (6m-6yr) or Womens crew socks (0-18m) Girls knee socks also work GREAT.
Sewing machine or needle & thread
Scissors
Pins
STEP 1: First cut the socks into sections as pictured below. You will toss the heel & toe scraps, but keep the bottom of the foot. Note: for this tutorial I am working with crew socks, but the process is the same as with tube socks.

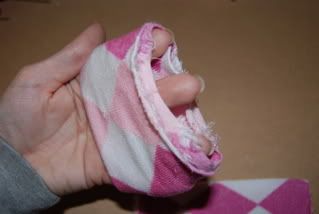
STEP 2: Take the section remaining from the foot & you want to fold it inside of itself as pictured below. You should have the nice side of the sock on the outside & inside with a fold on one end & both raw edges on the other.
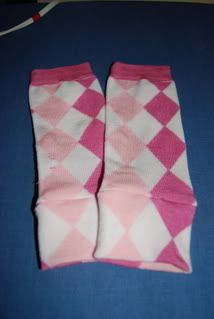
STEP 3: Stick the long section of the sock inside your newly created tube. This would give you 3 raw edges on the side we are going to sew, the other side will have the folded edge & the finished edge that was originally the top of the sock. If you have a pattern such as stripes or argyle as I used you may try to get them to line up. Once you are happy with the positioning pin together. Make sure to pin just 3 layers, not all 6 or you won’t have a hole to stick your little ones leg through when you are finished.

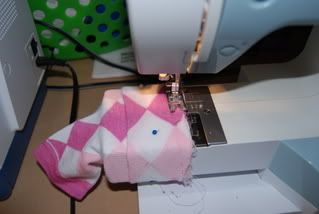
STEP 4: Time to Sew! Set the stitch length on your sewing machine to 4 (longest stitch), this will allow the most stretch. If the long straight stitch just doesn’t stretch enough for you can also us a narrow zig zag stitch… width at 2 & length at 3. You want to stretch the pinned side over the arm of your sewing machine & sew a straight stitch all the way around. If you can’t get it to stretch over then you can use what ever method you use to sew circles normally, or you can simply stitch it together with a needle & thread the old fashion way.
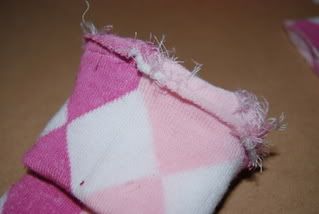
STEP 5 (OPTIONAL): Your finished seam should look similar to this. For a cleaner more professional look you can use pinking sheers, a zigzag stitch, or serge the seam for extra strength & to prevent unraveling.
Then simply fold the trim down (putting the seam inside) & TADA… a baby & toddler leg warmer simply make another one & test them out on the nearest happy child!
If you have any questions, found a mistake OR would like pictures of baby leg & arm warmers YOU made with my tutorial added to the gallery then please email me so I can continue to improve the tutorial.
Don’t forget to check out all my other free tutorials including my lists of hundreds of free tutorials!
160 Responses
Melissa
This is an awesome tutorial! Thanks so much for sharing it. My 7 year old just took up ice skating and I wanted to make her cute legwarmers…buying them as you said can definitely become pricey. I’m not too great w/ sewing machines but was able to hand sew it.
Thanks again!!
Jessica
I have problems keeping socks on my chunky-legged girl. Also, getting pants to fit around the waist makes the legs way too long. I tried your original directions but the socks I chose weren’t tight enough to stay up around her thigh. So, I just cut out the heel, sewed the foot back on and made really long socks. Now I have socks and leg warmers all in one. Thanks for the inspiration momma!
Shannon
LOVE ‘EM! Fantastic idea– I heart your blog.
Olga
We recently lost a baby girl to a rare genetic disorder shortly before she turned 5 months. While in the hospital she was only able to wear these baby leggings because of her ventilator and heart monitor. We are now collecting baby legwarmers to send up to the ICU she stayed at in her name.
mj
Hugs to you Olga. So sorry you lost your baby girl. What a lovely idea you have!
We lost a full term baby 24 years ago. Jesus has been our comfort all along the way. I hope you have that comfort, too.
Now I’m a first time grandma and will be making legwarmers. Just found toe socks that are one long tube with toes on the ends. Bright and colorful! I’m going to make some out of them. Love, MJ
Jessica
Love love this project. Posted my pictures to your flickr group. Used some Hello Kitty socks I got on sale at Marshalls. After the holidays I picked up 3 packs of socks from Target for $3. Now I have them in all sorts of colors – love it!
Sarah Burnheimer
I had a few questions regarding your baby legs.. i know that you say that you make them with crew socks also.. can i get some more information.. thanks!
Kymy
I actually used crew socks for the tutorial. The only difference is they are shorter & only fit 0-12m legs & up to 2T as arm covers. Where as the knee socks will fit most 18m-4t quite well… they work for the younger kiddos too but they are bunch because they are long. Knee socks are easiest to find in the fall winter & spring, in the summer most stores don’t sell them & all you can find is the crew ones most of the time. Good luck!
Sarah K.
Thank you for the pattern! I’m new to using my sewing machine and these were perfect! No way will I pay at least $10 for store bought ones… Thanks again, I can’t wait to try on the two pair I made my little guy when he wakes up in the morning. 🙂
marinee
i’ve made 2 pairs from your tutorial!!! the 1st pair took about 45 minutes because i had no idea what i was doing…the 2nd pair took about 15 minutes!!! They are soooooooooooo cute and cost about $2 (the price of the sock) instead of $13!!! They are just as cute as babylegs brand! Love you for this tutorial!! Thank You!
Tigris
I really thought this sight was very helpful and you explained everything with great detail. I was told by a friend how to make these but I could not do it until I saw this sight. I thank you for the time you spent and the love you gave to show others this. May God bless you.
Kimberly
Hello, Im Kimberly from http://www.sheltonmade.blogspot.com my mother and I are wanting to do some baby leg warmers and I wanted to see if you mind if I put your tutorial on my post for tomorrow (8/25/10) we will give full credit to you! Thanks!
Kymy
That’s fine as long as it’s only 1 or 2 pictures & a link to the tutorial, not coping the tutorial.
lisa
That is the greatest twin pic ever! Thanks for the tutorial. I’m a sock designer with so many samples laying around, loved this for my 6 mon old daughter.
Jennie
Have you tried to sew in some socks? My baby’s socks always come off. I’m not an experienced seamstress (even these directions make me a little nervous) so I’m not sure how easy it would be, but it seems like it’d be pretty simple. Can you add directions how to do something like that?
DeniseS
Thank you so much for this. I have now made my daughter alot of these for about $1 each!
Laura
great idea!!! I saw some online at sockoes and I got 2 pairs for my baby they are so cute, but after I found this blog. I am making them myself lol . Thank you
Brittany
I have made about twenty five pairs already… So, THANK YOU for the tutorial and sharing your great idea with everyone! I have quite a few moms wanting to buy some for their little girls or for friends… What a great way to make some extra cash! You’re an awesome mom and an amazing creator! Keep it coming!
MamaMcF
You are my inspiration! I have twin girls (15 months) as well and have been bitten by the sewing bug. Trying to find time to sew and be creative can be difficult for me but seeing you do it AND blog it helps encourage me to continue working at it. Thanks for the help!
onepumponeyear
These are great! I made a few out of Girl’s knee highs (perfect!) for a friend with a 7 month old and Boys socks (not so great) for my 11 week old son. I’ll have to check again and see if I can find Girls / Womens socks in boy friendly pattern. Thanks for the awesome tutorial!!
Anne
I just cut off the toe of crew socks and turned them around so the heel lines up with my duaghters knee. She’s 6 months old and this worked out perfect. You don’t even notice the heel if you get a pair that doesn’t have a different color for the heel.
Tysha
Very great idea with the cuffs 🙂
Cute girls, too!
Amanda
I love this idea!! I just raided my sock drawer to see what socks I have that I could do this to!! I’m super excited, YAY!! Thank you sooooo much for helping all us othere mommies!!
Gina
Had my first baby girl after 3 boys and just made 2 pairs of the baby legs! I am so super excited to get more socks and make more! I can’t wait to put them on her. Thank you so much for the tutorial, it was super easy to follow!!
Brenda
WOW! I have a 13 month old daughter that is super TALL and THIN for her age, so jeans and pants that fit are extremely hard to find. These are perfect!!! I just made a sample one with a lonely sock in my drawer, stitched by hand, in under 15 minutes! THANK YOU!!
Sparta Savings
I just featured your great tutorial on my blog. Thank you so much for sharing this great idea! http://spartasavings.blogspot.com/2010/12/baby-leg-warmers.html
sonya
hi. i just wanted to tell you that I could just eat up those two little babies. that is all. 🙂
Tonya Staab
Thank you so much for such a simple tutorial. I just used it today to convert some winter socks for my daughter into leg warmers. She loves them.
Sarah
Thank you so much for posting this! I gave this a try and had a lot of fun making leg warmers for my little guy. I linked to you at http://tysonandmiles.blogspot.com/2011/01/rockin-baby-legs.html.
Have a great day!
Sarah
Jessica
THANK YOU, THANK YOU, THANK YOU for creating this tutorial! I have a dear friend who is about to have her baby and she has been asking for BabyLegs for her entire pregnancy. I just don’t have that kind of $$ to throw around. With help from this tutorial, I was able to make 5pr (2 toddler, 3 infant) for under $10!! Thank you again for your hard work that saved me money! 🙂
April
I have searched the web all over looking for an inexpensive pair of something like babylegs. I have also been eyeing the knee socks at the store trying to figure out how to turn them into leg warmers for my son. He is about to start crawling and I dont want his knees to get raw from the carpet. This is an awesome tutorial and I WILL be making some!
elsjanssens
I use my old baby leg warmers on my 3year old daughters arms. AND SHE LOVES IT.it brightens up every t-shirt !!!
Tomara
Amazing! So easy…once I got it figured out. This was my first project on a sewing machine … the first two leggings had holes, the next two – looked pretty great! Unfortunately I have a long-legged 4 month old, so they were a little short. Can’t wait to go buy knee-highs to try out, those should fit better! Thank you!
And for a beginning sewer, I must say I really appreciate the help with which dial to set it on for the stitches.
Angela
I just made some of these for my son and I am so excited. They are sooooo cute and your instructions where so easy. Thank you so much for sharing! love the idea!
Sheila
Target has some cute grey/cream argyle knee socks on their clearance racks right now for 50 cents. They also sell some cute knee socks in other patterns for around $2. can’t wait to try out some of these! 🙂
Amanda Freidline
What a fabulous idea! I was just thinking the same thing, I can’t afford $12.95 for babylegs, but I do have a serger and sewing machine and can make my own. What a great idea to give as a gift to a new momma too! 🙂 Thanks so much! Found you by googling “make your own baby legs”…you’re the first thing that popped up. I’ll be following now….Thanks again!
Stephanie Scott Rucker
These are sew great!! (pun intended) I am not the best sew-er, but I think I can do this! It will be great to try!
thiscraftygirl
Thanks for the tutorial! I linked to your blog from mine…come by and visit!
Kristyn
For all the babies with skinny legs…gap kids have knee highs for girls that are skinny!!
Mary
Sorry but I don’t understand this part: “Take the section remaining from the foot & you want to fold it inside of itself”. Obviously everyone else “got it” but I didn’t. Thanks for the idea and for your help.
Kymy
You want to take the rectangle tube section that is from the middle of the foot & fold one edge inside until it matches up with the other edge creating a smaller tube with all the ‘wrong sides’ on the inside,,, does that make sense? I plan on taking some more/better photo’s for this soon.
Annie
Thank you so much for this tutorial! For me to be a part time SAHM Ive had to really budget my money and can’t afford the cute baby legs, but I have a lot of socks laying around, and now my baby can have her cute “baby legs” for free!! I usually dont leave comments but I love this tutorial and had to 🙂
Lisa
Ok, so I used your tutorial and made a pair by hand and they turned out pretty good, but seem a little tight around the thigh. Do you use the prefinished end around the thigh? Have you ever used elastic thread?…or do you just really stretch out the fabric while you sew so that there is plenty of room for stretch?
Thanks for any tips.
Lisa
Kymy
Generally yes you but the un cut sock edge on the thigh because it has more stretch. I wouldn’t recommend elastic thread for three reasons.
1.) Though it makes for a stretchier stitch it is still limited to how tight it can be pulled by the same stitch length
2.) It gathers as you sew with it most of the time causing
3.) It is not designed for seams… it is to stretchy & can cause them to fall apart.
The best application I have found in sewing for elastic thread is gathering & shirring.
If you are sewing them by hand (not on a sewing machine) I believe you want to use a back stitch? Also some babies like my niece simply have very chunky thighs & there really isn’t a good way to sew them to use the cuff on top.
I hope this helps!
Kymy
HC
I am craft-challenged but I actually was able to make a pair of these yesterday! Thank you for the very easy tutorial…
Kristen
ADORABLE. I’m definitely not an artsy-fartsy kind of mama, but I made a pair of these in about 10 minutes flat. So cute and EASY!
Carolina
thank you soooo much. I am sharing this site on my blog for others to see. 🙂 Thanks again!!
Brooke
Love this they were so easy to make and way cheaper than buying! My LO will have so many cute leggings to go with or cloth dipes!
beth
Hi! I just had to say thank you! I never leave messages but I really appreciate this! I have already made a couple pairs for my twins(a boy and girl) as their little legs get cold with just onsies. Plus its so much easier to change diapers with them. Target has some great patterns for boys and I just picked up a couple pairs at Walmart with the cutest Valentine’s Day patterns. I think I paid $3 for 2 pair! Just wondering if you have tried to add tulle at the bottom or ribbon for a ruffle?
Thank you!!!!!!!!
Beth
PS Your twins are adorable!!!!
crystal
just made some and they turned out great!!
خياطة وتفصيل
Thank-you so much this info was great !
natasha
Hi! how can you add ribbons and things of that nature? thanks!
Deborah
I’m so excited to try this! I have a baby boy and can’t find many leg warmers for boys, but this will expand my options!
Amanda H.
Amazingly well written and photographed tutorial! I literally spent my first time with a sewing machine two days ago when i tried to make cloth baby wipes. I saw this and it seemed too easy not to try too! I had great success, and i simply refurbished some old socks i had in the back of my drawer, so no real cost to me for five pairs of baby legs! I also second the commentor who gave thanks for telling us exactly how to set our machine dials. As a genuine beginner, i appreciate that! Keep up the grest work, and please post more tutorials!
Kelly
Would u use womens crew socks or girls knee highs for a 4-5 pound preemie baby??
Kymy
I would use GIRLS knee sock’s preferably for a shoe size 11-13ish? I wish they all used the same sock sizing! For a preemie that small womens socks are going to be far to wide.
Corinne
Umm, all the pictures are gone.
kymy
Yes unfortunately one of our original picture hosts changed their policies and pricing last year. We are slowly working on getting the photos fixed/updated, I will add this one to the priority list!