Well I had heard about this for a long time, but I finally decided to give it a try…. & I have found my new love!!!! I HATE gathering… as much as one person possibly can. In all honesty that is what kept me from sewing for a very long time. Silly I know, but gathering & zippers are just no fun! I had learned how to gather with clear elastic… better then doing it by hand, but not super easy either unless it is just light gathering.
Anyways I have had a few people ask me about this so I figured I would make a photo tutorial! I have seen a few descriptions on the web, but never a photo tute. Its pretty simple & if you machine doesn’t have a differential thats fine, you don’t need it to gather. This process is a little bit of trial & error… every machine is different as well as fabric. Here are the basic instructions!
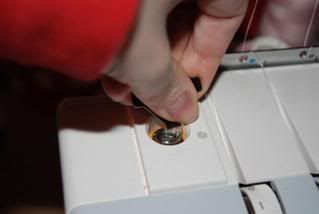
STEP 1: Loosen your pressure foot!
This allows for it to gather more. To do this simply locate the pressure foot adjuster directly above the pressure foot on your machine. Then using a coin or tool you want to loosen it… remember, lefty loosy, righty tighty! I normally do 3-5 turns, but every machine is different.
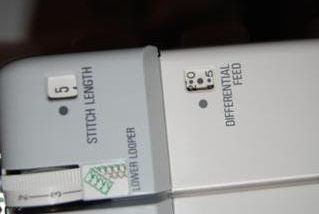
STEP 2: Adjust differential (if you machine has it) & Stitch Length
You want to turn it all the way up to the highest number. It is important you do this FIRST because when you set the stitch length it will adjust it on most machines.You could also take up a sewing course if you are a beginner.
Now that your differential is set you want to adjust your stitch length to the longest possible… this is 5 on most machines. This may change the differential, thats okay, just leave it alone.
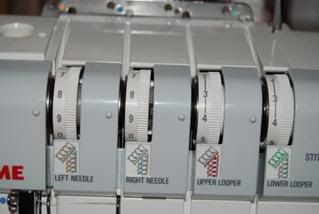
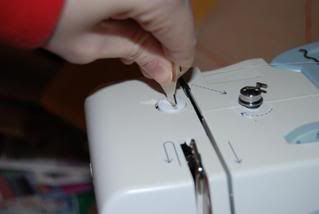
Step 3: Adjusting Tension & Looper Threads…
I turn both my looper’s up one number… they are normally set at 3, so I turn them up to 4. Then turn your needle thread tension up to 9 or the highest number available.
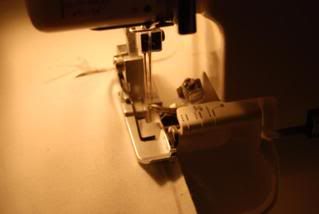
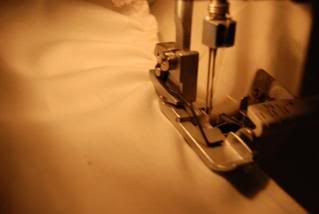
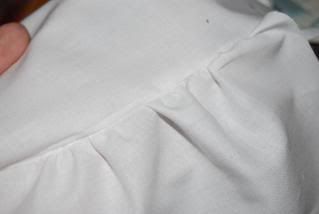
Step 4: SEW!
Put your fabric in the machine, put the presser foot down & sew! DON’T Pull or push the fabric, just let the serger pull it through, just keep it lined up straight. It should look something like this…

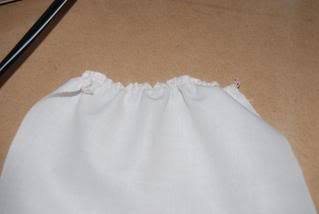
Step 5: Attach it to the rest of the project!
Make sure to first put ALL your settings back to where they were!!!! That can cause some headaches if not. Then go for it!
Remember this is trial & error, I ALWAYS test it first to see how it gathers, & to figure out how much I need. If you serged it & its to long you can simply gather it a little by hand or try running it through the machine a second time. If you gathered it TO much you can break a few strings & carefully ungather it a bit until it fits.
If your needle thread(s) break… turn your tension down by .5 & try again. some machines don’t like it that high! The lower your tension # the less gathers.
Well I hope that this tutorial will help someone! This is a technique I don’t think I can live with out!!!!
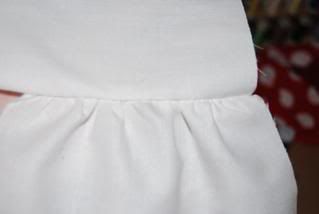
THIS CAN BE DONE ON SEWING MACHINES AS WELL! The gather is not as nice, but it is is very easy to adjust because you have the traditional pull strings. Just loosen the pressure foot, turn the tension all the way up & set the stitch length to the highest on your machine, you want a basting stitch. These are some quick pics I snapped. It will look better if you pin your gathered peice to the other peice first… I did not do this as I was in a hurry. The serger gather is a lot easier to handle then the sewing machine one… cause it is more secure, which is why I prefer it, it holds its gathers in place better until you get them attached. BUT if you don’t have one this is the next best thing!


51 Responses
Shea
Great Tut
thank you 🙂
thelandofka
I use this technique on my serger all the time! I found it on patternreview.com, but this is a great tutorial to put out there. It’s such a time saver.
Steph
Awesome! I just bought the same serger that you have 🙂 Any tips on the Lettuce Edge. I asked my dealer and she wasn’t very informative on how to do a lettuce edge????? Thanks for the tips!
Theresa
Great Tut!! I started off struggling with a ruffler foot attachment that my machine apparently hated. My mom made an off handed comment about my surger being able to make ruffles, but didn’t know how to do it herself, so I did a quick Google search and you popped up first but WOW you explained it quick and easy and I’ve found yet another reason to love my serger! The ruffler foot, yeah that’s making a return trip back to the store it came from!
Carrie
YAY!!!!! Thank you!
Patricia LaForte
I was considering purchasing a ruffler foot for my sewing machine, now I don’t have to. Many thanks for this easy to follow & understand tute.
Veronica
Thank you for your gathering tips….back to my serger. V.
Patricia
I bought a Janome 634D about 3 years ago. There it sat in my sewing room looking pretty. It was threaded but I was still terrified to use it. Well, finally, I said enough is enough!!! This is not going to conquer me by scaring me to death. It came with a VHS tape and I looked at it about 25 times!!!!. Then I read the book that came with it. So one day I took all the thread off and started at the beginning. That was a LONG LONG Day, however I kept persistent and patient. FINALLY SUCCESS CAME and machine was correctly threaded and tension was set properly. WHAT A GREAT SENSE OF ACCOMPLISHMENT. Now it’s just a snap to thread my serger. AND IF I CAN DO IT ANYONE CAN DO IT.
That same day I learned to change from standard stitch to rolled hem and do a rolled hem, with wooly nylon thread, a lettuce hem with fishing line thread.
The rolled hem is wonderful. It was close to Christmas and I made so many glitzy tree skirts and tablecloths for dear daughter and dear daughter in laws that they now think I’m a pro. I’m still learning and I’m on to serging pj’s for grandkids, receiving blankets for babies. It’s so fast and much more economical than purchasing from stores. I now am a fabric stash collector. When I go to the fabric store I call it Heaven.
Dorian
Gather ye rosebuds, or your ruffle for your kids twirly skirt. I LOVED
this lesson and I have it now. I love your site. Thank you…..Dor
Jennifer
This is the most fabulous find- seriously, you took something that was tedious and dreaded and made it SIMPLE!!!!!!!! My machine doesn’t quite like the 9 for thread tension, but an 8 does a perfect job! THANK YOU!!!!!!!!
Tammy
This is a great help, I just got a new Brothers and my old machine (20 years) didn’t have all of this fun stuff. This was very helpful. Thank you Tammy
Nicole
Just bought and used the Janome 1110dx and looooove it. I am going to try to make some ruffles tonight using this easy tutorial. Thank you so much!!
Remee
THANK YOU! I’ve been struggling to find a tutorial on gathering with my serger! AWESOME. I did exactly as you said and voila! gathers for my daughters’ twirly skirts!
Darcy
Thanks so much for this information. My serger is still very new to me and I tried this gathering technique the other day and it worked perfectly the first time! I was so excited! I have used it a few times since and always am pleased with it, not to mention it saves so much time because it’s also serging the raw edge.
🙂
Christine Sews
I agree, gathering can be soooo tedious! Great tutorial. Thanks.
QT Pie Bows
I hate gathering too! Thanks so much for this tute!
Nina
I wish I would have found this yesterday!!! Just finished gathering (which I detest) a skirt for my DGD. Will try this on my next project! Thank you!
theroadtohobbiton
Thank you thank you! This worked out great!
JaDe Rain
Thank you so much!!!! It only took me about half an hour to figure out the differences for my Janome Compulock. That is going to save me so much time until I get my gathering foot. I can’t tell you how much this helped me get the job done right and without stress.
Nikki
Thanks. This worked great and was just what I wanted to know.
Phylis Culp
Thanks so much. I had lost this and neede it pronto.
misty
oh oh oh oh me! 1000 thank you’s! i just bought (2mths ago) a serger janome harmony from hancock. and it’s been except that one main reason for purchasing it was that “the box” said it gathered. and i think i must hate gathering as much as u. well the instruction manual was a joke. and the workers @ the fabric store weren’t very helpful, but thank the LORD i found ur post! i just gathered ny first ruffle with the serger!!!! no more basting for me! lol
Leigh
Thank you so much for this tutorial!!! I tried this technique out last night and couldn’t believe how much time it saved. Your tutorial was simple to follow and the gathering came out great. Using the basting stitch on my sewing machine and then pulling the bobbin threads was so frustrating for me. I am so thrilled to have learned how to gather on my serger! Thanks again!@
KGreen
A-ma-zing! I didn’t know that I could love my serger any more than I already do. If you haven’t tried this yet, get out your serger right now and do it. Seriously. It’s amazing. Just do it. You won’t be sorry.
TheDarlingPlum
Thank you!!!! I had about had it with my gathering/ruffler foot and had almost given up on trying to gather tulle with a machine. I made a cute little tutu this morning and it was a breeze to do the gathering on my serger! I was sitting there just waiting for something to go wrong, but it came out great! Again many thanks for this tutorial!!!
norma
I am like the lady that was afraid of her serger. I have a Janome and still afraid to thread it. I will try your ruffle/gathering idea as soon as I can make a path to it. I am trying to get all the idea/projects together for the class I am teaching for my chapter of the asg on Oct. 9. Everything is from recycled items. Thanks for the info.
Cathy D
Hi! I’m new to sewing & really appreciate this tutorial! But, I have a question which may sound silly to you more seasoned sewers – do you still do the backstitching at the beginning and end? I’m about to start playing with the settings on mine and hopefully, I’ll be creating ruffles in no time! Thanks 🙂
Kymy
No because this does NOT hold a garment or 2 pieces of fabric together, you still have to attach it with a traditional seam that you back stitch at the start & end.
jaci
This is wonderful. I hated making anything with ruffles. My little girl loves her dresses with ruffles! Thanks so much! Easy!
Mimi
Thanks so much! Great tutorial!
Wendy
So this is a whole new revelation for me! I have been doing this on my sewing machine with great success but never would have thought that it could be done with my serger. Now I’ve gotta go try it. Thanks for the tut!
Barbara
gathering on my serger seriously revolutionized my life! great tutorial!
Renata
Thank you so much for this tutorial. It’s great to know that this can be done without any special accessories.
Renata
I’m back to say thanks again! I also hated gathering and it is so much fun to do it like this. My upper needle thread kept breaking even after adjusting the tension. Then I remembered your tip for loosening the foot pressure. No more breaks!
Nadia
Freaking genius!
Sheri
Thank you for this information, It worked great on my machine– Thank you–
karusia
you are a genius! thank you for this tutorial, it worked like a charm on my white serger. i had to ruffle 16 yds of trim for a full circle skirt. no way was i going to pull threads!!!!!!! great tutorial, very clear and easy to follow. and i learned a new skill. thank you thank you thank you.
Autumn
THANK YOU!!!!! I have to make 20 yards of ruffles and did not want to spend a small fortune on a ruffle skirt! And I marked the foot before I started so I can return it to normal when I’m finished!
Again, thanks!
Amber Williams
Thank you so much for this. saved me a lot of time.
Stacie
I just bought the Janome 110D serger. Thanks for the tutorial about ruffling!! Can’t wait to try it. Why oh why do sergers have to intimidate us so much?!!
fran
thank you so much for this great tutorial! I know this is an old post but you have just saved my sanity! With 5metres worth of ruffle needing to be made I was ready to tear my hair out. I could never have figured this one out by myself 😉
THANK YOU!!!!!!!!
Josie
I just used this tutorial on my new serger 🙂 Thanks so much!! I really appreciate the great resource you’ve got here!!
rennisha
thanks 4 savin my day
i really do appreciate this tutorial
thanks again
Cassandra
Thank you SO much for this!!! You just saved me a whole lotta pain while trying to ruffle 2 metres of fabric!!! The serger method is brilliant!
Laurie Folino
Love this method! Thanks so much for sharing! My sewing machine is in the shop and I needed to make more ruffles for my dresses and tanks. I love this method much better than on the regular sewing machine. Brilliant! I appreciate you.
Barbara
THANKS so much. I’ve had my serger for several years, but didn’t know how to do ruffles. I changed the needle tension until I got the fullness that I wanted.
Diana
Does this work on gathering netting or tulle for petticoats?
Kymy
Yes it does, it actually works GREAT for that!
Dawn
Thank you for your excellent tutorial! I have an older Serger and it does not have a differential feed. I read several blogs and even watched a few videos and could not get my machine to gather. Releasing the tension on the presser foot made all the difference (you are the only one to include this step) loving my beautiful ruffles!
Piracy Karen
Thanks so much…great tutorial. Make pillowcase dresses for the children in Africa And they are so much nicer with a ruffle on the bottom…what a great way to use up the scrap pieces and decorate the dresses. Bet I’ll be able to make some rosettes this way too.
Leticia
I can’t tell you how grateful I am r this tutorial. It was awesome! Thank you so much.